NullSpace
Technical Design Document
Producer, Josh Hobbes
Designer, CJ Clark
Technical Director, Ed Pfent
Technical Writer, Jeff Keely
Art Director, Nathan Gray
Product Manager, Dan Brakeley
Lead Tester, Amadou Savadogo
Table of Contents
Connection Methods and Protocols
Sound Engineering Instructions
Game Mechanics
Platform & OS
OS
Windows 9x/NT/2000/ME
Distribution
Media
CDROM
Target
Platform
Required
PII
300mhz CPU
64MB
RAM
8MB
OpenGL compatible 3D video card
100MB
free hard drive space
Direct
Sound compatible Sound Card
CDROM
TCP/IP
Internet connection required for online play
Recommended
PII
600mhz CPU
64MB
RAM
32MB
OpenGL compatible 3D video card
100MB
free hard drive space
Direct
Sound compatible Sound Card
CDROM
DSL/Cable or faster connection to the Internet
File Management
File I/O
All-purpose
Overview
The All-Purpose File I/O tool serves as a wrapper to abstract the actual work of opening, closing, reading, and writing files. This allows the game to be a little less platform dependent as only a few functions would need to be changed to alter the scheme by which files can be read. Only a few functions are actually even necessary to be wrapped at all.
Data Structures
None, though the primary data type is the NS_FILE, a
typedef’ed (FILE*)
Functions
OpenNSFile takes the pathname of the file that will
be opened/created. The flags are a combination
of both whether or not to open it as ASCII or binary and how much read/write
access to give it. It returns a handle
to the file that has been opened, which will be equal to the null define if it
has bad data. It serves as a wrapper
currently for the stdio function fopen.
NS_FILE OpenNSFile(char
*pathname, char flags);
CloseNSFile takes a handle to an open file and calls
the stdio function fclose to deallocate resources.
void CloseNSFile(NS_FILE
file);
IsEndOfNSFile takes a handle to an open file and
returns 1 if the handle is at the end of the file or a 0 if it is not. It is basically a wrapper for feof.
int IsEndOfNSFile(NS_FILE
file);
WriteString takes a handle to a file to be written
to and a string to write to that file.
It will write the string in ASCII.
This function serves as a sort of wrapper for the fprintf function.
void WriteString(NS_FILE
file, char *string);
ReadString takes a handle to a file and will grab
one string at a time out of that file until it finds one that has data that
does not begin with the “skip” character which is passed in along with the
function. This allows users to add
comments to their text files without it disrupting any reading the game will do
from that file. It grabs the string
with the stdio function fgets.
void ReadString(NS_FILE
file, char *string, char skipMe);
WriteData is designed to be used with a binary file,
specified by the handle parameter. It
can write out data of any size or type, but both need to be specified before it
knows how much data to write into the file.
As a final parameter it also needs how many elements of the data type
are in the array that is passed in to be used for writing. It returns the
amount of these “items” that it successfully writes to the file. It is a wrapper for fwrite.
int WriteData(NS_FILE
file, void *data, int itemSize, int numItems);
ReadData is designed to be used with a binary file,
specified by the handle parameter. It
reads data into the buffer passed as a parameter. The user must specify how big each element of the buffer is and
how many of these “items” that are to be read into the array. It returns the amount of items successfully
read. It is a wrapper for the stdio function
fread.
int ReadData(NS_FILE
file, void *data, int itemSize, int numItems);
Game-Specific
Overview
The Game-specific portion of the File I/O tool is actually spread out among the other game-specific tools. For instance, the function to load in all ship models is a game-specific graphics engine function that accesses the all-purpose File I/O tool. Furthermore, there is no ability to load or save a game. Therefore there are no functions or data types specific to this section of File I/O.
Secure File Management
We do not expect any security problems and therefore are including no secure file management. All game files will be easily accessible and modifiable by players.
Directory Structure
·
NullSpace – the
executable file, documentation (readme.txt)
o
Art
§
2D
§
3D
·
Texture
·
Model
o
Map
o
Collision
o
Option – preference
o
Ship
Memory Management
Null Space will not be a memory intensive application. 95% of all dynamic allocations will occur at the initialization phase of run time. The only other time any dynamic allocation will occur is when a player enters or leaves during mid-game. For this reason, a memory tool is not necessary. We will use C ++’s new and delete memory operators for all dynamic memory allocations.
External Code
External APIs
OpenGL 1.2
The OpenGL API will be used to supply vector-based drawing routines in order to create the in-game graphics. It also supplies the transformations necessary to draw objects in three dimensions. If available, OpenGL extensions will also be used to enhance the drawing speed of the game.
DirectSound
The sound engine will indirectly require use of DirectSound for its ease of use and supplied mixing ability. All music and sound objects will have data passed through DirectSound functions before reaching the sound card.
DirectInput
For the final version of the game, the input engine will be altered to make use of DirectInput functions to optimize the speed at which the game receives input and therefore is able to act upon that input.
Winsock 2.0
Winsock will be used to supply all of the lowest level networking functions and support for the network itself. Using the API allows for the construction of a TCP/IP and UDP based messaging system across the LAN or Internet.
Xaudio
Xaudio is a freeware MP3 decoder written by Gilles Boccon-Gibod and is freely distributable so long as either the product it is involved in is non-profit or the user signs a freeware license agreement. For quick access to multiple audio file support including MP3 and WAV, the Xaudio library’s functions will provide the lowest level of the audio engine. Xaudio will interface with DirectSound to abstract the hardware level processes of the audio engine. For more information on Xaudio, see the Xaudio webpage at www.xaudio.com.
Win32
Win32 provides low-level interface with the OS including most of the menu functions prior to the actual game. During the menus, the Win32 API will be used to provide the drawing routines and handle the callback system for the buttons and dialog boxes.
Graphics
Prior to the current project, Nathan Gray investigated OpenGL and found the NeHe Tutorials (http://nehe.gamedev.net) to be an excellent resource on the subject. These resources are supplied free of charge and any code may be reused however credit must be made to NeHe. Therefore, much of what has been already written of the graphics engine owes greatly to these tutorials.
Already written by Nathan Gray before the current semester but for the current semester’s project is the code to:
- Initialize OpenGL
- Open an OpenGL window
- Initialize and run OpenGL extensions
- Read in a model from a file
- Load model drawing into either vertex arrays or drawing scripts
- Draw a model in 3D space
- Keep track of loading and releasing textures
- Create a camera and move it in the world via direct manipulation or scripting
- Read in an arena object from a file
- Display an arena in 3D space
- Play a windows .AVI file
Specific credit is due to Jeff Molofee for his knowledge and functions to help play an .avi file in OpenGL. Also, Michael Lodge-Paolini wrote the app that converts model files from the exported 3D Studio Max Ascii file (.ASE) to the NullSpace Model File (.NSM), which is what the code that is already written can read in.
Much more graphics code is yet to be written. Most of it is in getting the existing code to work with the NullSpace engine. For example, there are 3 predetermined camera states that need to be added to the functionality of the camera, and instead of only allowing a different model per game object, multiple objects will need to use the same model file. Finally, code has to be written to draw the new map tiles to the screen.
Networking
The networking portion of the game is most essentially handling the messages sent to and from different computers. To speed up the process and allow the programmers to immediately get their feet wet in the networking, several functions are being ported over from a previous DigiPen Institute of Technology project.
These functions serve to abstract the users from the lowest level of network programming or, specifically, the sockets functions. They also provide functionality for maintaining a list of connections so that creating a new one does not replace the current one unless specified. And perhaps most importantly, the already written functions have been tested thoroughly and provide extra error checking and error handling that the basic WinSock functions do not. The full list of already written functionality is:
- Initialize WinSock (and therefore Sockets)
- Get a numerical IP from a host address
- Return the IP address associated with a socket
- Accept and close TCP/IP connections
- Broadcast UDP messages across LANs
- Create a client socket
- Create a “host” (server) socket
- Receive and send strings of data
All of these functions were written by Michael Lodge-Paolini, and have been modified for use with the C++ STL List tool by Nathan Gray. The primary part of the networking remains to be written and involves which messages will be sent, how they will be constructed, to whom they will be sent, and when they will be sent.
Sound/Music
The sound engine was written over the past summer by Nathan Gray to better encapsulate the functionality supplied by the Xaudio API. This includes abstracting out music objects and sound objects, including the differences between the two. While it is not completely finished, the current audio functions can:
- Initialize a soundcard for audio playback
- Create a dynamic number of “audio channels” to mix multiple audio streams
- Automatically loop a song (when it is finished) back to a specified point
- Determine which audio players are already open and automatically play music and sound files in the available players
- Distinguish between a music file and a sound file, thereby intentionally limiting the amount of simultaneous music channels for clarity
- Establish individual song/sound effect properties such as priority
Xaudio supplied a great encapsulation of its API already in the XaudioPlayer class, which creates an invisible window upon instantiation to handle all of the callback messages for the player. Beyond that, some of the Audio code still needs to be written, including anything game-specific. This includes the loading of the audio files and when/where they are played.
Timer
Typically, projects that need to use precise timing use the Windows Multimedia extensions library function timeGetTime() which returns the current time specific to the millisecond. However, code supplied in one NeHe tutorial supplied a method to be even more exact. By using the low-level command QueryPerformanceCounter(), the current time can be retrieved to the nano-second. Nathan Gray neatly wrapped up this functionality into a class with the help of the NeHe tutorial. Nothing left about this needs to be written as it is a tight, concise concept.
User Interface (UI)
Dan Brakeley started the in-game UI in NullSpace last March. The code in its present condition can render text in any of the windows fonts in any size and color in an OpenGL graphics window. It also makes allowances for designs that were intended for one resolution, but are being rendered in another, allowing it to have the same size relative to total screen real estate regardless of the resolution.
Also, code to display a bmp file (windows bitmap) as a simple texture mapped quad in OpenGL has been written (the size of the bitmap is limited by the max texture size allowed by the graphics hardware). Using these textures, the code also can draw frames with transparency around text, as well as placing a background behind the text itself, giving functionality similar to the text boxes in Square RPGs like the Final Fantasy series.
The code does have holes current, and it still needs bug testing and some additional functionality added to it before it is ready to be used in NullSpace. Specifically, the functionality of easy loading from a file does not work in all cases. Also, there is no functionality to easily display columns (this would be useful for score lists that NullSpace will need).
Additionally, this code is useless in creating the front end for the NullSpace server and client, as those will be using standard Microsoft Windows controls in a typical 2D Windows style. The code written ONLY works in OpenGL.
Coding Guidelines
Overview
For the purpose of readability and neatness, our project will require coding guidelines. These guidelines will give a standard way of writing function declarations, function comment headers, and file layout. The exact way described here is not necessarily the way that it must be done. This just provides an outline of what must be done. Each member on the team may a have a slightly different style.
Here is an example of what the beginning of a file would contain:
/*******************************************************
* FILE fileName.cpp
*
* AUTHOR name
* CREATED 10/1/01
* LASTMOD 10/7/01
*
* PURPOSE
* Description of what’s
going on in this file.
*
******************************************************/
Here is an example of what a function declaration would contain:
//-----------------------------------------------------
// FUNCTION
// functionName
//
// DESCRIPTION
// Description of what the function does.
//
// RETURN
// void
//-----------------------------------------------------
Void functionName( TYPE1
name1, TYPE2 name2 )
{
}
Other than above, programmers will be using advanced programming techniques to help the readability. Some examples of these are:
Naming Conventions
Members of a class with a prefix such as m_MemberName.
Class names should begin with a prefix c such as cClassName.
Pointers should have a prefix p such as pPointerName.
Comments
Comments are a big key in readable code. So for our project, we will require that there be comments on almost everything. Declaring a variable? What’s it used for? Calling a function? What for? You get the point.
Code Objects
Overview
The code objects that we will be using for Null Space are OpenGL, Window based GDIs, C++’s STL lib, Winsock DLLs, and custom tool libraries.
OpenGL is used for the actual game window. Any OpenGL objects are initialized in GameInit() and deleted in GameTerminate(). The Window’s GDIs are used for the front-end menu system. Any Window objects are initialized in MenuInit() and deleted in MenuTerminate().
The STL lib has a nice link list interface specific to C++. For more information see the STL lib section in External Code.
The networking will be using the Winsock DLLs. Any networking/Winsock objects will be created before running the menu system. The objects will be released/deleted after all other engines and windows are destroyed. For more information see client main in the Control Loop section.
Our custom tool libraries will make up most of our game engine. Each tool library will try to stay independent from the other libraries. There maybe some small exceptions where this cannot be avoid. Each tool library will have two types of functions, game specific and all-purpose. Game specific functions are functions that are mandatory functions that will only be used for this project. They cannot be ported over to another project because their parameters will have data structures and other Null Space related objects being passed in. All-purpose code is the exact opposite. All-purpose functions are general code that is portable and the game specific functions depend on them. They do not take any Null Space objects as parameters.
Tool Dependencies
Modular Tools
Null Space’s engine will be built using our modular tools. This makes function calls in the game loops very high level and easy on the eyes. Another purpose of making modular tools is for easier debugs. Being able to debug a tool separately away from the rest of the engine is very time saving.
Map Editor Tool
Overview
The map editor will be used to create all the maps for NullSpace. All NullSpace maps will be saved in a file with a .map extension. The map editor will be a fully seperate executable than the client or server executables. It will not interact with or rely upon any other sections due to it being fully separate than the game and likewise no other sections will rely on the map editor. The File section will load the maps that were created and saved from the map editor. The map editor will be written using a pre-exsisting map editor's core engine.
Explanation of Interface
The interface for the map editor will consist of very few buttons. The standard arrow keys will be used to move around the map and holding shift and an arrow key will jump the user one screen in the given direction. The mouse will be used to select options or buttons and place or remove tiles. Finally the “esc” button will be used to quit and will auto save the map as “NewMap.map”. The map will be shown with every tile being 16x16 in size on the screen and in the nine tile buttons at the bottom of the screen. On the right hand side there will be five option buttons that the user can select that will do a variety of things.
When the user begins a new map the editor will automatically load a empty level that is the size of the screen. They will have the option of using that map, loading a different map, or resizing the map to a given number of tiles. If they choose to load a map the screen will turn black and they will be shown a list of all the *.map files that are in the same folder as the map editor’s .exe file. Clicking on one of these will load that map. If the user decides to resize the map they will be asked what width and height they want. Entering a couple of numbers and pressing enter will set each one in turn. If the user resizes the map so that it is smaller than the current map they may destroy part of the map and lose that data. If the user decides to make the map larger then it will add to the lower edge and the right edge of the map.
The tile buttons in the map editor are as follows: (in order from left to right)
0 – Blank tile, no collision, no art
1 – Solid tile, collision with art
2 – 45 degree angle tile with collision and art
3 – 45 degree angle tile with collision and art
4 – 45 degree angle tile with collision and art
5 – 45 degree angle tile with collision and art
6 – Multiprize spawning point with collision and art
7 – Safe Zone with no collision and some art
8 – Black Hole with collision and some art
The option buttons in the map editor are as follows: (in order from top to bottom)
0 – Place Tile (must also click a tile button that the user is going to place)
1 – Resize Map
2 – Select All (selects entire map and user can move it around to center it with the mouse)
3 – Save Map
4 – Load Map
Format of the .map file
Width #
Height #
######…….
……..
……..###
Explanation: Each ‘#’ character represents a single digit. After Width and Height there can be any number of digits as necessary to represent the number of tiles wide and high that the map is. After Height there will follow a long stream of ascii values that represent the tile number and will be in the proper position on the map. There will be as many tile digits here as Width * Height.
Game Specific Functions
There are no game specific functions in the map editor due to it being a seperate executable and the layout of the .map file is able to be used for anything.
All-purpose Functions
Structures:
struct MAP
{
unsigned int **pMapArray; // A
2D array that holds all the tile index's in their //
relative positions on the map.
int Height; // The height of the map in tiles
int Width; //
The width of the map in tiles
char *pMapName; // A
string containing the map name to save the map as, // defaults as NewMap.map
}MAP;
struct DATA
{
DDSurface *pTileImage[9]; // A
direct draw surface that holds all the images for //
the Tiles
DDSurface *pObjectImage[6]; // A
direct draw surface that holds all the images // for the Object buttons
DDSurface *pBackBuffer; // A
pointer to the direct draw backbuffer
DDSurface *pFrontBuffer; // A
pointer to the direct draw screen surface
MAP *pMap; // A
pointer to an instance of the MAP structure
RECT ViewportLoc; // A
rect in tile coordinates that represents the // viewport's location on the map allowing the
user to //
see that portion of the map.
POINT MouseLoc; //
The location of the mouse in window coordinates
int OptionSelected; //
What option the user is currently using
int TileSelected; // What
tile the user has selected.
bool ShiftHeld; //
Weather or not the user is holding the Shift key.
}DATA;
Functions:
void DrawMap(DATA *pData)
{
Check location of viewport on map.
for(x = loc.left; x < loc.right; x++)
{
for(y = loc.top; y < loc.bottom; y++)
{
DrawImage()
}
}
}
DrawOptionButtons(DATA
*pData)
{
for(i = 0; i < 6; i++)
{
DrawImage(pData->OptionImage[i])
}
}
DrawTileButtons(DATA *pData)
{
for(i = 0; i < 9; i++)
{
DrawImage(pData->TileImage[i])
}
}
void MoveViewport(DATA
*pData, int Direction)
{
Check location of the viewport on map.
if(user is holding the Shift key)
{
Move map in the Direction indicated by an entire screen
if able.
}
otherwise
{
Move the map in the direction indicated by one tile if
able.
}
}
void SelectOption(DATA
*pData)
{
Check the location of the mouse.
Perform RECT check to see if the mouse is inside one of the
option buttons.
if so
{
Set pData->OptionSelected to that index.
}
}
void SelectTile(DATA *pData)
{
Check the location of the mouse.
Perform RECT check to see if the mouse is inside one of the
tile buttons.
if so
{
Set pData->TileSelected to that index.
}
}
void PlaceTile(DATA *pData)
{
Check the location of the mouse.
Offset that location according to the location of the viewport
on the map.
Find out what tile the user clicked on.
Set pData->pMap->Map[MouseX][MouseY] =
pData->TileSelected.
}
void DeleteTile(DATA *pData)
{
Check the location of the mouse.
Offset that location according to the location of the viewport
on the map.
Find out what tile the user clicked on.
Set pData->pMap->Map[MouseX][MouseY] = 0.
}
Input
Overview
The input tool is code that is responsible for having some
type of action occur when the user presses a key. This tool will only be used for the client game loop. The server doesn’t take much input, and the
input it takes is handle by Window’s GDIs.
The menu’s input will also be using the Window’s GDIs. This tool will be mainly used for in game
input, e.g. holding the up arrow key to accelerate the user’s ship forward.
There are four states that a key can be in, pressed, just-pressed, just-released, and not pressed. Pressed indicates that the User has been holding down the key in question. Just-Pressed indicates that the User has started holding down the key. Remember that when a key on the keyboard is tapped, the input devices get hundreds, if not thousands, of “hits” for that key. So if we only wanted one thing to happen when a key is press, we would have to check for the just-pressed state. Just-Released indicates that the User stopped pressing a key and not press simply means the key in question has not be used.
The input tool does not rely on any of the other tools and other tools do not rely on the input tool. Only the game loop needs to check the input to see what the User wants to do in the game.
The input class will need two very important arrays. Both these arrays will be n array of bytes the size of 256. The first array, called keys, will be the current state of all the keys in the keyboard. The second array, called lastKeysState, will hold all previous key states. We need to know the last state a key was in, to decide if a key is being pressed, just-pressed, or just-released.
There will be two input classes. One input class for Direct Input and one class for the Windows’ Input. The only difference between these classes is the private data. The Direct Input class will need instances of Direct Input and a keyboard device.
We will be using direct input, however since it makes debugging difficult, we will be using the standard input/ output until the final version. Two input classes will be used, one for direct input and one for the standard i/o. A define will determine what class we’ll use, so a switching between the two classes will be easy. However, this means that the standard i/o class must have the same functionality as the direct input class. The means that the standard class will have two empty functions, which are init() and end().
We will define all the direct input and the entire window input with the same defines so that we it will be easier to work with one set of input defines.
Here is an example:
#define INPUT_UP DIK_UP //VK_UP
#define INPUT_DOWN DIK_DOWN //VK_DOWN
#define INPUT_LEFT DIK_LEFT //VK_LEFT
#define INPUT_RIGHT DIK_RIGHT //VK_RIGHT
#define INPUT_PGUP DIK_PRIOR //VK_PRIOR
#define INPUT_PGDN DIK_NEXT //VK_NEXT
#define INPUT_TAB DIK_TAB //VK_TAB
#define INPUT_F1 DIK_F1 //VK_F1
#define INPUT_F2 DIK_F2 //VK_F2
#define INPUT_F3 DIK_F3 //VK_F3
#define INPUT_F4 DIK_F4 //VK_F4
#define INPUT_F5 DIK_F5 //VK_F5
#define INPUT_F6 DIK_F6 //VK_F6
#define INPUT_F7 DIK_F7 //VK_F7
#define INPUT_F8 DIK_F8 //VK_F8
#define INPUT_F9 DIK_F9 //VK_F9
#define INPUT_F10 DIK_F10 //VK_F10
#define INPUT_F11 DIK_F11 //VK_F11
#define INPUT_F12 DIK_F12 //VK_F12
#define INPUT_ESC DIK_ESCAPE //VK_ESCAPE
#define INPUT_NUMPAD0 DIK_NUMPAD0 //VK_NUMPAD0
#define INPUT_NUMPAD1 DIK_NUMPAD1 //VK_NUMPAD1
#define INPUT_NUMPAD2 DIK_NUMPAD2 //VK_NUMPAD2
#define INPUT_NUMPAD3 DIK_NUMPAD3 //VK_NUMPAD3
#define INPUT_NUMPAD4 DIK_NUMPAD4 //VK_NUMPAD4
#define INPUT_NUMPAD5 DIK_NUMPAD5 //VK_NUMPAD5
#define INPUT_NUMPAD6 DIK_NUMPAD6 //VK_NUMPAD6
#define INPUT_NUMPAD7 DIK_NUMPAD7 //VK_NUMPAD7
#define INPUT_NUMPAD8 DIK_NUMPAD8 //VK_NUMPAD8
#define INPUT_NUMPAD9 DIK_NUMPAD9 //VK_NUMPAD9
#define INPUT_A DIK_A //'A'
#define INPUT_B DIK_B //'B'
#define INPUT_C DIK_C //'C'
#define INPUT_D DIK_D //'D'
#define INPUT_E DIK_E //'E'
#define INPUT_F DIK_F //'F'
#define INPUT_G DIK_G //'G'
#define INPUT_H DIK_H //'H'
#define INPUT_I DIK_I //'I'
#define INPUT_J DIK_J //'J'
#define INPUT_K DIK_K //'K'
#define INPUT_L DIK_L //'L'
#define INPUT_M DIK_M //'M'
#define INPUT_N DIK_N //'N'
#define INPUT_O DIK_O //'O'
#define INPUT_P DIK_P //'P'
#define INPUT_Q DIK_Q //'Q'
#define INPUT_R DIK_R //'R'
#define INPUT_S DIK_S //'S'
#define INPUT_T DIK_T //'T'
#define INPUT_U DIK_U //'U'
#define INPUT_V DIK_V //'V'
#define INPUT_W DIK_W //'W'
#define INPUT_X DIK_X //'X'
#define INPUT_Y DIK_Y //'Y'
#define INPUT_Z DIK_Z //'Z'
Game Specific Functions
void UpdateInput(mainData
*theWorld);
UpdateInput checks all the keys and will send the appreciate
data to the networking window. The
networking window will take care of the data being send to the server. To see more on the networking window, see
the networking section of this document.
The states of the keys that should be checked are pressed, just-pressed,
and just-released. Since we do not want
to flood the server, we only need to send messages if a button is just-pressed
or just-released. For example, if the
User is holding do the up arrow key to accelerate, the server only needs to
know that the User has started to accelerate.
The server will keep accelerating the User until it receives a
just-release update. UpdateInput will
take a mainData pointer so it can have access to the networking window. UpdateInput will not return anything.
Void UpdateInput(mainData
*theWorld)
{
if(IsKeyPress(upArrow) = = Just-Pressed)
PostMessage(GetNetworkingWindow(np),
WM_FORWARDDOWN,0,0);
if(IsKeyPress(upArrow) = = Just-Released)
PostMessage(GetNetworkingWindow(np), WM_FORWARDUP,0,0);
:
:
:
}
All-Purpose Code:
BYTE IsKeyPressed(BYTE key);
IsKeyPressed is a function that checks to see what was the last input for the key in question and returns what state is it in. The function also updates the lastKeyState.
Although this function is very simple, it’s very important. This function will be the heart of the input tool. The only data that IsKeyPressed needs is a BYTE which represents a key on the keyboard. The array lastKeyState will be updated to pressed for that key if the last key state was just-pressed. The function will return one of the four states a key could be in, pressed, just-pressed, just-released, and not pressed.
void Update();
Update goes through the array of keys and checks the current state of each key. Depending on what the key’s last state was, will decide what the current state will be. For example, if a key’s last state was pressed, and updated checks the key and sees that it is not longer being pressed, it will change the last key state to being just released. The next time Update is called, it sees that the key is still not being pressed so it will change the last key state to being not pressed. Update does not need any data since everything it needs is internal due to C++.
int Init(HINSTANCE
hInstance, HWND hWnd);
Init sets up the direct input devices. It needs the hInstance and hWnd of the window to create the direct input EX and to set the cooperative level. Init will return false if any of the direct x objects cannot be create thus failing the initialization. Init will return true if everything gets create correctly. The objects that need to be created are, the direct input, keyboard device, keyboard data format, setting the cooperative level, and acquiring the keyboard device.
void End();
The end function will free up all the direct input objects that Init creates. No data needs to be passed in and nothing is returned.
Networking
All-Purpose
Overview
The All-Purpose section of the Networking Engine has a very distinct and simple purpose. The objective is to supply low-level functions that help to abstract use of the Winsock API from the game-specific networking. There are three types of functions that help accomplish this: the general functions, the TCP/IP-specific functions, and the UDP-specific functions.
The general functions include WinSock initialization and various ways of getting a user’s IP address from either domain names or sockets. The TCP/IP and UDP sections are fairly similar in that they both provide sections to send and receive data, differing mostly in the initialization data passed to the sockets (one specifying TCP, the other UDP). However, the major difference is that with TCP/IP one is allowed to establish connections between the computers, so a number of functions are made available to help connect and disconnect two computers.
This section is wholly contained in and of itself. It only needs access directly to the Winsock API, the STL List class and no other section, game-specific or otherwise. It has a single internally defined structure called “Connection Data” whose purpose is to keep track of connections between users and any data currently being sent between the two of them. It is also important to note that the all-purpose networking is neither specific to the client nor the server and may be used freely in either one.
Data Structures
The CONNDATA structure is important because it lets
the user keep representations of the connections they’ve made in the past. This also allows them to disconnect by
providing a CONNDATA instead of a socket.
To properly keep all the data of a connection, a number of variables are
needed. The first and most important is
the SOCKET variable that WinSock uses when sending data across the
network. This SOCKET is created upon
connection with another user. It also
needs a WinSock-defined struct that keeps the IP address of the connection and
the time that the connection was made.
In addition to this information, if the user is
currently receiving information from a user, it is important to keep track of
how many bytes they currently are receiving so that if a different user’s
packet is received in the meantime, they can pick up where they left off. Besides these counting variables and the
buffer used to store them, the final key piece of information is the internal
representation of the user’s identification: an unsigned integer that is 1 +
(the ConnectionID of the most recent connection).
typedef struct _stConnData
{
SOCKET hSock; // connection Socket
SOCKADDR_IN stRmtName; // local address and Port
SYSTEMTIME lStartTime; // time of connect (by the system
time)
int iBytesRcvd, // data currently buffered
iBytesSent; //
data sent from buffer
LONG lBytesCount; // total byte recieved
char IObuffer[BUF_SIZE]; // network I/O buffer
unsigned int ConnectionID; // a unique ID given to a connection
} CONNDATA, *PCONNDATA,
FAR *LPCONNDATA;
Functions
General Network Functions
This function runs Winsock’s initialization
functions, abstracting them from the user.
It must be called before any other networking functions will work.
int ALL_InitWSAComponent();
This function returns a string containing the IP
address of the socket that is passed in.
It also adds it to the buffer variable that is passed in. This IP address is received by calling a
sockets function.
char * ALL_GetIPString(SOCKET
hSock, char *buf, int len);
ALL_GetHostAddress takes a domain name (or, if on a
LAN, a computer name) and calls some sockets functions to fill in the IP variable
with a string containing the IP address of the computer.
int ALL_GetHostAddress(char
*cHost, char *IP, int iplen);
ALL_GetHostName fills in the cHost string with the
name of the computer associated with the IP variable that is passed in. This name is received by calling a
sockets-specific function.
int ALL_GetHostName(char
*IP, char *cHost, u32 hostlen);
TCP Functions
TCP_AcceptConn takes a socket and grabs some
information on it (storing it in a variable) using sockets functions, then
associates it with the current host socket and returns the newly connected
SOCKET. The SOCKET will be a NULL value
if the function failed.
SOCKET TCP_AcceptConn(SOCKET
hLstnSock, PSOCKADDR_IN pstName);
TCP_CloseConn takes a socket that it is currently
connected to, grabs any remaining information from that socket (storing it in a
buffer), then closes the connection. It
returns failure (0) if it could not close the connection.
int TCP_CloseConn(SOCKET
hSock, LPSTR chInBuf, int len);
Sends a connection message to a specified IP over a
specified port. It also needs access to
the socket that the message is being sent from. It calls the sockets connect function.
BOOL TCP_Connect(SOCKET hSock, char *IP, unsigned short PORT);
Needs the list of all connection messages made by
the socket that is to be terminated so that it can run through each of them and
disconnect the sockets. It also needs
the HWND of the window that will be handling the WinSock messages so that it
can post a WM_SOCKET close message. It
returns the amount of bytes that were left to be received from the closed
connections.
int TCP_DestroyWSAComponent(SOCKET
hSock, list<LPCONNDATA> & m_list, HWND hwnd);
TCP_Disconnect takes a socket and closes it off,
freeing any resources allocated for it.
Returns 0 for a successful close.
int TCP_Disconnect(SOCKET
hSock);
Given a SOCKET, TCP_FindConn will look through the
supplied list of connections and, if it finds it, will fill in the iterator
variable with the iterator of the connection.
If it does not find it, the iterator will be uninitialized and the
function will return 0.
int TCP_FindConn(SOCKET
hSock, list<LPCONNDATA>
&m_list, list<LPCONNDATA>::iterator &it);
TCP_InitClientSock is for sockets on the client
side. Given a handle to the window that
is to receive a socket’s WinSock messages, it will create the socket, associate
it with the window using WinSock, and return it. If the function fails, the socket will be NULL.
SOCKET TCP_InitClientSock(HWND
hwnd);
TCP_InitHostSock is for sockets on the server
side. Given a handle to a window that
is to receive the socket’s WinSock messages, it will create the socket and
associate it with the window. It will
set up to listen on the specified port and will fill in its properties in the
passed in SOCKADDR_IN.
SOCKET TCP_InitHostSock(HWND
hwnd, SOCKADDR_IN *stLclName, unsigned short Port);
TCP_NewConn allocates a new connection structure and
fills it in with the information supplied by the variable passed in. It then takes the socket and associates it
with the particular connection and adds it to the list of connections. It also returns a pointer to the newly
allocated connection directly, which will be NULL if the function failed.
LPCONNDATA TCP_NewConn(SOCKET
hSock, PSOCKADDR_IN pstRmtName, list<LPCONNDATA> & m_list);
TCP_RecvData takes a socket and checks if there is
any data waiting to be received from it.
If there is, it will fill out the packet that was passed in with an
amount of information specifed as a parameter.
A handle to the WinSock window is also provided so that any errors can
be posted directly to the window as messages to close the socket. The function returns the total number of
bytes actually received.
int TCP_RecvData(SOCKET hSock, char
*lpPacket, int cbTotalToRecv, HWND hwnd);
TCP_RemoveConn takes a pointer to a connection and a
list of connections. It finds the
connection within the list and removes it.
If it cannot find the connection in the list, then that means it has
already been removed.
void TCP_RemoveConn(LPCONNDATA lpstConn,
list<LPCONNDATA> & m_list);
TCP_SendData sends data out on a particular socket
(to any sockets it may be connected with).
The data it sends is supplied in the packet, which is passed in by
pointer, followed by the sizeof(the packet) so that it knows how many bytes to
send. Finally, the handle to the
WinSock window is supplied in case there is an error and it needs to close the
socket. Returns the number of bytes
successfully sent.
int TCP_SendData(SOCKET hSock, char
*lpPacket, int cbTotalToSend, HWND hwnd);
UDP Functions
This function takes a socket and a list of
connections, making sure to eliminate any connections between the socket and
the sockets in the list. It then frees
the socket and any resources allocated with it. If it encounters an error, it posts the error to the WinSock
window. It returns 0 for success.
int UDP_DestroyWSAComponent(HWND
hwnd, SOCKET hSock, list<LPCONNDATA> & m_list);
UDP_InitSock creates a socket and associates it with
the supplied port. It then associates
it with a window (via the window handle) so that if it receives WinSock
messages they are sent to that window.
Next it polls the hardware for some information and fills out the
SOCKADDR_IN structure that was passed in.
SOCKET UDP_InitSock(HWND
hwnd, SOCKADDR_IN *stLclName, u16 Port);
UDP_RecvData takes a socket to start looking for
data with, a string to fill in with any data received, and a buffer length for
that data. It searches all known
networks for any data and if it finds any will fill in the string and the
SOCKADDR_IN with the information about the sender of the data, then return the
number of bytes successfully received.
int UDP_RecvData(SOCKET
hSock, char *lpInBuf, int BufLen, SOCKADDR_IN *stRmtName);
UDP_SendData takes a socket that has already been
initialized, a pointer to a SOCKADDR_IN struct contains information about the
data’s destination (if this parameter is NULL, the data will be broadcast
across the network), a port to send the data on, an array with the data and an
amount of bytes to send. It will
attempt to send the data and will return the amount of bytes successfully sent.
int UDP_SendData(SOCKET
hSock, SOCKADDR_IN *stRmtName, u16 Port, char *lpOutbuf, int cbTotalToSend);
Game-Specific
Overview
The Networking Engine interfaces with the game in two different manners. The first is when the game needs to tell the engine to send some information. To that end, a system of Windows messages has been “user-defined” that are associated with specific actions, such as sending a chat string. Therefore, at any time during the game, the code can post a networking message to the network window using the GetNetworkWindow() access function. Depending on the message sent, extra parameters may need to be passed as WPARAM and LPARAM. The Network Proc will receive this message and, because it is given access to the game’s main data structure at the beginning, it will have the ability to grab any additional information it needs from the game to send across the network.
The second way that the Networking Engine interfaces with the game is a little more “hands-off.” This is when the game receives a message across the network. Because the networking runs in its own thread constantly checking for messages across the network, it will receive any data and automatically act upon it. Because the network engine receives access to the game’s main data structure at initialization, it will already have the data to manipulate based off of the given message. What it manipulates and how is determined by the message that it receives.
The multi-threading is accomplished by creating the thread (passing in the pointer to the MainData structure as the extra parameter) which then handles the creation of the invisible Networking window that will serve as a callback point for all of the WinSock messages. Right after the thread is created, the main thread will suspend itself until the network window is created and “sets an event,” which unsuspends the main thread and allows it to continue. If there is an error and the even doesn’t get set, the suspension will time out and will return an error. Once the network window is created, it will throw itself into a message loop to handle any messages and will quit when a WM_QUIT message is received.
The callback structure of WinSock is a simple one; every time a socket is created that information will be sent out through, it is associated with a window handle so that all messages will be redirected to it through the WinProc callback function. The messages that it can receive are the WinSock-defined FD_ACCEPT, FD_READ, FD_WRITE, and FD_CLOSE. Whenever one of these messages are received, the appropriate action is performed and, if it was a read, the packet received is acted upon.
Network Messages
There are four main types of messages that can be sent, and several subtypes that belong to each of the main ones. There are also messages that the main thread will need to send to the network thread to indicate what messages need to be sent.
Primary Messages:
NM_REQUEST //For trying
to get access (and connections) to a server
NM_INIT //For
telling clients to (and how to) add players
NM_PLYR_SYNC //For keeping
all clients synchronized
NM_PLYR_ACTN //Messages
clients send to server saying they’ve done something
Secondary Messages:
/* NM_REQUEST messages */
RQST_ACCESS //sent
to server to request connection
RQST_DENIAL //sent
from server to client if game is full or an error
RQST_CFRM_NEW_USR //a message
to confirm that the server need make a new user
/* NM_INIT messages */
INIT_MAP //which
map will get used
INIT_PLYR_ADD //lets
the clients know to add a player to their game
INIT_PLYR_NUM //send
the amount of players currently in game
INIT_PLYR_NAME //using
bit manipulation allow for a name to be sent
INIT_PLYR_IDS //setup
each clients player ID
INIT_PLYR_SHIP //send a
players Ship ID
INIT_PLYR_ID //send a
players Connection ID
INIT_GC //send
any other “game conditions”
/* NM_PLYR_ACTN messages */
PLYR_SPEC_PROJ //tell all
computers about a special projectile creation
PLYR_NORM_PROJ //tell all
computers about creating a normal projectile
PLYR_CHANGE //send
whenever a player changes motions
PLYR_STRING //used
to send a string of characters
/* NM_PLYR_SYNC messages */
PLYR_POSITION //update
of the players position (incase of errors) PLYR_ACCEL //update of the player’s
acceleration
PLYR_VEL //sync
the player’s velocity
PLYR_ANG_ACCEL //update
of the player’s angular acceleration
PLYR_ANG_VEL //sync
the player’s angular velocity
PLYR_HEALTH //sync
the players health
PLYR_DEATH //notify
players about a player death
PLYR_NUM //sent
from the server, confirming number of players
PLYR_SCORE //lets
the player know player scores
PLYR_BOUNTY //lets
the player know bounty values
PLYR_DISCONN //let
players know that a person is disconnecting
Windows Messages:
WM_CONNECT //attempts
to connect to IP address string in WPARAM
WM_DISCONNECT //disconnects
from IP address specified by WPARAM
WM_SENDSTRING //includes
message to be sent as WPARAM
WM_UPDATE_PLAYERS //server
message telling netProc to send update messages
WM_UPDATE_STATUS //client
message telling netProc to send updates
Data Structures
The network_params structure is a solely internal
representation of variables important to keep track of for the network’s
separate thread. It serves as a way to
communicate between the network window and the main game. First and foremost, there’s the handle to
the program’s instance, which will need to be filled in before the
network_params is passed off to the InitNetwork function because the network
will need direct access to that handle so it can create a window. The remaining variables are going to be set
inside of the network’s thread.
The window handle is the handle to the invisible network window that all messages sent there will need to be posted to. Therefore, there is an access function that will return this window handle since all postmessages will need it. The thread’s ID is set upon creation of the thread and is used in destroying the thread. Next, the handle to the thread itself is created in case any error detection handling needs it. Then there is a handle to an event that will allow us to suspend the main thread while waiting for the network thread to complete a task (such as create its window). And finally there is the void parameter which points to game’s main data structure so that it can be passed off to the network proc.
typedef struct _network_params
{
HINSTANCE hInstance;
HWND hwnd;
DWORD ThreadID;
HANDLE Thread;
HANDLE hEvent;
PVOID pvoid;
}*NETWORK_PARAMS;
The tPacketData structure contains the fields for a data-based packet. It contains three fields, two for signed integers and one for an unsigned integer, which are all different depending on which packet is being sent. Note that it is possible to store floating point values within these integers with a simple memcpy command, they just won’t look right until they are memcpy’ed back into a floating point number again.
typedef struct _packet_data
{
int sdata1; // depends on type of packet
int sdata2; // depends on type of packet
unsigned int udata; // depends on type of packet
} tPacketData,
*ptPacketData;
The tPacketString structure contains the fields for a string-based packet. The size will be roughtly 512 bytes in size to begin with, and if it proves to be too much or too little during testing it will be accounted for.
typedef struct _packet_string
{
char p_string[BUF_SIZE]; //a string to be sent
} tPacketString,
*ptPacketString;
The tPacket is the important structure that groups
data specifically so that when it is sent across the network it can be read out
in an orderly fashion. The constant
portion of the packet will be the initial variable containing the ID value of
the user who sent the data, a variable for the type of data contained within
the packet (see Network Messages), and a variable for the size of the data
portion of the packet so that we don’t read out too much or too little
data. Finally, we have a simple union
of the packet string and the packet data structures, of which only one would
ever be used at a time so we can treat the packet as being one or the other
(based on the type field).
typedef struct _packet
{
unsigned char source; //
who sent the data
unsigned short type; // data in packet
unsigned short size; // the size of the data portion of the
packet
union
{
tPacketString
string;
tPacketData
data;
};
} tPacket, *ptPacket;
Functions
Internal Networking Functions:
InitNetworkWindow is a wrapper for the RegisterClass so that it creates a completely blank window type and associates it with the string that is passed in.
int InitNetworkWindow(HINSTANCE
hInst, char *App);
CreateNetworkWindow is a wrapper for the Windows API CreateWindow function, where most of the parameters that are passed are set to NULL since the networking window is completely invisible and “hidden” to the user. The only parameters it needs are the instance of the program, the same string as the one used in the InitNetworkWindow, and the extra parameter which points to the game’s main data structure.
HWND CreateNetworkWindow(HINSTANCE
hInst, char *App, void *pvoid);
The NetworkThread is the thread handler that will be passed off to the WinAPI CreateThread function when the network’s thread needs to be created. The pvoid parameters will be the NETWORK_PARAMS so that the network can communicate with the with the main thread by resupplying the window handle through the structure.
DWORD WINAPI NetworkThread(PVOID
pvoid);
The NetProc is the callback for the WinSock window that all networking messages will be processed in. It is a standard Windows API callback function.
LRESULT CALLBACK NetProc(HWND
hwnd, UINT message, WPARAM wparam, LPARAM lparam);
Public Networking Functions:
InitializeNetwork is the very important function whose responsibility is to create the network thread, passing off all of the proper variables including the pointer to the game’s main data struct. First of all, it allocates the NETWORK_PARAMS variable and sets its instance handle variable. The function will suspend itself immediately after creating the thread for a “timeout period” until either the network thread sets the event to unsuspend it or it times out. In the event that it times out, the function returns FALSE for failure, however if it succeeds then it returns TRUE for success.
BOOL InitializeNetwork(HINSTANCE
hInstance, NETWORK_PARAMS *np, PVOID pvoid);
Terminate network closes the thread and frees any resources allocated to the NETWORK_PARAMS, setting it to NULL when it is finished.
void TerminateNetwork(NETWORK_PARAMS
*np);
GetNetworkWindow is a data access function to get the handle to the network window from the NETWORK_PARAMS variable.
HWND GetNetworkWindow(NETWORK_PARAMS
np);
Audio
All-Purpose
Overview
The All-Purpose portion of the Audio Engine exists to provide a simple way to play Music files and Sound Files (which can be in either MP3 or WAV format). To facilitate this, the audio engine provides an interface to the Xaudio API. The development kit for Xaudio provided a class called the XaudioPlayer that encapsulates most of what Xaudio has to offer. In the XaudioPlayer, an invisible window to handle player callback messages is automatically created, placed in a separate asynchronous thread, and destroyed at the proper times, keeping that nasty bit of code hidden from the user. Instead it reveals a number of virtual functions that the user is allowed to define personally to handle callback messages.
This is where the AudioPlayer class steps in. It is designed to further abstract the XaudioPlayer by handling the callback message “notify player state” so that the song knows when it ends and therefore when to loop. This looping funcionality needs only to be available to Music files, a fact that gets enforced by later classes. The cornerstone of the Audio Engine is the AudioClass, which manages an array of these AudioPlayers so that multiple channels of audio may be played at once. Due to Xaudio’s inherent use of DirectSound, all of these channels are automatically mixed together.
Finally, at the highest level, there are the Music and SoundEffect classes themselves, which are each linked to an AudioClass then contain other pieces of information such as the pathnames to the audio files that will be played. Because the audio files will be played out of files, the Audio Engine needs access to the File I/O handler, but other than that it is completely indepenedent of all other tools.
Data Structures
The AudioPlayer class is the encapsulated XaudioPlayer
that adds the extra feature of automatically repeating songs and keeping track
of whether or not it is currently in use.
It needs variables to know if it is currently playing (set during the
Play function and cleared when it reaches the end of file or a Stop is called),
what the offset is (i.e. where to play from in the file once it reaches the end
and it loops) and whether or not it should repeat at the end of a file. To accomplish this, it defines a function
that directly applies to the base XaudioPlayer class, the HandleStateMessage,
which repeats a song from the repeat point on the state “end of file”. The AudioPlayer is what ultimately needs
access to the File I/O handler as it needs to confirm whether or not a file
exists.
class AudioPlayer : public
XaudioPlayer
{
bool repeat;
bool inuse;
int offset;
public:
//Function to handle PlayerState callback messages
//Function to play/stop an audio file
//Access function to check if a player is currently in use
};
The AudioClass contains an array of several
AudioPlayers and an integer to keep track of how many were dynamically
allocated. There are two allocations
that must be performed: one for setting how many players there are, and then
one for each player itself. The
AudioClass is self-terminating as all the free commands are located in its
destructor. Whenever a song is called
to be played, it is run through the AudioClass to find a player that doesn’t
currently have audio playing and plays it from that AudioPlayer (consequently
setting that player to “active” until the song/sound effect is finished). It is important to note that it is assumed
music files will never need to overlap, therefore to insure maxiumum
efficiency, the first channel of the ppPlayers is reserved for music. If any new music file is played, it will
replace whatever is playing in the first index, while sound effects are
relegated out to how ever many players remain (the number of which is specified
upon the AudioClass’s initialization).
class AudioClass
{
AudioPlayer **ppPlayer;
int numPlayers;
public:
//Functions to initialize, play and stop audio
//Access function to get access to a player that has nothing
playing
};
A Song class is an encapsulation of what a song
is. First of all it has a pathname of
the song file and a name to be associated with the song (if one ever needs to
display that). Next it has whether or
not the song is supposed to be repeated and, if it is, where to repeat it
from. Specifically, this repeat point is
a number out of 1000 representing a percentage forward into the song to “skip over.” Finally, it needs access to an initialized
AudioClass from which to actually play itself, which must be set during the
Song’s creation.
class Song
{
char name[SONG_NAME_LEN];
char path[SONG_PATH_LEN];
bool repeat;
int repeatPoint;
AudioClass *ac;
public:
//Access functions to change the song’s pathname
//Function to “create” the song
//Function to play/stop the song
};
A SoundEffect class is an encapsulation of what a
sound effect is. First of all it has a
pathname of the sound effect file. Next
it has a value indicating the priority of the sound effect. This is set up so that if there is a sound
effect that absolutely must be heard and there are no players available, it
will stop one of those players and play itself. Finally, it needs access to an initialized AudioClass from which
to actually play itself, which must be set during the SoundEffect’s creation.
class SoundEffect
{
char path[SONG_PATH_LEN];
int priority;
AudioClass *ac;
public:
//Access functions to change the sound effect’s pathname
//Function to “create” the sound effect
//Function to play/stop the sound effect
};
Functions
AudioPlayer Functions
In the AudioPlayer constructor, we need to pass a
handle to the current application instance to the constructor of the
XaudioPlayer, which will use it to create an invisible, internal window to
handle its own messages.
AudioPlayer::AudioPlayer(HINSTANCE
hInst);
The XaudioPlayer supplies many virtual void
functions, including OnNotifyPlayerState, so by defining the function we can
handle any of its callback messages.
So, if we get any important state messages, here is where they are
handled. We are, in fact, only
interested in one possible state, that of the “end of file,” which is when we
set the file to loop if its looping variable is set to true.
void AudioPlayer::OnNotifyPlayerState(XA_PlayerState
state);
PlayAudio takes a pathname of a file and, using the
File I/O, checks to make sure the file actually exists. If so, it will initialize the variables for
looping and the offset upon repeat.
Then it calls the XaudioPlayer class’s functions for loading input and
playing the audio. Also sets the
isPlaying variable to true if it begins to successfully play.
void AudioPlayer::PlayAudio(char
*path, bool loop=false, int off=0);
StopAudio halts any audio currently playing in the
AudioPlayer by calling the XaudioPlayer’s stop and closeaudio functions. Also sets the isPlaying variable to false.
void AudioPlayer::StopAudio();
This function serves as an access function to the isPlaying variable and returns whether or not the audio currently is in use.
bool AudioPlayer::IsPlaying();
AudioClass Functions
The Init function takes a handle to the program
instance that it will pass to the constructors of each AudioPlayer it
creates. It also needs a handle to a
window that gets priority so that it can call an Xaudio function to associate a
player’s priority with a window.
Finally, it needs a number of channels to dynamically allocate
AudioPlayers in an array. This number
must be at least one for music to play, and more for there to be sound.
void AudioClass::Init(HINSTANCE
hInst, HWND hwnd, int numChannels);
Play indexes into its array of AudioPlayers by the specified index variable, then calls the PlayAudio function of the specified player. The remaining parameters are the parameters that will also need to be passed into the play audio function, including the pathname of the music file, whether or not it loops, and the point to loop over from.
void AudioClass::Play(int
whichPlayer, char *path, bool loop=false, int off=0);
Stop indexes into the array of AudioPlayers and
calls the StopAudio function of that player.
void AudioClass::Stop(int
whichPlayer);
GetOpenPlayer returns the index of the first player it finds in the array that isn't playing anything. If the parameter is specified to true, then it will include the first AudioPlayer in the search for an open player, but this is not recommended as the first AudioPlayer is reserved for music only.
int AudioClass::GetOpenPlayer(bool
includeZero=false);
StopAll runs through the array of AudioPlayers calls
the StopAudio function for each player.
void AudioClass::StopAll();
Song Functions
The Create function of the Song class associates the
song with an instantiated AudioClass so that it can play sound when it is told
to later. It also gives a string for
the name, the pathname for the mp3 or wav file, whether or not the song will
repeat, and if so what point to repeat the song from (a value from 0 to
1000). This function must be called
before the Play will work.
void Song::Create(AudioClass
*audio, char *n, char *p, int off, bool loop=1);
If a song is already created and its properties are
set, ChangePath is available to redirect where the Song will look for its file.
void Song::ChangePath(char
*p);
Play will, if the audio class associated with the
song is valid, pass the song’s information off to the first player (player 0)
of the AudioClass to let it handle the playing from there.
void Song::Play();
Stop will, if the audio class associated with the
song is valid, stop the audio that is playing in the first player (player 0) of
the AudioClass.
void Song::Stop();
SoundEffect Functions
The Create function of the SoundEffect class
associates the sound effect with an instantiated AudioClass so that it can play
sound when it is told to later. It also
gives a pathname for the mp3 or wav file and a priority value which, if set to
1, will guarantee that the audio gets played even if all the audio players are
currently in use. This function must be
called before the Play will work.
void SoundEffect::Create(AudioClass
*aclass, char *p, int priorityvalue=0);
If a sound effect is already created and its
properties are set, ChangePath is available to redirect where the SoundEffect
will look for its file.
void SoundEffect::ChangePath(char
*p);
GetPath is a data access function that returns the
path currently associated with the sound effect.
char * SoundEffect::GetPath();
Play will, if the audio class associated with the
song is valid, pass the song’s information off to the first open player of the
AudioClass to let it handle the playing from there. If the sound effect’s
priority is set to true, then if it does not find an open player it will play
out of player 1 regardless. Also, since sound effects can pan to the left and
to the right there is a “panvalue” parameter that is from –1.0 to 1.0 and
represents the bias to left and right speakers respectively. This variable needs to be calculated
beforehand so the sound comes from the proper direction (or can just be set to
0.0 to play equally in both speakers).
void SoundEffect::Play(float
panvalue=0.0);
Game-Specific
Overview
In the game, different tools will call into the sound effect functions when they need them. For instance, all ship objects and projectile objects are associated with various sound effects, i.e. explosion sounds for when they collide. These sounds are loaded in as strings from a file and are “built” during the load function, which includes associating them with the AudioClass. Therefore it is not the responsibility of the game-specific audio engine to further abstract the process. Along the same lines, the AudioClass’s initialization function already exposes enough functionality and does not need a wrapper that is game-specific.
The only game-specifc functionality that is necessary is the loading/creation of the game’s songs, and how they are played. By interfacing this tool with the File I/O tool, the function can read in an array of songs from a text file and play them by index value instead of needing to rely on the actual Song object.
Data Structures
The mainData struct contains the Song array, which is
loaded in from a file and can be indexed later to play the individual music
files. There also is a variable for how
many songs are loaded in so that the song array is never over-indexed. For more information on what else the
mainData structure contains, see the Game Object Data section of this document.
struct mainData
{
//...other variables...
Song *songArray; //the array of song files that play
music
int numSongs; //the number of songs to choose from
//...other variables...
}
Functions
LoadSongList takes a pathname to a configuration file
and, using the File I/O handler, loads in a number of pathnames equal to the
number specified at the top of the file.
It then allocates the proper number of Songs in the song array. Finally, it associates them with the
instantiated AudioClass pointer that was also passed in. The function returns the number of properly
allocated Song files.
int LoadSongList(char
* configPath, AudioClass *ac, Song **songArray);
EmptySongList takes a pointer to an allocated array of
Songs and the number of those songs. It
runs through each one in turn, makes sure the audio is not playing, and then
deallocates the array, setting the songArray to NULL when it is finished.
void EmptySongList(Song
**songArray, int numSongs);
PlaySong takes an array of songs and an index into those
songs to the one that the user wants to play.
This index must not be longer than the array, or it will cause
errors. This index value will typically
be associated with a define for either MENU_MUSIC or GAME_MUSIC so that the
proper music file can be played when it’s supposed to and it looks intuitive to
the programmer.
void PlaySong(Song
*songArray, int whichSong);
Special Effects Tool
The Special Effects
will rely entirely on a particle engine.
All special effects will be done with this engine and allow everything
from thruster fire, explosions, smoke and radial explosions. All particles will be placed in a list with
data for location, direction and what graphic to draw.
The special effects tool will rely on two other tools to call it. Collision will call it when there is any form of collision. For example if one player shoots another there will be an explosion effect or if a player runs into a wall there may be an effect with sparks flying. Input will also call the tool to generate thruster fire to allow the ship to actually look like its flying. It will also handle other input particle generation such as the radial explosion that pushes nearby players away.
The special effects tool’s draw function will be called by the game specific graphics function to draw all images.
Structures
Struct PARTICLE
{
IMAGE *pImage[ ]; // A
pointer to an array for the graphics for this //particle
Int Frame; //
What frame of the graphics to draw
POINT Location; //
Where the particle is
VECTOR Direction; //
Where the particle is going
};
struct SPECIAL_EFFECT
{
PARTICLE *pParticleList;
// A list of all the particles
in this effect
Int
EffectNumber; // What effect this special effect is
simulating
};
Game Specific Functions
Generate_Thruster_Effect(SPECIAL_EFFECT
*pSpecialEffect)
{
Creates a certain number of particles for each period of time
the button is pressed.
NewParticle =
CreateNewParticle(….);
Add the new particle to the
pSpecialEffect->pParticleList;
}
Generate_Explosion_Effect(SPECIAL_EFFECT
*pSpecialEffect)
{
Creates a certain number of particles.
NewParticle = CreateNewParticle(….);
Add the new particle to the pSpecialEffect->pParticleList;
}
Generate_Radial_Explosion_Effect(SPECIAL_EFFECT
*pSpecialEffect)
{
Creates a certain number of particles.
NewParticle = CreateNewParticle(….);
Add the new particle to the pSpecialEffect->pParticleList;
}
All-purpose
Functions
InitParticleList(SPECIAL_EFFECT
*pSpecialEffect)
{
Initialize memory for the pParticleList and set to 0.
}
CreateNewParticle(SPECIAL_EFFECT
*pSpecialEffect)
{
Initialize memory for the new particle
Set all data necessary
Return that particle
}
AddParticleToList(SPECIAL_EFFECT
*pParticleList, PARTICLE *pParticle)
{
Adds the pParticle to the end
of the pParticleList
}
UpdateParticles(SPECIAL_EFFECT
*pSpecialEffect)
{
Updates the positions of all the particles in the
pSpecialEffect->pParticleList and changes their image indexes if necessary.
}
DrawParticles(SPECIAL_EFFECT
*pParticleList)
{
Draws all the particles in a given list with the appropriate images.
}
Control Loop
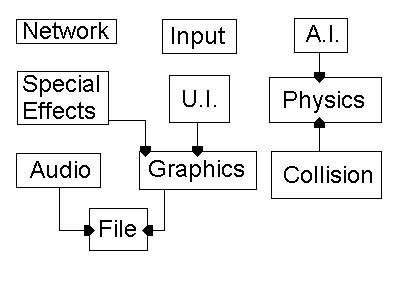
There will be two control loops, which are basically the heart of the program. The client main will be the control loop for the user and the server main will be the control loop for the dedicated server. The main purpose of the control loops is to start the game, by calling all the proper initialization functions, run the game in a loop, and, when the user gives the command, exit the game, by calling all the proper closing functions. This will interact will all other major code sections by the virtue of that it will call all the highest level functions to start up all the other lower level functions. A good way to think of this is that when the game runs, it forms a tree, the control loop would be the trunk, whereby all other sections of the game are branching from, i.e. networking, input, A.I., graphics.
The control loops, by default, is game specific. The following function prototypes are the highest level, game specific code that will be mandatory for this project.
Control Loop
Functions
Client:
void clientMain()
The client main has three main sections to it.
1) Initialize
2) Main game loop
3) Termination
Initialization will be handle by a function called Initialize. This function will set up all necessary networking code. The main game loop will be an infinite loop that will call the starting menu loop function and then the starting game loop function. The loop will break if either function returns the GAME_EXIT value. If GAME_EXIT is not returned by either function the infinite loop will insure that the other function will be called. The termination will be handle by a function called Termination. This function will clean up the networking code that was set up by the Initialization function.
All the data that will be used for the client part of our code, will be instantiated in the client main. No data is needed for this function.
Client main()
{
//initiate main data here.
UI_ClientFrontEnd menu;
Initialize();
While (1)
{
if(menu.run(Hinstance window, mainData * theWorld) ==
GAME_EXIT)
break;
if(GameLoop(mainData * theWorld) == GAME_EXIT)
break;
}
Termination();
Return (0);
}
void
Initialize(mainData *theWorld);
The Initialize function has the job of setting up all engines needed before the menu window is called. At this point, the only engine that needs to be called is the network engine. Since the menu and the game are going to exist in different windows, the only thing that they both need is networking. Otherwise, setting up functionality for the two different windows when there is a possibility that one of those windows will not be used (users decides not to play once in the menu) is going to slow down initialization time.
The initalize function needs a pointer to the main data
structure. This is for networking. The networking needs to know everything
about the environment and any data changes.
void
Initialize(mainData *theWorld)
{
initNetworking(theWorld);
}
void Termination();
The Termination function closes all the engines that Initialize() calls. The only engine that is need to be closed is the Network engine. No data is need and none is returned.
void Termination()
{
closeNetwork();
}
menu.run(Hinstance window,
mainData *theWorld);
The function menu.run() will make the front end window and system. The basic idea of this function is to initialize the menu window, run in a loop, and terminate the window when the user decides to play the game or exit out of the program. To learn more on the menu system, please go to the front-end section of this document.
GameLoop(mainData *
theWorld);
The GameLoop function controls the flow for everything in-game. The function will first call GameInit() which will initialize everything for in-game use. A infinite loop will handle the drawing, updating input, updating physics, and updating collision. When the update for input receives the data for exiting the game, the loop will break and GameTerminate function is called. This function will close down the window and anything else game specific.
The data need for GameLoop is a pointer to the main data
structure. The main data structure was
design to work with the game loop since everything changed in game must be
stored and passed on to other engines.
GameLoop(mainData *
theWorld)
{
GameInit(theWorld);
While(1)
{
if(peekmessage(…))
{
~~~~~ (handle message)
}
else
{
if(!drawGame)
return error; //draw failed
else
{
//waste unnesccessary cycles here
UpdateInput();
ret = handleInput();
UpdatePhysics();
UpdateCollision();
//includes setting,current menu , iplists, ship, name, ect
if(ret == RET_MENU || ret == EXIT)
break;
}
}
GameTerminate();
}
GameInit(mainData *
theWorld);
This function sets up all the data in the mainData structure to be used for the game. GameInit will also set up the game window. It is here where all game related engines would get called to set up the client side of the game. There are two engines that need to be set up, audio and input. The server handles other engines, like physics and collision, and the client application will not have a need for them. Also the function makes calls to load in the ship models and the ship template.
GameInit(mainData *
theWorld)
{
initopenGl();
createGLwindow();
associateGLextensions();
InitAudio(theWorld.GLinstance);
InitInput();
LoadShipModels(theWorld);
LoadShipTemplates(theWorld);
}
GameTermination(mainData
*theWorld);
The GameTermination function closes and frees up any memory allocated by the functions in GameInit(). The main data is needed so that it can be properly freed.
After this function is done, no new data is returned. No data period.
GameTermination(mainData
*theWorld)
{
GlTermiate();
CloseAudio();
UnloadShipModels();
UnloadTemplates();
}
Server
void serverMain();
The serverMain function is the control loop for the dedicated server. This function’s main purpose is to instantiate the main data structure and calls all the high-level functions while the server is running. Before the server goes into its game loop, it must do five things; create an empty window, prompt the user for some game related information, load the ship templates, load the user stats, and initialize the network. When the game loop is broken, meaning the server has been asked to quite, a close network function will be called to release any networking objects. After the network has been closed, a function will delete the ship templates.
Void serverMain()
{
mainData * theWorld
CreateBlankWindow(theWorld);
SetServer(theWorld);
LoadShipTemplates(theWorld);
LoadUserStats(theWorld);
InitNetwork(theWorld);
SeverGameLoop(theWorld);
CloseNetwork(theWorld);
UnloadShipTemplate(theWorld);
}
void ServerGameLoop();
The function ServerGameLoop controls the persistent environment created by the dedicated server. Done in an infinite while loop, the function will repeatedly check and handle all the game’s statistics, physics, collision, and A.I. After updating, a networking function call will send out all the updates to all the appropriate clients. ServerGameLoop will need a pointer to the main data structure, so that it has access to all the players, networking, and A.I. data. Since this function is of the highest level, it will return nothing and will not physically change any main data, just pass it along to different tools.
void ServerGameLoop(mainData
* theWorld)
{
CreateAIBots();
While(1)
{
if(peekmessage(…))
{
~~~~~ (handle message)
}
else
{
SaveUserStats(theWorld);
UpDateCollision(theWorld);
UpDatePhysics(theWorld);
UpDateAI(theWorld);
UpDate(theWorld);
SendUpDatesToClients(theWorld);
}
}
}
Game Object Data
Data Types
typedef GLfloat Point3D[3];
typedef unsigned int
Triangle[3];
typedef GLfloat
GLPoint2D[2];
typedef GLfloat
GLPoint3D[3];
typedef GLuint GLInt3D[3];
typedef FILE *NS_FILE;
Data Structures
Structures
struct MainData
{
//these are the game objects that change in-game data
list<PLAYER> playerList; //contains ship list
list<PROJECTILE> projectileList;
list<char *> chatstrings;
MAP theMap;
MAPOBJ *tileArray;
Model *shipModelArray;
Model *projectileModelArray;
Arena theArena;
//these are interface objects that let us directly interact
with the game
DInput input; //
Main Input Object, the "DirectInput Class"
GLClass glObject; // Main Graphics Object, the
"OpenGL Class"
MoviePlayer mPlayer; // Movie Frame Grabber to display
movies
AudioClass audio; // Object that plays music and sound
files
Camera camera; // Object to change where the view is
set
}
struct MAP
{
TILE
*ptile;
int
width, height;
};
struct LINE2D
{
float x1,y1,x2,y2;
};
Classes
Inheritance Charts
Classes derived from other classes are depicted as containing that class.
SHIP derived from OBJ derived from GEOMOBJ
PROJECTILE derived from OBJ derived from GEOMOBJ
MAPOBJ derived from GEOMOBJ
Class Definitions
class GEOMOBJ
{
private:
POINT3D
position;
POINT3D
rotation;
float scale;
Model
*pModel;
AnimData animation;
public:
//write functions here
};
class OBJ : public GEOMOBJ
{
private:
float mass;
float centerMass;
float acceleration;
float angAcceleration;
float velocity;
float angVelocity;
int ownerID;
int objectID;
float radius;
public:
//write functions here
};
class SHIP : public OBJ
{
private:
int armor;
int weapon;
float mainThrust;
float turning;
float topSpeed;
float firingRate;
float weaponDrain;
float weaponSpread;
public:
//write functions here
};
class PROJECTILE : public
OBJ
{
private:
float damage;
bool doesBounce;
float lifeSpan; // (time) (-1 == infinite)
int collisionType; // (Bullet,Bomb,Power-up)
public:
//write functions here
};
class PLAYER
{
private:
int handle;
int score;
int bounty;
int team;
int kills;
int deaths;
float avgBountyKilled;
int maxPersonalBounty;
int maxKilledBounty;
int rank;
SHIP theShip;
public:
//write functions here
};
Class MAPOBJ : public
GEOMOBJ
{
private:
int numCollisionLines;
LINE2D *pLine; //
pLine[numCollisionLines];
bool doesBounce;
float elasticity; // (=1.0) (multiply by velocity)
bool safeArea;
public:
//write functions here
};
Data Flow
There are two main phases of data flow in NullSpace, the loading of the font end window and loading of the OpenGL “game” window. The Front End window will be loaded into virtual memory first. This window will be using windows GDIs and will not need to have any other data loaded in with it except for a few options to be read in from a text file. The OpenGL window will be loaded into virtual memory after the Front End winow has been destroyed. Also loaded into virtual memory, at this point, are the Null Space Arena file (.nsa) and any Null Space Model files (.nsm). When the user quits the game back the menu system, the OpenGL window is destroyed and the Front End window is loaded back into virtual memory.
Game Physics and
Statistics
Physics
Overview
Physics is the lifeblood for any type of simulation game. Without it, a sim is simply not, for lack of a better word, a sim. Seeing a ship drift through space after accelerating to a high velocity is an act of physics at work. Another example would be seeing a ship move slightly in a certain direction after impact from a missile. There are many factors to be considered in writing a physics engine.
NullSpace will need several functions written that represent Newtonian physics that will be applied to all objects that contain certain variables. These variables are an object’s mass, center of mass, acceleration, angular acceleration, velocity, angular velocity, position, and elasticity.
· Mass: The weight of an object.
· Center of Mass: Point representing the mean position of the matter in an object.
· Acceleration: The rate of change of velocity with respect to time.
· Angular Acceleration: The rate of change of the angular velocity with respect to time.
· Velocity: The speed (magnitude) and direction of an object.
· Angular Velocity: The speed and direction of rotation of an object.
· Position: Object’s X and Y position in 3D space.
· Elasticity: The amount of “bounce” an object applies to another object. For example, a ship colliding into a wall with an elasticity of 0 would not bounce off the wall; it would come to a complete stop. If the wall had an elasticity of 1, then the ship would bounce of the wall at a new angle and continue with its current velocity. For a picture example, look at the Phy_CalcElasticityVelocity() function explanation.
Velocities and accelerations are manipulated through the actions of movement (thrusting) and collisions. Ships will have side, fore, and aft thrusters. Activating your side thrusters will make the ship turn (rotate), therefore affecting the angular velocity and angular acceleration. Using the fore or aft thrusters will change your forward and backward velocities and acceleration. All the other properties listed above will be handled within the physics functions.
There are two main sections within the game that will rely on the physics engine for its calculations: Input and Collision. Collision will rely heavily upon physics because it is used to resolve all collision types. Input will make calls to the two update functions: Phy_UpdateVelocity() and Phy_UpdatePosition(). Collision on the other hand will make calls to all the physics functions that are provided. The physics engine itself will not rely too heavily upon any one section in the game, just the information passed in through the function calls, which can be called from anywhere within the game.
Game Specific Functions
void UpdatePhysics( list *pShips, list *pProjectiles );
This function will be used to call non-game specific physics functions. When objects need to be updated every frame, a call to this function will renew all objects’ velocities and positions. This function will need the list of ship and projectile objects.
All-purpose Functions
float Phy_UpdateVelocity(
float accel, float vel, float time );
The purpose of this function will be to update an object’s velocity or angular velocity. The velocity of an object is its current speed and direction. An amount of acceleration is added to the object’s velocity depending on how much time has elapsed since the last call to velocity update function. For example, if exactly one second has passed, then the full acceleration would be added to the velocity. Otherwise, a percentage of the acceleration would be added. Five seconds passed, then 500% of the acceleration will be added. Only .3 seconds have passed then 30% of the acceleration will be added.
If this function is not implemented then an object will never be able to reach full velocity or come to a complete stop.
Only three pieces of information will be needed in order for this function to do its job: the object’s acceleration, velocity, and the amount of elapsed time since the last call to this function for that specific object. After performing the calculations described above, a new velocity will be returned.
void Phy_UpdatePosition(
float vel, long *x, long *y );
This function will be used to update an object’s X and Y position based on its current velocity. The reason this function is needed is because the object is being moved based on its velocity, which gives the user a sense of true movement throughout the environment. There’s really nothing else that needs to be known about this function except for the variables that are passed in.
The object’s current velocity, a pointer to its X position, and a pointer to its Y position need to be passed in. The two given pointers will be modified within the function and are replaced with the object’s new X and Y position.
void
Phy_CalcForceFromVelAndMass( float vel, float mass, float *force );
Calculations of forces and their magnitudes play an important part in physics. In this function a force is calculated and returned to the caller through the pointer that was passed in. We need this function so that we can find the force that an object would exert onto another object. For example, if missile struck a ship, we would use the mass and velocity characteristics of a missile to compute the amount force that would be applied on the ship. We can now figure out how much rotation needs to be added and how much the ship needs to be shifted because of the impact.
All this needs to know in order to compute an object’s applied force is the object’s velocity and mass. A float pointer also needs to passed into the function to store the result of the computation and returned to the caller.
float
Phy_CalcForceRotational( float angleOfIncidence,
float force,
float mass,
float accel,
float angAccel,
float angVel,
float *vel );
Phy_CalcForceRotational() will be used to calculate the amount of force needed to rotate an object, which will in turn, dictate how fast it rotates. For game purposes, when a ship is struck by something very powerful, it will cause the ship to spin uncontrollably until the player is able to regain control.
In order to use this function (we will use a missile and a ship as an example): we will need the missile’s force (power), the ship’s current mass, acceleration, angular acceleration, current angular velocity, and the angle of incidence. The angle of incidence is the angle at which the missile collides with the ship.
|
|
a < 90°, clockwise rotation |
a > 90°, counter-clockwise rotation |
|
|
|
|


If a = 90°, then a head collision has occurred and only the ships velocity will be modified. After impact, the ships angular velocity will be either increased, decreased, or remain the same along with a modification in the ship’s velocity. The ships new angular velocity will be a return value, while a pointer to the ship’s velocity is needed so it can be adjusted.
To perform a perfect turn left or turn right using this function a couple of defines will be provided. These are:
#define CCW_THRUST_ANGLE 180 // rotate ship counter-clockwise
#define CW_THRUST_ANGLE 0 // rotate ship clockwise
These two defines can be passed in as the angleOfIncidence parameter.
float
Phy_CalcElasticityVelocity( float vel, float elasticity );
The above function will calculate the new velocity of an object after colliding with another object with an elasticity factor. This is done by multiplying the two given variables passed in through the function call and returning the result. Elasticity will be a value from 0.0 to 1.0, with 0.0 being non-elastic (no bounce) and 1.0 having full elasticity (full bounce). For an example, look at the below picture.
|
|
Wall with elasticity of 0.0 |
Wall with elasticity of 1.0 |
|
|
|
|

Collision
Overview
This section will encompass all of the collision for ships, weapons, and power ups. The first priority in the collision, are the ships. Collision will be checked with all ships to see if they have collided with another ship, a weapon, a power-up, or a wall. Then, all weapons will be checked with the walls. This will be all the checking that needs to be done. For this task to be accomplished, it will need to be able to use the SHIP Data, Object Data, and the Level Data. In the OBJ data, the center point and radius are stored. Each ship and object has this and will be used for detecting collision.
The fact that you know exactly when and where a collision accrued, and with what objects, many other functions from other sections will need to be called from the collision functions. Some other sections that the collision section will communicate with are:
Physics
Physics functions will need to be called from the collision section because it will need to calculate forces, magnitudes, and the elasticity, so that it can appropriately assign the correct positions, velocities, and forces. The physics functions that will be used include: Phy_UpdateVelocity(), Phy_UpdatePosition(), Phy_ForceFromVelAndMass(), Phy_CalcForceRotational(), Phy_CalcElasticityVelocity().
Sound Effects
Different sound effects will by played for all types of collision to make a more realistic appeal. If a collision results in the destroying of a ship, a louder and longer sound effect would be played. The sound function to call that would play the sound effect would be something like SoundEfx_Play(“explosion”).
Special Effects
Collision between weapons and walls, weapons and ships, and ships to enemy ships, will trigger special effects to be displayed. If a collision results on a ship being destroyed, a bigger special effect would be displayed, in this case an explosion. The function that would be called in this case would be SpecialEfx_Start(location, EFFECT_NAME).
Scoring and Stats
If there were a collision that results in destroying an enemy ship, the player’s score and possibly ranking would increase. A collision between a ship and a power-up, and also the case of destroying an enemy ship, the player’s bounty points would increase. This will require that the collision function call CaculateNewBounty (PLAYER).
Energy
If there were a collision between a weapon and a ship, that ship’s energy would decrease. If there were a collision between two ships that are on different teams, both ship’s energy would decrease. The amount of energy that is decreased for the ship to ship collision depends on the speed at which the both ships are traveling. For example, a collision where both ships are traveling at high speeds would decrease their energy more than a collision where both are traveling at low speeds. For this the collision section will need to call EnergyShipCollide(PLAYER,FORCE1,FORCE2).
After there had been a collision, depending on the objects that collided, different things will happen. Possibilities include:
|
Ship to Ship This collision will be the most computational collision
routine. It will require computing the point of collision, finding the line
orthogonal to the collision circle where the point of collision lies, calling
physics functions to calculate both directional forces and angles, calling
another physics function to set the new positions and velocity vectors of the
ships, and calling the physics function to set the rotational forces. For a
better vision of this, take a look at figure 1. Where V is the Velocity
Vector of ship 1, R1 is the
Reflection Vector from collision (ship 1’s new vector), θ is the angle
of collision, R2 is the Resultant Direction Vector of ship 2 after collision,
and R3 is the Rotational Force that is applied to ship 2. R1 is calculated by
using the N, (the normal vector of the Line Orthogonal to the collision
point). R3 is calculated in a physics function, where the angle and force on
impact are sent. On collision, there would be a sound played. If ship 1 and
ship 2 were on different teams, then energy would be taken off both ships.
The amount of energy taken off would depend on the force of both ships and an
explosion would be displayed if the energy of a ship goes below the minimum
level. |
|
|
Ship to Wall & Weapon to Wall This collision routine will encompass a less computations than the previous one. All that is needed is the angle β and the Normal Vector to the wall (N), and then you can calculate the Reflection Vector (R). See figure 2. On collision, a sound would be played. For the weapon colliding into the wall, the same technique would be used. But, if the weapon property, DoesBounce, were not true, then on collision, there would be an explosion called and a sound played. |
|
|
Ship to Weapon & Ship to Power-Up This type of collision is trivial. When the ship collides with the weapon, an explosion function and sound function will be called. If the ship’s energy is depleted, then it will be a larger explosion, and the ship will be destroyed, the player who fired the weapon, their score and bounty points will be increased, which will be a function call. Ship to Power-Up is the same except no explosion would be called. A sound that you picked it up will be called, and your bounty points increased. And also the power-up added to your inventory. |
|
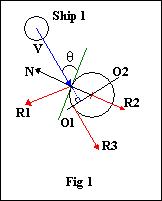
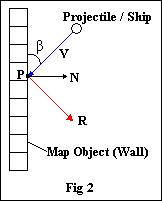
Game Specific Functions
void doCollision( SHIPOBJ,
PROJECTILEOBJ, MAPOBJ );
This is the main collision function that is called from the main game loop. This function serves as a placeholder for all other collision functions that follow. This helps simplify things by having all the collision functions inside one main function. The Ship Object, Projectile Object, and Map Object need to be passed into this function, so that the other functions inside can have access to them.
void Collision_Player(
SHIPOBJ, PROJECTILEOBJ, MAPOBJ );
This function will check the collision of ship-to-ship, ship to weapon, ship to power-up, and ship to wall. It will check this for every ship currently in the game. As you see, it takes the Ship Object, Projectile Object, and the Map Object. These are necessary in order to know the information that will be needed for collision detection. Inside this function, the fallowing functions will be called. Named accordingly.
int ship_ship( SHIPOBJLIST
);
int ship_projectile(
SHIPOBJLIST, PROJECTILEOBJLIST );
int ship_wall( SHIPOBJLIST,
MAPOBJ );
void Collision_Weapon(
PROJECTILEOBJ, MAPOBJ );
With the collision of ships already complete, the only other collision that needs to be checked is with Projectiles and Map Objects. So, the only data that we would need would be the Projectile Objects and the Map Objects. Please see Figure 2 in the previous section for a collision of a Projectile and a Map Object (wall).
All-Purpose Functions
int coll_CircleVector(
CenterPt, Radius, Vector, *IntersectPt );
This is the first one to be called when checking for
collision. It calculates the intersection point of a vector and a circle. To do
this it needs the center point and radius of the circle, and the vector. It
will return a 0 for no collision and a 1 it there was a collision. If there was
a collision, then the *IntersectPt would be filled with the correct
intersection point.
int getOrthVector( CenterPt,
Radius, PtOnCircle, *OrthVector );
This function, once the intersection point is known, will create an orthogonal vector to the circle. This will be used later on to get the normal vector. To get the orthogonal vector, it will need the center point and radius of the circle, and the point on the circle, which would be the intersection point. When the function is done, it will put the orthogonal vector into the *OrthVector and return 1. See O1 is figure 1.
int getNormalVector( Vector,
*NormalVector );
This function will use the orthogonal vector created above to find the normal vector. The normal vector will be perpendicular to the orthogonal vector. All it needs to do this is the orthogonal vector and will return the normal vector. See N is figure 1 and 2.
int getAngle( NormalVector,
Vector, *Angle );
It is necessary to have an angle of collision so that the reflection off of the objects is realistic. To get the angle, it will need the normal vector and another vector, and it will compute the angle between them and put it into *Angle. See β and θ in figure 1 and 2.
int getReflectionVector( NormalVector,
Angle, *ReflectionVector );
This final step of calculations is the resultant vector. This is the new vector that will be assigned to the ship, (or projectile), after collision. To calculate this, it would require the already computed normal vector and angle to return the reflection vector. See the reflection vectors R1 and R in figures 1 and 2.
Statistics
Null Space will depend on a very complicated system for creating statistics. There are many different stats a player will establish while playing. These stats are the players Max Bounty, Deaths, kills, the Death/Kill ratio, Avg. Kill Bounty, Highest bounty of an enemy the player killed. Using these statistics, harsh functions will be implement for a unique way of calculating a player’s score (rank). All the statistics will be game specific code. None of it can be used for any other project.
The statistics code for the game will be just a collection of functions. This subject is simply not large enough to be organized as a class or anything else.
Game
Specific Code
int calculate rank();
Calculate rank is a function that uses all the player’s stats to decide a placement which is represented in a point value. A high rank means that the player is doing better then other players with low rank. A mathematical function has been cleverly devised to decide the rank. This function will be passed in all the player stats and then using that data, in the math function, yet to be announced, to return the players rank.
int calculateRank(player
stats){
return (C1(maxBountyYou) +
C2(maxBountyThem )+ C3(kills * l)/(C4 + deaths));
}
where: C1 = 4.3, C2 = 6.98, C3 = 0.25 ,C4 = 1.68
note: these variables might be change depending on game play issues.
void CaculateNewBounty ();
After the player gets a frag, the bounty on their head will increase. To calculate this increase will depend on the bounty of the player they just fragged. The player should be rewarded more when they frag someone with a higher bounty and receive a smaller bounty increase when the Player frags an opponent with a smaller bounty. The function will need the player’s stats and the opponent stats.
CaculateNewBounty()
{
Bounty = theirBounty – yourBounty;
if
Bounty < 0 then
yourBounty += (C9(Them Bounty/ Your Bounty +C8));
else
yourBounty += Bounty(C7);
}
where: C7= 1 C8= 1C9 = 5
note: Once again, these variables might be change because of game play issues.
int calculate damage done();
This function will calculate the damage done to the player based about the power of the attack and the strength of the Player’s ship. The function will need data that tells the strength of the attack and the strength of the Player’s armor. To calculate the damage is easy, it’s just the strength of the weapon minus the strength of the armor.
int
CalculateDamageDone(player stats, attacker stats)
{
return WeaponStrength – PlayersArmor;
}
void recharge()
The shield of a player’s ship determines if he’ll survive an attack or not. When the player is not being hit by anything and is not firing, the shields will slowly recharge. This function will add the recharge rate to the shields of the player’s ship. The function will need the player’s stats.
void recharge(player stats)
{
shieldpower += rechargeRate;
}
Artificial
Intelligence
The AI in NullSpace is used primarily to create life-like bots for humans to face off against. The best way to do that given the time and resources will be a finite state machine and some A* pathfinding. At any given point in the game the bot AI will have a state. These states will be out of the following list:
Powering Up
Triggering Conditions: Medium to full energy, but not many power-ups.
Primary Goal: Find power-ups (aka multiprizes).
Secondarty Goal: Find targets with low energy for targeting.
Tertiary Goal: Avoid high-ranking targets.
Aggressive
Triggering Conditions: Near full energy, at least some power-ups.
Primary Goal: Find high-ranking targets.
Secondary Goal: Find power-ups.
Low Power
Triggering Conditions: Low energy.
Primary Goal: Avoid getting hit.
Secondary Goal: Avoid firing weapons.
Tertiary Goal: Find a Safe Area.
Chase:
Triggering Conditions: Good target aquired.
Primary Goal: Destroy target.
Secondary Goal: Avoid getting killed.
Evasive Manuever:
Triggering Conditions: Shots land within a certain radius.
Primary Goal: Evade getting hit
Secondary Goal: Return fire.
Tertiary Goal: Resume last state.
The current state dictates the priority of actions according to the above table. In order for those actions to take place, the AI will need certain information about enemy locations and velocities. It can get this straight out of the MainData, since all the AI bots will be running off the server, which also contains all the data on all ships in the game. The AI can be made easier and harder by multiplying various random error variables against various stages of the vector math necessary to predict where the enemy ships are heading.
The math needed would be straight prediction routines that would multiply current velocity vectors by time and adding to current positions to get future positions. The AI can guage how fast it can get up to a position and look for the inersection with the projected enemy position, and try to fire shots ahead of the player.
To make the firing patterns more realistic, when the AI bot thinks it has a good shot, it can fire a spread of shots to cover more area, in case the enemy ship tries to turn or avoid the shot.
Also, the AI bots can have special routines for the different power-ups. The following is a list of actions the AI bots can take depending on their state and the power-ups the ships have:
1. Repel – The AI can use these if it enters the Evasive Maneuver state and it detects enemies close by.
2. Brick – The AI can use these if it is in the Evasive Maneuver state and detects a ship directly behind it.
3. Warp Gate – The AI can use these if it is in the Evasive Maneuver state and trying to get away from a chaser.
4. Warp Disabler – The AI can use these if it is in a Chase state and doesn’t want to lose its target (thinks it has a shot).
The basic AI class would look like this:
#define AI_STATE_POWERUP
#define AI_STATE_AGGRESSIVE
#define AI_STATE_LOWPOWER
#define AI_STATE_CHASE
#define
AI_STATE_EVASIVEMANEUVER
class AI_Bot {
int m_current_state;
int m_previous_state;
int m_current_target;
public:
AI_Bot();
~AI_Bot();
Update(MainData * theWorld);
};
It would contain all functionality and state information internally, and multiple bots can be created by making multiple instances of the class, 1 for each bot. Each iteration of the main game loop, each AI’s update function should be called with a pointer to the main data.
Game Specific
Functions
int pathFinding(TILE *tile)
Our pathfing algorithm will be based off of A *. The basic idea is to use the tile based maps as a way for the A.I. bot to find it’s opponent. When nothing is between the A.I. bot and it’s opponent, a straight line can be used to find out the angle at which the bot must turn to head towards/away from an opponent. However, there is a good chance that an obsticle will be in the way. This is where the pathfinding will be most important.
The A * algorithm checks the surrounding tiles of the bot. If the tile being check is a legal tile, meaning the bot can move there and it hasn’t been checked yet, then the algorithm will recursively call itself using that tile. The recursion will stop when one of three things occur, the oppenont has been found, a dead end was found, or if the algorithm is recursively called to its limit. The limit will be a constant.
Every time the function is called on a tile farther away from the bot, the constant will be decreased. When the constant becomes zero, it indicates that this tile is way too far from the A.I. bot to consider. This constant will be defined later after some play testing, but for now it can be 10. The function will take a TILE and use it as a base to check all the tiles around it. The function returns the tile of the best choice of where the bot should move.
void ChoseAction()
ChoseAction will call pathfinding to see where it’s opponent is. Once the location of the opponent is found, this function will take into consideration all the stats of the bot and make a choice. To see the list of choices a bot can make, see the beginning of the Artifical Intellegnce section. ChoseAction will need the bot data and a list of players, so it can choose a target. This function will not return anything.
Multiplayer
Connection Methods
and Protocols
Multiplayer is the predominant part of the game; a network connection must be established for a person to be able to play at all. The surest way to give the user reliable connection at the sacrifice of a little speed is by using the TCP/IP protocol. This is accomplished in the code using the windows sockets API WinSock.
The game is broken up into two individual executables: the server executable and the client executable. Once a server is run, client executables can connect to that server by the user inputting the IP address of the machine the server is running on. The client executables contain the majority of the game’s graphics, input, and sound routines, as that is what each player will run to play the game. Information is sent in the form of network packets between the two computers to establish first a connection and then to send the game’s data.
When the player first runs the client executable, they will be presented with a menu allowing them to input an IP address of a known server. All IP addresses in the list are periodically checked for latency, so that the player gets a good idea of how their connection fares to each server executable. They are also presented with other game options such as selecting a name and ship, and then they submit the information to the server of their choice. When a person first creates a server they are presented with a menu of options to select server settings (max number of players, max number of ai bots, limited camera angle, etc.) and then when the select “start,” these options are no longer made available to them because the game has begun.
Connection
Configuration
The Multiplayer environment of NullSpace is persistent. That is to say, clients can connect and disconnect as they please and the server will continue running the world without them. Up to a server-specified number of players, the server will supply AI bots to fill in however many players are missing. If enough players join that this limit is exceeded, the AI bots would no longer respawn when destroyed. Therefore it is imperative in the construction process to properly connect and disconnect players, thereby freeing memory, as well as keeping track of players that may have timed out.
If, for whatever reason, the server becomes disconnected, all clients must recognize that the server timed out and then properly close off all the data and report an error, bringing the player back to the menu.
Packet Types
There is one general type of packet with several variables contained inside of it in the form of unions. These unions allow the packet to contain a variety of data types in different orders, so long as there is a header byte specifying what type of packet there is to follow. Another important feature for each packet to have is the ID of the player/computer that sent it. This allows for great ease of updating player data depending on which packet was received.
Again, depending on the packet type, some packets are sent nearly every game loop to keep all players updated. If a packet needs to be sent often like this, it will contain information about as many players as possible so that it doesn’t need to be sent quite as often. The reason for this is that internally a lot of data is added to each packet by the network protocol to assure that it gets to the proper destination. Therefore, by sending more packets when one could cram them all into one adds a staggering amount of unecessary headers and effectively slows the entire process down.
As the multiplayer needs to be available over the Internet, which is highly unstable, it is a genuine concern that packets will be lost. By using the TCP/IP protocol, any packets that are lost are internally sent again until they are confirmed received. This, while it slightly slows down the overall process, guarantees that all important packets will be received if there is something on the other end to receive them.
Broadcast vs Direct
Messages
One major consideration is whether or not to use broadcast messages to find servers. Because this game is designed to be run over the Internet, it was felt unecessary to broadcast messages (which is limited to LANs) in order to be able to find servers. If this was a more mainstream game, an executable would be set up on a static server to receive any requests for NullSpace games, of which it would have a list because every time a NullSpace server was hosted it would let this executable know. It suffices for now to just display the current server’s IP address when it is run so that players know what IP address to connect to.
Networking Specifics
Any specifics on what sort of packets are to be sent and the general implementation of the Networking Engine are included in the Networking API section of the document.
User Interface
Overview
The User Interface can be broken down into 2 sub-sections. The first is the front end. The front end is what the user first sees when he/she starts NullSpace. The front end will be contained in a window that pops up on the user’s desktop (as opposed to immediately going full screen). It will utilize Windows Controls and Win32 APIs in order to create a window that is recognizable and easy to use, in the standard Microsoft Windows style.
The second sub-section is the in-game UI, which will be quite different. Once the user has setup the game in the manner he/she wants, then the user will press a button to start the game. At this point, the main game window will open and the game will go full screen. All the graphics from this point on use the OpenGL APIs. This means that no longer can NullSpace rely on Windows controls to display UI information. All code from this point on will have to be written from scratch.
Front End (Game
Shell)
Overview
The front end is everything the user needs to get an actual gameplay session up and running. There are two Front ends, one for the server app and one for the client app. They both share from the same pool of basic UI elements, which are considered non-game specific.
All-purpose
This is the full list of available UI elements. Each of these will be entirely sefl contained in separate classes:
1.
class UI_TrackBar
2.
class UI_ListView
3.
class UI_IPAddress
4.
class UI_TextBox
5.
class UI_RadioButton
6.
class UI_Button
7.
class UI_CheckBox
8.
class UI_Bitmap
9.
class UI_Image
Each class, except UI_Bitmap and UI_Image, will be inherited from the following pure virtual class:
class UI_FrontEndBase {
private:
HWND m_hwnd;
int m_left;
int m_top;
int m_width;
int m_height;
public:
UI_FrontEndBase();
~UI_FrontEndBase();
virtual bool Create(
HWND
parenthwnd,
HINSTANCE
parenthinst,
int
left,
int
top,
int
width,
int
height) = 0;
virtual void Enable() = 0;
virtual void Disable() = 0;
};
UI_FrontEndBase::UI_FrontEndBase();
This is the constructor for this class. It will set all the internal variables to 0 or NULL.
UI_FrontEndBase::~UI_FrontEndBase();
This is the deconstructor for this class. It does nothing.
bool UI_FrontEndBase::Create(HWND
parenthwnd, HINSTANCE parenthinst,
int left, int top, int
width, int height);
This function will create the window associated with the control. It will also establish the controls position and size on the screen and draw it. The parenthwnd is the HWND of the window that owns this control. The parenthinst is the hInstance of the window that owns this control. The left and top define the upperleft corner’s x and y position in the client coordinates of the parent window. The width and height specify the x and y size of the control, respectively. This function returns true on a successful window creation, and false on an unsuccessful one.
void UI_FrontEndBase::Enable();
This function will enable a control. It takes in nothing and returns nothing. When a control is enabled, it will act normally. See Disable() for further clarification.
void UI_FrontEndBase::Disable();
This function will disable a control. It takes nothing and returns nothing. When a control is disables, it will be greyed out and the user will be unable to interact with it. To re-enable the control, call UI_Enable()
Each inherited class will also have the appropriate access functions to get at the values that that control holds, as well as any functions needed to update the state or status of the control (like any WndProc message handlers).
class UI_TrackBar : public
UI_FrontEndBase {
private:
int m_min;
int m_max;
int m_pos;
public:
UI_TrackBar();
~UI_TrackBar();
void SetAll(int min, int max, int pos);
void GetAll(int &min, int &max, int &pos);
void SetPos(int pos);
int GetPos();
};
UI_TrackBar::UI_TrackBar();
This is the constructor for this class. Its only purpose will be to set all the internal variables to 0.
UI_TrackBar::~UI_TrackBar();
This is the deconstructor for this class. It will be empty, as it will not be needed for anything.
void UI_TrackBar::SetAll(int min, int
max, int pos);
This function will set all the variables that define a track bar. The min is the minimum value the track bar can be set to, which visually is the left extreme of the track bar. The max is the maximum value the track bar can be set to, which visually is the extreme right side of the track bar. The pos is the current position of the track bar, which visually is the tab that you can drag around that indicates what the track bar is currently set to. It returns nothing.
void UI_TrackBar::GetAll(int &min,
int &max, int &pos);
This function will get all the variables that the track bar currently has (what you can currently see drawn). The variables have the same meaning as the above function, and since they are all reference variables, they will be filled in by the function and nothing needs to be returned.
void UI_TrackBar::SetPos(int pos);
This function will set only the position of the track bar. As stated above, the position is what the track bar’s tab currently points to. It must be between min and max. It returns nothing.
int UI_TrackBar::GetPos();
This function will retreives the current posititon of a trackbar and returns it.
class UI_ListView : public
UI_FrontEndBase {
private:
int m_num_cols;
int m_num_items;
public:
UI_ListView();
~UI_ListView();
void AddColumn(char * name, int width, int order);
void AddItem(char * buffer, int item, int subitem);
void GetItem(char * buffer, int buffsize, itn item, int
subitem);
void RemoveRow(int item);
int GetSelection();
int GetCols();
int GetRows();
};
UI_ListView::UI_ListView ();
This is the constructor for this class. Its only purpose will be to set all the internal variables to 0.
UI_ListView::~UI_ListView ();
This is the deconstructor for this class. It will be empty, as it will not be needed for anything.
void UI_ListView::AddColumn(char *
name, int order);
This function will insert a column into a list view control. It will use the string in name as the column header. The width specifies the width of the column in pixels, and the oder specifies where it should try to insert this column. If order is set to 0, it will become the far left column, and all other columns will be moved to the right. If it is set higher, it will wedge between order-th column and the column after (ie if order was 1, it will wedge between the first and second columns, or after the first if there was no second, or first if there were no columns). Nothing is returned.
void UI_ListView::AddItem(char * name,
int item, int subitem);
This function will insert a new item into a list view control. An item can be defined as one entry in a given row for a given column. The row is given by item, and the column given by subitem. For example, an item of 0 and a subitem of 0 means the first row and the first column. To fill the other columns in for a given row, make additional calls to AddItem with the subitem variable increasing by 1 each time. This function returns nothing.
void UI_ListView::GetItem(char *
buffer, int buffsize, int item, int subitem);
This function will retreive a given entry in a list view control. The entry is defined by the item, subitem pair in a similar fashion to the above AddItem() function. The item designates the item, and the subitem designates the column. This function fills in buffer with the string contained in the table at the specified location. There is no return value.
void UI_ListView::RemoveRow(int item);
This function will remove an entire row. The row is specified by item. There is no return value.
int UI_ListView::GetSelection();
This function will retreive the currently selected row in the table and return it. If there is no row selected (or no rows present) it will return –1.
int UI_ListView::GetRows();
This function returns the number of rows in the list view.
int UI_ListView::GetCols();
This function returns the number of columns in the list view.
class UI_IPAddress : public
UI_FrontEndBase {
private:
public:
UI_IPAddress ();
~UI_IPAddress ();
void GetIPString(char * buffer, int buffsize);
DWORD GetIPDWORD();
};
UI_IPAddress::UI_IPAddress();
This is the constructor for this class. It is empty.
UI_IPAddress::~UI_IPAddress();
This is the deconstructor for this class. It is emtpy.
void UI_IPAddress::GetIPString(char *
buffer, int bufsize);
This function will retreive the IP address from the IP Address control (all automated by Windows Common Controls) and place it into a string in the common xxx.xxx.xxx.xxx format. The maximum size of this string is therefore 15 + \0 = 16 bytes. The minimum size is 7 + \0 = 8 bytes. The size of the buffer needs to be passed in as bufsize. Nothing is returned.
DWORD UI_IPAddress::GetIPDWORD();
This function will retreive the IP address from the IP Address control (all automated by Windows Common Controls) and place it into a DWORD. This is the IP Common Control’s deafult format where you can use the FIRST_IPADDRESS(DWORD), SECOND_IPADDRESS(DWORD), THIRD_ IPADDRESS(DWORD), and FOURTH_ IPADDRESS(DWORD) macros to get the individual IP bytes out of it. Nothing is returned.
class UI_TextBox : public
UI_FrontEndBase {
private:
public:
UI_TextBox();
~UI_TextBox();
void GetText(char * buffer, int bufsize);
void SetText(char * buffer);
};
UI_TextBox::UI_TextBox();
This is the constructor for this class. It is empty.
UI_TextBox::~UI_TextBox();
This is the deconstructor for this class. It is emtpy.
void UI_TextBox::GetText(char * buffer,
int bufsize);
This function will retreive the IP address from the IP Address control (all automated by Windows Common Controls) and place it into a string in the common xxx.xxx.xxx.xxx format. The maximum size of this string is therefore 15 + \0 = 16 bytes. The minimum size is 7 + \0 = 8 bytes. The size of the buffer needs to be passed in as bufsize. Nothing is returned.
void UI_TextBox::SetTest(char *
buffer);
This function will retreive set the text in a text box. It copies out the NULL-terminated string in buffer. It returns nothing.
class UI_RadioButton :
public UI_FrontEndBase {
private:
public:
UI_RadioButton();
~UI_RadioButton();
bool Get();
void Set(bool state);
};
UI_RadioButton::UI_RadioButton();
This is the constructor for this class. It is empty.
UI_RadioButton::~UI_RadioButton();
This is the deconstructor for this class. It is emtpy.
bool UI_RadioButton::Get();
This function will retreive the setting of the radio button and return it. A return value of true indicates a filled in radio button. A return value of false indicates a cleared radio button.
void UI_RadioButton::Set(bool state);
This function will set the value of a radio button to the passed in state. A value of true lights up the radio button, while a value of false clears it. It returns nothing.
class UI_Button : public
UI_Button {
private:
public:
UI_Button();
~UI_Button();
bool IsPressed(LPARAM lParam, WPARAM wParam);
void SetButtonText(char * text);
};
UI_Button::UI_Button();
This is the constructor for this class. It is empty.
UI_Button::~UI_Button();
This is the deconstructor for this class. It is emtpy.
bool UI_Button::IsPressed(LPARAM
lParam, WPARAM wParam);
This function will return weather or not the button has been pressed. This function should be called within the WM_COMMAND message in the parent window’s WndProc, and the WM_COMMAND’s LPARAM and WPARAM should be passed in as parameters. It will return true when the button has been pressed, and false when it has not.
bool UI_Button::SetButtonText(char *
text);
This function will set the text in the button to the passed in Null-terminated string text. Nothing is returned.
class UI_CheckBox : public
UI_CheckBox{
private:
public:
UI_CheckBox();
~UI_CheckBox();
bool Get();
void Set(bool state);
};
UI_CheckBox::UI_CheckBox();
This is the constructor for this class. It is empty.
UI_CheckBox::~UI_CheckBox();
This is the deconstructor for this class. It is emtpy.
bool UI_CheckBox::Get();
This function will return true when the check box is checked, and false otherwise.
void UI_CheckBox::Set(bool state);
This function will set the check box to checked (true) or unchecked (false) depending on the value of state. It returns nothing.
class UI_Bitmap {
int m_width, m_height;
int m_pitch;
uchar * m_bits;
uchar * m_mask;
void DeleteBuffers();
public:
UI_Bitmap();
~UI_Bitmap();
void Clear();
void SetSize(int width, int height, bool mask);
void GetSize(int &width, int &height);
uchar * GetBitPointer();
uchar * GetLinePointer(int line);
uchar * GetMaskBitPointer();
uchar * GetMaskLinePointer(int line);
bool LoadBMPFromFile(char * filename,
uchar mode = LOAD_BMP_COLORKEY_NONE,
int ck_x = -1,
int ck_y = -1);
bool LoadBMPFromBuffer(uchar * buffer,
uchar mode = LOAD_BMP_COLORKEY_NONE,
int ck_x = -1,
int ck_y = -1);
int GetPitch();
bool hasMask();
};
This class will be the only class usable by both the front end and in-game UIs. It is a generic BMP file loader. Once loaded, the front end and the in-game will each have to have their own wrapper class to deal with the bitmaps. It has the following defines (for the loading mode):
#define
LOAD_BMP_COLORKEY_NONE 0
#define LOAD_BMP_COLORKEY_UPPERLEFT 1
#define
LOAD_BMP_COLORKEY_LOWERLEFT 2
#define
LOAD_BMP_COLORKEY_UPPERRIGHT 3
#define
LOAD_BMP_COLORKEY_LOWERRIGHT 4
#define
LOAD_BMP_COLORKEY_CENTER 5
#define
LOAD_BMP_COLORKEY_ARBITRARY 6
These defines allow the user to define a color to use as the colorkey, allowing a mask image to be generated concurrently that allows transparency against any single color in the image. The class itself uses default values of no masking, so the masking parameters need only be included if you want to define a mask. The ck_x and ck_y values specify which pixel contains the color key value, and are only used if the LOAD_BMP_COLORKEY_ARBITRARY flag is passed in.
UI_Bitmap::UI_Bitmap();
The constructor sets up the variables to starting values to 0 or NULL.
UI_Bitmap::~UI_Bitmap();
The deconstructor calls DeleteBuffers().
void UI_Bitmap::DeleteBuffers();
This checks for the existence of buffers, and if they exist, it frees them. This should be called only destroy all data (like when the class is being destroyed, hence why it is private and not public).
void UI_Bitmap::Clear();
This function clears out the bitmap to 0. If there is a mask, it clears that out to 0 as well.
void UI_Bitmap::SetSize(int width, int
height, bool mask);
This function resizes the bitmap, effectively destroying whatever was contained before. It takes in a new width and height, and a boolean that is true if there should be a separate mask image, and false if not. Before returning, it calls Clear().
void UI_Bitmap::GetSize(int &width,
int &height);
This function takes two int’s via reference parameters, and fills them in with the image’s current width and height.
uchar * UI_Bitmap::GetBitPointer();
This function returns a pointer to the bits of the image. The image is in RGBA format, so every 4 bytes is a new pixel (and no padding is needed). The pitch is the width of the image * 4 (as stated, no padding neccessary).
uchar * UI_Bitmap::GetLinePointer(int
line);
This function will return a pointer to a particular line of the bitmap. This is useful since a bitmap is usually stored upside down. The rules from the above function apply.
uchar * UI_Bitmap::GetMaskBitPointer();
This is the same as GetBitPointer(), only it points to the first byte of the mask.
uchar * UI_Bitmap::GetMaskLinePointer(int
line);
This is the same as GetLinePointer(), only it points to the start of line “line” in the mask.
bool UI_Bitmap::LoadBMPFromFile(char * filename, uchar mode, int ck_x, int ck_y);
This loads a Windows Bitmap file from a given filename (null-terminated) into the a memory buffer. That buffer is then passed into LoadBMPFromBuffer() (below) along with all the parameters passed into this function. It returns true if it successfully loaded the image, and false if there was an error with the file.
bool UI_Bitmap::LoadBMPFromBuffer(uchar * buffer, uchar
mode, int ck_x, int ck_y);
This loads a Windows Bitmap file from a given memory buffer containing a memory-mapped BMP file. IT MUST BE AN ENTIRE, VALID BITMAP. This will destroy any bitmap currently held by this class. The mode parameter should be one of the above defines, and tells the class whether or not to generate a mask for the image. A mask will take the given pixel (one of the corners, the center, or an arbitrary point (ck_x, ck_y), and use that color as a color key. Any time that color shows up in the bitmap, the mask will have that pixel set to white, and all other pixels set to black. Also, the image will have that color overwritten with black as it is processed. It returns true if there were no problems at any point, and false otherwise.
int UI_Bitmap::GetPitch();
This returns the pitch of the image. The pitch is basically width * number of color channels. Assuming the number of color channels is 4 (default), there is no padding on the end.
bool UI_Bitmap::hasMask();
This returns true if the image has a secondary mask image, and false otherwise.
class UI_Image {
private:
UI_Bitmap m_bmp;
int m_x, m_y;
public:
UI_Image();
~UI_Image();
bool LoadFromFile(char * filename, uchar mode, int ck_x, int
ck_y);
bool LoadFromBuffer(uchar * buffer, uchar mode, int ck_x, int
ck_y);
void SetPos(int x, int y);
void GetPos(int x, int y);
void GetSize(int &width, int &height);
void Draw(HDC hdc);
};
UI_Image::UI_Image();
This is the constructor for the class. This sets m_x and m_y to 0.
UI_Image::~UI_Image();
This is the deconstructor, and does nothing.
bool UI_Image::LoadFromFile(char *
filename, uchar mode, int ck_x, int ck_y);
This will call and return m_bmp.LoadBMPFromFile(), passing in all parameters.
bool UI_Image::LoadFromBuffer(uchar *
buffer, uchar mode, int ck_x, int ck_y);
This will call and return m_bmp.LoadBMPFromBuffer(), passing in all parameters.
void UI_Image::SetPos(int x, int y);
This will set m_x and m_y to the passed in values. This changes the position offset when the Draw() is called (aka changes the bitmaps location within the client area of the window).
void UI_Image::GetPos(int &x, int
&y);
This will set the passed in parameters to m_x and m_y, giving the user access to the current position of the bitmap on the screen.
void UI_Image::GetSize(int &width,
int &height);
This will get the current size of the bitmap by passing the referenced parameters along in a m_bmp.GetSize(width, height) call.
void UI_Image::Draw(HDC hdc);
This will draw the bitmap onto the given HDC at location (m_x, m_y). This function returns nothing.
Game Specific
Server
The server app will need the following things:
1. Text Box
a. Map Filename
2. Track Bars
a. Max number of players allowed
b. Minimum number of players
3. Check Boxes
a. Allow Top-Down view
b. Allow First-Person view
c. Allow Chase (Three-Quarters) view
4. Button
a. Start Server (all other controls should be disabled when this is clicked, and the text will change to Stop Server)
The front end for the server will be handled by a single class.
class UI_ServerFrontEnd {
private:
UI_TextBox m_text_mapfile;
UI_TrackBar m_tb_maxplayers;
UI_TrackBar m_tb_minplayers;
UI_CheckBox m_cb_topdown;
UI_CheckBox m_cb_firstperson;
UI_CheckBox m_cb_chase;
UI_Button m_btn_start;
public:
UI_ServerFrontEnd();
~UI_ServerFrontEnd();
bool Create(HWND parenthwnd,
HINSTANCE parenthinst);
};
All values relating to the UI elements’ left/top and width/height will be #define’d in the frontend.h header file.
UI_ServerFrontEnd::UI_ServerFrontEnd();
UI_ServerFrontEnd::~UI_ServerFrontEnd();
bool UI_ServerFrontEnd::Create(HWND
parenthwnd, HINSTANCE parenthinst);
This will call Create() on ALL UI elements contained in this class, and pass in the parenthwnd, parenthinst, and then defines for left, top, width, and height for each element. It will return false if ANY Create() call fails. Otherwise, it will return true;
The Server Front End will also need a WndProc in order to handle the window messges associated with standard Windows Controls. This WndProc will be named ServerFrontEndWndProc, and will have access to the server’s MainData structure through a static pointer passed in at WM_CREATE. The UI_ServerFrontEnd.Create() call will be made during the ServerFrontEndWndProc’s WM_CREATE message. All necessary message handling of various windows messages will be placed into their appropriate sections.
In general, the ServerFrontEndWndProc needs the following functionality:
1. When the START button is pressed (m_btn_start), all other UI elements must have their values error checked.
a. Make sure at least one check box is checked.
b. Make sure the Map File in m_text_mapfile is a legitamate map file.
c. If no errors:
i. Disable all controls except start button.
ii. Change START button text to STOP.
iii. Start the server.
d. If there were errors:
i. Pop up MessageBox explaining the error
2. When the STOP button is pressed (start button while server is running):
a. Close down server.
b. Enable all controls
c. Change the STOP text back to START.
3. All other windows controls need to behave normally (enter text into a text box, clicking a check box toggles the check graphic, etc).
Client
Overview
The client app will need the following things:
1. Text Boxes
a. Handle
b. Password
2. Radio Buttons for Controls
a. Key Config 1
b. Key Config 2
3. Slider Bars
a. Music Volume
b. Sound Volume
4. List View – Server List
a. IP
b. Ping
c. Number of players
5. Buttons
a. Add Server
b. Remove Server
c. Refresh Servers
d. Start Game
6. IP Text Box
a. IP Address for adding a server
7. Ship Selection Area – Where the player can choose his/her ship
a. 9 radio buttons, each with a graphic
b. larger graphic area where the currently selected ship and its stats can be viewed.
The front end for the client will be handeled by a single class.
class UI_ClientFrontEnd {
private:
UI_TrackBar _tb_music;
UI_TrackBar _tb_sound;
UI_ListView _list_servers;
UI_IPAddress _ip_ipadd;
UI_TextBox _text_handle;
UI_TextBox _text_password;
UI_RadioButton m_rb_keyconfig1;
UI_RadioButton m_rb_keyconfig2;
UI_Button _btn_add;
UI_Button _btn_remove;
UI_Button _btn_refresh;
UI_RadioButton m_rb_ships[9];
UI_BMP _bmp_ships[9];
UI_BMP _bmp_shipstats[9];
bool
Create(HWND parenthwnd, HINSTANCE parenthinst);
public:
UI_ClinetFrontEnd();
~UI_ClientFrontEnd();
bool Run(HINSTANCE hinst, MainData * theWorld);
};
All values relating to the UI elements’ left/top and width/height will be #define’d in the frontend.h header file.
UI_ClientFrontEnd::UI_ClientFrontEnd();
UI_ClientFrontEnd::~UI_ClientFrontEnd();
bool UI_ClinetFrontEnd::Create(HWND
parenthwnd, HINSTANCE parenthinst);
This will call Create() on ALL UI elements contained in this class, and pass in the parenthwnd, parenthinst, and then defines for left, top, width, and height for each element. It will return false if ANY Create() call fails. Otherwise, it will return true;
bool UI_ClientFrontEnd::Run(HINSTANCE
hinst, MainData * theWorld);
Run is an entire message handling routine, from initialization to destruction, in one function. It should be called from the main game loop whenever the Front End menu should pop up. This will happen on start and between rounds. If this window is closed, the game is shut down. If the Start Game button is pressed, certain error checking will take place, and once the networking has establiched a connection to the server, the game will start. The return value indicates whether to start a game or to abort. When it returns true, a new game should be started. When it returns false, the user has closed the window and it is time to quit the game.
Run has the following flow:
1. Initialize all data, including loading graphics into UI_Images.
2. Call Create, creating all child windows.
3. Main Message Loop using Win32 Message Loop APIs:
a. GetMessage()
b. TranslateMessage()
c. DispatchMessage()
4. Clean up
5. Return true on enter game, false on quit.
The Client Front End relies on an internal WndProc function, ClientFrontEndWndProc. This function handles all the window messgaes for the standard controls, and also both creates and destroys them.
In general, the ClientFrontEndWndProc will have the following functionality:
1. When the Start Game button is pressed, all other UI elements must have their values error checked.
a. Make sure there is a username and password.
b. Make sure a server is selected.
c. If no errors:
i. Contact Server and request a connection.
ii. Wait for server to respond for 5 Seconds.
iii. If you get a good response enter the game (return true).
iv. If you get no response:
1. Display error MessageBox.
2. Go back to the menu.
v. If you get an error response:
1. Bad Password:
a. Error MessageBox
b. Go back to menu.
2. User doesn’t exist:
a. Create User? yes/no MessageBox:
i. Yes, enter game (return true).
ii. No, go back to the menu.
d. If there were errors:
i. Pop up MessageBox explaining the error
2. When the STOP button is pressed (start button while server is running):
a. Close down server.
b. Enable all controls
c. Change the STOP text back to START.
3. All other windows controls need to behave normally (enter text into a text box, clicking a check box toggles the check graphic, etc).
In Game (Main Play
Screens)
Overview
The in-game user interface is everything that the user sees that isn’t generated by the graphics engine. This includes the following elements:
The chat area – This is will be composed of a scroll back buffer and a text input field.
Energy meter – This is a bar at the top of the screen that has to convey three pieces of information: First, the player’s current energy level; second, the player’s current energy upper limit (aka their max level), and third, the largest upgrade the player can get to that upper limit.
Power-Up Info – This is an area on the left of the screen that displays different graphics depending on the current power-ups the player has obtained, and a count on the power-ups that have a limit.
Radar – This is an area on the right side of the screen that shows the player who is near his/her ship. It displays basic information about nearby walls, enemies, and teammates. The orientation of the radar is dependant on the current point-of-view:
Top-down – The radar will always have the same orientation as the map (which is stationary). There will be a “T” shape overlaid on the map that indicates the players heading.
Three-quarters & First-Person – The radar will have it’s “up” be the direction the player is currently facing, and all the information (walls, players, etc) will rotate around as the player turns. There will be a mark on the outside edge of the radar that indicated “north” on the map. There will also be a highlighted pie-wedge that indicates the player’s field of view.
The two different radar areas would look like this:
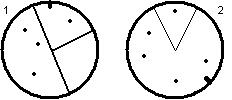
This boils down to the following user interface elements and properties:
Scroll Back Text Buffer
location, size, total lines of text, string array with all text
Text Box
location, size, text
Energy Meter
location, size, min, max, current value
Power-Up Info
location, array of the following:
power-up graphics
count, where:
0 means don’t draw the graphic,
-1 means inifinte, so draw the graphic with no text
Radar
location, size, texture containing current radar
This functionality will be contained in the following classes:
class glUI_ChatArea
class glUI_TextInput
class glUI_Radar
class glUI_EnergyMeter
class glUI_PowerUps
All these elements rely on certain underlying graphics functionality to exist. This functionality will need to be specifically written to use OpenGL, and can be summed up as follows:
1. The ability to display strings at any given location in any given font and color (text scrollback, text input)
2. The ability to display 2D bars of color (energy meter)
3. The ability to display small graphics quickly and efficiently (power-ups, radar)
4. The ability to access a texture and modify it on the pixel level (radar)
They will also expose certain functionality:
1. AddChatString – Add a chat string to the scrollback buffer (received from Networking)
2. SetTextInputString – Set the string in the input string box. Called everytime that string changes.
3. UpdateRadar – Draw a new picture of those around you.
4. UpdatePowerUps – Draw the pictures of those power-ups you currently have.
5. Draw – This needs to be called whenever the screen refreshes and everything is redrawn.
These game specific elements rely on underlying non-specific interfaces to OpenGL API calls. These elements are as follows:
class glUI_TextureManager;
class glUI_Font;
class glUI_Image;
class glUI_Frame;
class glUI_Text;
class glUI_TextBox;
The last four all inherit from:
class glUI_BaseElement;
That’s the most basic, so we’ll start there:
class glUI_BaseElement {
protected:
int m_x, m_y;
int m_width, m_height;
public:
glUI_BaseElement();
virtual void SetPosition(int x, int y);
virtual void GetPosition(int &x, int &y);
virtual void SetSize(int x, int y);
virtual void GetSize(int &x, int &y);
virtual void Draw() = 0;
virtual bool InitFromFile(char * filename, char * name,
GUITextureManager *tm);
virtual bool InitFromBuffer(char * buffer, int dwSize,
char * name,
GUITextureManager *tm) = 0;
};
glUI_BaseElement::glUI_BaseElement();
This constructor sets all the variables to 0.
void glUI_BaseElement::SetPosition(int
x, int y);
This function sets m_x and m_y (the position of the element) to the passed in x and y. It returns nothing.
void glUI_BaseElement::GetPosition(int
&x, int &y);
This function fills in the x and y with the current position of the element. It returns nothing.
void glUI_BaseElement::SetSize(int x,
int y);
This function sets the size of the element using x as width and y as height. It returns nothing.
void glUI_BaseElement::GetSize(int
&x, int &y);
This function fills in the x and y passed in with the size of the element, where x is width and y is height. It returns nothing.
void glUI_BaseElement::Draw();
This function will draw an element in OpenGL. It returns nothing.
bool
glUI_BaseElement::InitFromFile(char * filename, char * name, GUITextureManager *tm);
This function will load the file filename (null-terminated string) and load it into a memory buffer. It will then call the below InitFromBuffer() function, passing in the buffer, the buffer size, the name parameter, and the texture manager parameter, and get the return value. It will then free the buffer and return the return value from InitFromBuffer(). For more informaiton on the Texture Manager, see the below class definition for glUI_TextureManager
bool glUI_BaseElement::InitFromBuffer(char * buffer, int
dwSize, char * name, char * name, GUITextureManager *tm);
This function will initialize the element from a buffer memory that contains a string (usually the contents of a text file). This routine will be different for each UI element. The “name” passed in is the UI elements “name” in the text buffer. See the below discussion on reading in text files for further details. It returns true on success, false on failure (ie file not found).
Reading UI
information in from a file.
You can read the layout for UI elements out of a text file using the InitFromFile or InitFromBuffer commands (the File one calls the Buffer one anyways, so they are essentially the same thing).
Here is an example with two iamges:
--- dump of sample.txt ---
[image test01]
upperLeftX=10
upperLeftY=10
texture=background.bmp
[image text02]
upperLeftX=250
upperLeftY=250
texture=graphic1.bmp
--- end of dump ---
The name string that is passed into the InitFrom*() functions is the “text01” and “text02”. They specify inside the file which of the images to load.
The syntax for a frame is as follows:
--- dump of sample2.txt ---
[frame test01]
upperLeftX=50
upperLeftY=50
width=200
height=100
stretch=true
cornerWidth=16
cornerHeight=16
imageTopLeft=border_ul.bmp 0
0
imageTopRight=border_ur.bmp
0 0
imageBottomLeft=border_ll.bmp
0 0
imageBottomRight=border_lr.bmp
0 0
imageTop=border_st.bmp 0 0
imageBottom=border_sb.bmp 0
0
imageLeft=border_sl.bmp 0 0
imageRight=border_sr.bmp 0 0
--- end of dump ---
The “0 0” on the end of the image*= lines are the coordinates of the color key color to use for transparency. Leaving off the 0 0, like this:
imageRight=border_no_transparency.bmp
will cause the image to not using masking or transparency. If stretch is set to true, then the top, bottom, left, and right tiles will be stretched to fill the size of the frame. If set to false, then those graphics will be tiled to fill the area.
This base class relies in turn on this Texture Managing class and corresponding data type:
struct s_texture {
char key[MAX_KEY_LEN];
The
key is how the texture is located in a list.
In this case, it is the filename of the texture this structure
identifies. When looking for a texture,
you simply specify the name in this field, and if the texture is already loaded
into memory, the corresponding data will be filled in automatically. If it was not already loaded, it will be
loaded, and then the information is copied in.
Either way, you get your texture, and you reduce the number of file
accesses and memory used by duplicate textures.
bool has_mask;
The
has_mask is a flag to indicate if the texture includes a mask texture. Masks are used for transparency.
GLuint image;
This
is the OpenGL texture index for the main image.
GLuint mask;
This
is the OpenGL texture index for the image’s mask (usually image + 1)
int width;
This
is the width of the texture that image indexes.
int height;
This
is the height of the texture that image indexes.
int instances;
This
is the number of times this texture has been asked for. Each time you ask for a texture, you must
also free it. If it is NOT freed for
EACH access, then it will continue to use up memory. This is so different areas of code don’t have to communicate what
textures to carry over, so long as the same texture manager instance is
used. As long as everyone cleans up
after themselves, everything should be fine.
};
class glUI_TextureManager {
list<s_texture> m_texlist;
public:
glUI_TextureManager();
~ glUI_TextureManager();
int LoadFromBitmap( s_texture &tex, char *filename,
uchar mode = LOAD_BMP_COLORKEY_NONE,
int ck_x = -1, int ck_y = -1);
int Find(s_texture &tex);
int Delete(char *key);
};
glUI_TextureManager::glUI_TextureManager();
The constructor is empty.
glUI_TextureManager::~glGUI_TextureManager();
The desconstructor is emtpy.
int
glUI_TextureManager::LoadFromBitmap(s_texture &tex, char *filename,
uchar mode, int ck_x, int
ck_y);
This function loads a texture in from a bitmap file. If the file is already loaded, then it pulls the already loaded entry out of the texture list and copies it into the passed in s_texture structure. On success this function returns 1. On failure (ie the file didn’t load) it returns 0.
int glUI_TextureManager::Find(s_texture
&tex);
This function will search through the texture list for a texture with a key value the same as the one in the passed in texture structure. If there isn’t a similar bitmap, then it will return 0. If there is, it will fill in the passed in texture structure with the desired information and return 1;
int glUI_TextureManager::Delete(char
*key);
This function will delete a texture structure from the list with the given key value. If it is found and deleted it will return 1, otherwise it will return 0.
The next most basic element is the glUI_Font:
class glUI_Font {
private:
GLuint m_Base;
int m_Size;
int m_ScreenWidth;
int m_ScreenHeight;
int m_VResX;
int m_VResY;
char m_Fontname[MAX_FONTNAME_LEN];
GLuint MakeMeAFont();
HDC m_hdc;
HFONT m_font;
public:
glUI_Font();
~glUI_Font();
GLvoid SetFontName(const char * fontname);
GLvoid SetSize(int size);
GLvoid SetRes(int resX, int resY);
GLvoid SetScreen(int screenX, int screenY);
GLvoid GotoXY(int x, int y);
GLvoid GotoXYScreen(int x, int y);
GLuint Build(const char * fontname, int size, int resX, int
resY, int screenX, int screenY);
GLvoid Kill(GLvoid);
GLuint Rebuild();
GLvoid Print(const char *fmt, ...);
int GetHeight();
int GetStringSize(LPCTSTR lpString, int cbString, LPSIZE
lpSize);
};
The glUI_Font class uses some interesting techniques to keep font size relative to the screen as a whole, and not to the resolution.
1. The "VResX" and "VResY" specify the resolution in which to work. This should be constant across a project, and is a "virtual" resolution, as the hardware can be set to an entirely different resolution, but all the graphic elements remain relative to this "virtual" resolution.
2. The "ScreenWidth" and "ScreenHeight" specify the current resolution of the screen (viewport window thingie) in pixels.
3. The font "size" is the height in pixels relative to the VResX and VResY resolution. This guarantees that no matter what resolution you are in, the font will always be the same size and position relative to the total screen size (and not pixel size).
4. The GotoXY() function takes coordinates in terms of VResX and resY (making all of the font routines resolution independant).
The benefits of this method are to allow easy transitions among different resolutions. If one user decides they want to play at 800x600, and another at 1600x1200, the font should scale accordingly so the height in inches (not pixels) is the same across the board (assuming identical monitors, of course).
For example, assuming a virtual resolution of 1600x1200 and an actual resolution of 800x600, then text at position (50,50) will be drawn at pixel (25x25). Then if the screen changes resoution, and (25,25) moves becase the pixels are smaller, then the text won't move, because it will just recompute the position based on the "Virtual" res of 1600x1200. So, say we are now in 1600x1200, well then the text at (25,25) is now at (50,50) and to the user, it hasn't moved a bit.
Also, as you increase in resolution, the text will look better because it'll get rerendered at that higher resolution.
To get this functionality to work, you’ll have to call the SetScreen() and Rebuild() functions on all fonts you are using (see below function definitions).
glUI_Font::glUI_Font();
This is the font constructor. It sets everything to 0, NULL, or ‘\0’.
glUI_Font::~glUI_Font();
This is the font deconstructor. It calls Kill()
GLvoid glUI_Font::SetFontName(const
char * fontname);
This copys in the name of the font you want to use. IT DOES NOT CHANGE ANYTHING until you call Rebuild().
GLvoid glUI_Font::SetSize(int size);
This function sets the size of the font in vertical pixels (based on the virtual resolution). IT DOES NOT CHANGE ANYTHING until you call Rebuild().
GLvoid glUI_Font::SetRes(int resX, int
resY);
This function sets the virtual resolution you wish to work in. See the above discussion of the “virtual resolution” for further clarification. IT DOES NOT CHANGE ANYTHING until you call Rebuild().
GLvoid glUI_Font::SetScreen(int
screenX, int screenY);
This function sets the screen (non-virtual, actual pixels) size. See the above discussion of the “virtual resolution” for further clarification. IT DOES NOT CHANGE ANYTHING until you call Rebuild().
GLvoid glUI_Font::GotoXY(int x, int y);
This function moves the current cursor position (invisible) to the virtual resolution of (x, y). The cursor position is the lower left corner of where text created with the Print() function is drawn.
GLvoid glUI_Font::GotoXYScreen(int x,
int y);
This function moves the current cursor position to the actual pixel coordinates of (x, y). This is relative to the set screen resolution, and, if set improperly, can cause the coordinates to be inaccurate. The cursor position is the lower left corner of where text created with the Print() function is drawn.
GLuint glUI_Font::Build(const char *
fontname, int size,
int
resX, int resY, int screenX, int screenY);
This function will build a font with the given parameters. This will not change an already existing font. You must use Rebuild to do that. This is a quick way to get a font up and running for the first time in one function call. This function returns 1 on success (font created) and 0 on failure (no font).
GLvoid glUI_Font::Kill(GLvoid);
This function destroys a font, making it empty. It only really needs to be called by the deconstructor, but available to the brave user.
GLuint glUI_Font::Rebuild();
This function will rebuild a font from using any changed parameters (using SetFontName, SetSize, SetRes, or SetScreen functions). It is the only function that can change an already existing font. If called on an uninitialized font it will only create a new font if all variables are set to valid values. It returns 0 on failure (can’t create font with current parameters), and 1 on success (font created).
GLvoid glUI_Font::Print(const char
*fmt, ...);
This function is very similar to printf() in functionality (it actually uses sprintf() internally), but will draw the formatted string to the current cursor position in an OpenGL window. Use GotoXY() or GotoXYScreen() to move the cursor position. You can use any format options you use in any other printf() function, including %d, %.2x, etc.
int glUI_Font::GetHeight();
This function simply spits out the height of the current font.
int glUI_Font::GetStringSize(LPCTSTR
lpString, int cbString, LPSIZE lpSize);
This function will try to calculate how many pixels a given
string will take up. This value is in
Screen coordinates (actual pixels), not virtual, and is stored in dereferenced
lpSize variable. It basically calls the
Win32 API GetTextExtentPoint32() to retrieve its result, and will return the
same return values as that function, which is 0 on failure, and non-zero on
success.
class glUI_Image : public
glUI_BaseElement {
GLuint m_texImage;
GLuint m_texMask;
bool m_mask;
int m_texWidth, m_texHeight;
bool m_stretch;
public:
glUI_Image();
~glUI_Image();
virtual void Draw();
bool GetStretch();
void SetStretch(bool stretch);
void SetTexture(s_texture tex);
bool InitFromBuffer(char * buff, int size,
char * name,
GUITextureManager &tm);
};
glUI_Image::glUI_Image();
This is the constructor, which sets all variables to 0.
glUI_Image::~glUI_Image();
This is the deconstructor, which does nothing.
void glUI_Image::Draw();
Same purpose as the base class’s draw function, although tailored for an Image.
bool glUI_Image::GetStretch();
This function returns true if stretch is enabled, and false if stretch is not enabled (implying tiling is enabled instead). Stretching is where the bitmap is stretched to fit an area that is not the same size as the original image. In OpenGL it automatically filters the image using hardware filtering to smooth out any jagged edges created in the stretch.
void glUI_Image::SetStretch(bool
stretch);
This function sets the streth/tiling setting. If set to true, stretch will be enabled if there is a difference in the texture size vs. the desired area this image should fill. If set to false, then tiling will be used, where the image is tiled to fill the area, cropping the image wherever it hits an edge.
void glUI_Image::SetTexture(s_texture
tex);
This function sets the image’s texture (aka the image itself). You can get a texture from the tile manager, or use the below function to load it all from a file (or buffer as the case may be).
bool glUI_Image::InitFromBuffer(char * buff, int size,
char * name, GUITextureManager *tm);
This function initializes an image from a buffer. Using the base classes InitFromFile() function (which will call the class specific InitFromBuffer to do all the actual work), you can configure this bitmap from a file. The name string is a string to search for in the text file.
class glUI_Frame : public
glUI_BaseElement {
glUI_Image m_img[FRAME_TOTAL_BMPS];
int m_tilex, m_tiley;
bool m_stretch;
public:
glUI_Frame();
~glUI_Frame();
virtual void Draw();
bool Recenter();
void SetStretch(bool stretch);
bool GetStretch();
void GetBorderSize(int &x, int &y);
bool SetTexture(int bmp_index, s_texture tex);
virtual bool InitFromBuffer(char * buff, int dwSize,
char
* name, GUITextureManager &tm);
};
A Frame relies on the following defines to be present.
#define FRAME_TOPLEFT 0
#define FRAME_TOPRIGHT 1
#define FRAME_BOTTOMLEFT 2
#define FRAME_BOTTOMRIGHT 3
#define FRAME_LEFT 4
#define FRAME_RIGHT 5
#define FRAME_TOP 6
#define FRAME_BOTTOM 7
#define FRAME_TOTAL_BMPS 8
glUI_Frame::glUI_Frame();
This is the constructor, which sets all variables to 0.
glUI_Frame::~glUI_Frame();
This is the deconstructor, which does nothing.
void glUI_Frame::Draw();
This function draws the frame in the current OpenGL window. It returns nothing.
bool glUI_Frame::Recenter();
This function will recenter a frame, updating all the components of a frame (aka all 8 images). You HAVE to call this function after changing the size of the frame or its position.
void glUI_Frame::SetStretch(bool
stretch);
This will set the image son the top, right, left, and bottom to be stretched to fill the area (stretch = true) or to tile to fill the area (stretch = false).
bool glUI_Frame::GetStretch();
This will return the current stretch setting. True means stretch is enabled, and false means tiling is enabled.
void glUI_Frame::GetBorderSize(int
&x, int &y);
This will get the size of the border, which is essentially the width and height of any corner tile, assuming they are all the same size. This is so you know how much room is being taken up by the graphics in a frame (since the size specified by GetSize and SetSize is the outside border).
bool glUI_Frame::SetTexture(int
bmp_index, s_texture tex);
This sets any 1 individual texture. Use the above defines to specify which texture you are specifying. You can pass in a texture you get from a Texture Manager, or just use the below function to load it all out of a text file. This function returns true as long as bmp_index is valid. If it’s not, this function returns false.
bool glUI_Frame::InitFromBuffer(char *
buff, int dwSize,
char *
name, GUITextureManager *tm);
This function will load in all the variables and graphics associated with a frame from a text file (or buffer). You can use this with the glUI_BaseElement::InitFromFile routine to actually get a file (automatically calls class specific InitFromBuffer routine). Returns true if successful, false if not.
class glUI_Text : public
GUIBaseElement {
list<char *> m_stringlist;
int m_iCount;
glFont * m_font;
COLOR_RGB m_color;
public:
glUI_Text();
~glUI_Text();
void SetColor(float r, float g, float b);
void GetColor(float &r, float &g, float &b);
void SetPosition(int x, int y);
void SetString(char * string);
void ClearStrings();
void AddLineToTop(char * string);
void AddLineToBottom(char * string);
void RemoveTopLine();
void RemoveBottomLine();
void DeleteString();
void SetFont(glFont * font);
glFont * GetFont();
int GetStringSize(LPSIZE size);
virtual void Draw();
virtual bool InitFromBuffer(char * buff, int dwSize, char *
name, GUITextureManager *tm);
};
glUI_Text::glUI_Text();
This function is the constructor and initializes the variables to 0 or NULL.
glUI_Text::~glUI_Text();
This function is the deconstructor and does nothing.
void glUI_Text::SetColor(float r, float
g, float b);
This function will set the color of the text to an RGB value
specified by r, g, and b. Each r, g,
and b must be in the range 0.0 to 1.0.
void glUI_Text::GetColor(float &r,
float &g, float &b);
This function will fill in the passed in r, g, and b with the current color of the Text. It returns nothing.
void glUI_Text::SetPosition(int x, int
y);
This function will set the position of the text in screen coordinates (pixels). The x value is the left of the text block, and the y is the bottom of the text block.
void glUI_Text::SetString(char *
string);
This function will clear any strings currently in the string list and parse the given string to populate the now empty list. You can use ‘\n’ in the string to indicate a new line for multiline strings. Each line will get its own entry in the string list.
void glUI_Text::ClearStrings();
This function will clear the list of all strings and set m_iCount to 0.
void glUI_Text::AddLineToTop(char *
string);
This function will add a single additional line of text at the top of an already existing string list. It essential is an insert to the head of the list. No parsing is done on the string.
void glUI_Text::AddLineToBottom(char *
string);
This function will
add a single additional line of text at the bottom of an already existing
string list. It essentially is an
insert to the tail of the list. No
parsing is done on the string.
void glUI_Text::RemoveLineFromTop();
This function will
remove the string off the top of the string list. If there is only one string, it is removed, emptying the
list. An already empty list is left
alone.
void glUI_Text::RemoveLineFromBottom();
This function will
remove the string off the bottom of the string list. If there is only one string, it is removed, emptying the
lsit. An already empty list is left
alone.
void glUI_Text::DeleteString();
This function will delete the string. This is actually a tricky maneuver given the dynamic array of strings that is created when SetString is called.
void glUI_Text::SetFont(glFont * font);
This function will set the current font associated with this
text block. The same font can be used
across many text blocks.
glFont * glUI_Text::GetFont();
This function will return a pointer to the current font
associated with this text block.
int glUI_Text::GetStringSize(LPSIZE
size);
This function will fill in size with the size, in pixels, of
this block of text. This function only
works if there is a valid font defined (SetFont has been called), and if there
is no font, it will return 0.
Otherwise, it returns 1.
void glUI_Text::Draw();
This function will Draw the block of text set by SetString
at location defined by the SetPosition call with the font defined by the
SetFont call. The text will be colored
by the current OpenGL color (glColor()).
bool glUI_Text::InitFromBuffer(char *
buff, int dwSize,
char *
name, GUITextureManager *tm);
This function will try to load in the text box variables out
of the given buffer. The buff parameter
is the buffer to load from, while the dwSize is the size of that buffer. The name is the name of the text element to
load out of the buffer. The texture
manager is there because it is an inherited function, but you can pass NULL is
as the texture manager since a text block does not use any textures.
class glUI_TextBox :
glUI_TextBox {
glUI_Frame * m_frame;
glUI_Image * m_bg;
glUI_Text * m_text;
int m_iInnerBorderX, m_iInnerBorderY;
public:
glUI_TextBox();
~glUI_TextBox();
virtual void SetPosition(int x, int y);
virtual void GetPosition(int &x, int &y);
void SetFrame(GUIFrame * frame);
glUI_Frame * GetFrame();
void SetText(GUIText * text);
glUI_Text * GetText();
void SetInnerBorder(int x, int y);
void GetInnerBorder(int &x, int &y);
void SetBG(GUIImage * text);
glUI_Image* GetBG();
void AutoSize();
void SetSize(int x, int y);
void GetSize(int &x, int &y);
virtual void Draw();
};
glUI_TextBox::glUI_TextBox();
This function is the constructor. It sets the variables to 0 or NULL.
glUI_TextBox::~glUI_TextBox();
This function is the destuctor. It is empty.
void
glUI_TextBox::SetPosition(int x, int y);
This function sets the position of the text box to x, y. The given location will be set as the lower left corner of the text box.
void
glUI_TextBox::GetPosition(int &x, int &y);
This function will retreive the position of the lower left corner of the current text box and place it into x and y.
void
glUI_TextBox::SetFrame(GUIFrame * frame);
This function will set the current frame object associated with the text box. The frame object can be shared with other text boxes, HOWEVER, you have to resize or autosize the text box before every draw on each instance that shares frames. Because of the texture manager, theres no good reason not to just have separate frames for each text box.
glUI_Frame *
glUI_TextBox::GetFrame();
This function will return a pointer to the currently associated frame. If no frame is associated, it will return NULL.
void
glUI_TextBox::SetText(GUIText * text);
This function sets the Text object associated with the text box. Like the frame object, its not a good idea to share texts with different textboxes. You can, but you have to make sure it is getting its position and size updated appropriately before each draw.
glUI_Text *
glUI_TextBox::GetText();
This function will return a pointer to the associated text object.
void
glUI_TextBox::SetInnerBorder(int x, int y);
This function will set the size between the inside of the border and the block of text. The x and y specified are in pixels, and that many pixels are left open between the text and the frame on all sides, with x applying only to left and right, and y applying only to the top and bottom.
void
glUI_TextBox::GetInnerBorder(int &x, int &y);
This function returns the values explained above for the inner border size.
void
glUI_TextBox::SetBG(GUIImage * text);
This function sets the background image to the specified image object. Nothing too exciting here. Specifying NULL or not calling this function will result in a transparent background.
glUI_Image*
glUI_TextBox::GetBG();
This function will return a pointer to the current background image object (or NULL if non specified).
void
glUI_TextBox::AutoSize();
This function will automatically resize all objects under its control to conform to the size the current text block takes up. It will base it’s position on the lower left corner in m_x, m_y, and then move outward from there, first by the width/height of the border, then by the inner border area set by SetInnerBorder(), then by the size of the text in the text block, then by the inner border again, then by the width/height of the border itself again. It will set the size values, so after this call you can find out how much room this thing is going to take up.
void
glUI_TextBox::SetSize(int x, int y);
This function manually sets the size. In the above description, it still uses border width/height first, then adds the innerborder width/height, then draws the text. However, now the outer frame is set manually to a certain size, so the text might end up going outside of the area. Be careful with this one, because it can look stupid if your text is running off your frame or off the edge of the screen.
void
glUI_TextBox::GetSize(int &x, int &y);
This function will retreive the size of the outside width/height of the text box.
void
glUI_TextBox::Draw();
This function draw the whole damn thing to the screen. Make sure to call SetSize or AutoSize first to get all the subobjects to line up appropriately.
class glUI_ChatArea : public
glUI_TextBox {
glUI_Text m_text;
glUI_Frame m_frame;
int m_extent_x, m_extent_lines;
public:
glUI_ChatArea();
~glUI_ChatArea();
void SetFont(glUI_Font * font);
void SetExtents(int x, int lines);
void AddChatString(char * chatmsg);
void ClearChatArea();
};
glUI_ChatArea::glUI_ChatArea();
This is the constructor. It calls:
SetText(&m_text), and
SetFrame(&m_frame),
This class is inherited from the glUI_TextBox class, so it automatically has all functionality that a TextBox has, including the Draw routine. Mainly, this class encompasses all the elements of a textbox except the font. That means the Frame and Text and contained in the same class as the TextBox.
glUI_ChatArea::~glUI_ChatArea();
This is the deconstructor, which is empty.
void glUI_ChatArea::SetFont(glUI_Font * font);
This function calls m_text.SetFont(font). This function must be run before any text will be displayed.
void glUI_ChatArea::SetExtents();
This function will set the largest area that can be used by the chat messages. The x value is the number of pixels wide the text box can get, and the lines value is the number of text lines vertically.
void glUI_ChatArea::AddChatString(char * chatmsg);
This function will add a string to the chat window. It has to make sure that the string doesn’t make the text box larger than the m_extent_x and m_extent_lines variables, so it has to take the following steps:
1. Calculate the length of the string in pixels using the m_text.GetStringSize().
2. Break the string into multiple shorter strings if necessary.
3. Add each string to the text box calling m_text.AddLineToBottom(string).
4. Check the number of lines the text box contains, and in a for loop for each string over the limit, call m_text.RemoveLineFromTop().
After doing that, and the strings have been added, the m_textbox.AutoSize() routine will be called to resize the text box’s frame around the new text.
void glUI_ChatArea::ClearChatArea();
This function will clear all the chat message text by calling m_text.ClearStrings().
class glUI_TextInput :
public glUI_TextBox {
glUI_Text m_text;
glUI_Frame m_frame;
public:
glUI_TextInput();
~glUI_TextInput();
void SetFont(glUI_Font * font);
void SetString(char * string);
void ClearString();
};
glUI_TextInput::glUI_TextInput();
This is the constructor. It calls:
SetText(&m_text), and
SetFrame(&m_frame),
This class is inherited from the glUI_TextBox class, so it
automatically has all functionality that a TextBox has, including the Draw
routine. Mainly, this class encompasses
all the elements of a textbox except the font.
That means the Frame and Text and contained in the same class as the
TextBox.
glUI_TextInput::~glUI_TextInput();
This is the deconstructor, which is empty.
void glUI_TextInput::SetFont(glUI_Font * font);
This function calls m_text.SetFont(font). This function must be run before any text will be displayed.
void glUI_TextInput::SetString(char * string);
This function will call m_text.SetString(string). This clears out the old string and enters in the new. It assumes that the string being sent in is not multiline and does not exceed the length requirements of the textbox.
void glUI_TextInput::ClearString();
This function will call m_text.ClearStrings() to clear the string out (displaying nothing in the box.
#define RADAR_RADIUS 50
#define RADAR_COLOR_WALL RGB(100, 100, 100)
#define RADAR_COLOR_ENEMY RGB(255, 40, 40)
#define RADAR_COLOR_FRIEND RGB(40, 70, 255)
class glUI_Radar : public
glUI_BaseElement {
glUI_Bitmap m_radar;
public:
void Draw();
void Update(MainData * theWorld);
};
void glUI_Radar::Draw();
This function will draw the current radar, and nothing
more. To update the current radar, the
user must call Update (below).
void glUI_Radar::Update(MainData * theWorld);
This function will update the radar image based on information it pulls out of the main data structure, theWorld. The basic idea is:
1. Clearing the radar with the template for the current mode.
2. Look within RADAR_RADIUS for the following:
a. All walls, to be drawn with color RADAR_COLOR_WALL.
b. All enemies, to be drawn with color RADAR_COLOR_ENEMY.
c. All friends, to be drawn with color RADAR_COLOR_FRIEND.
3. Draw the above elements, rotating them if necessary depending on the current mode.
The modes discussed above are as follows:
1. Top-down mode – In this mode, the radar positions are relative to the map, where up is up on the player’s view, down is down on the player’s view, etc. The map has a T shaped black area indicating the player’s current heading on the map.
2. First-person/chase mode – In this mode, the radar positions are relative to the player, where up on the radar is forward for the player, down is behind the player, etc. The map has a V shaped area indicating the field of view that is static and always pointer up.
class glUI_EnergyMeter :
public glUI_BaseElement {
int m_lower_limit;
int m_current;
int m_current_max;
int m_upper_limit;
public:
void Draw();
void Update(MainData * theWorld);
};
void glUI_EnergyMeter::Draw();
This function will draw the current energy meter to the screen based on the setting of m_lower_limit, m_current, m_current_max, and m_upper_limit. The following image gives an idea of what these variables indicate:
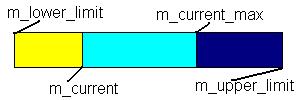
Where the yellow area indicates how much energy is left before you die, the blue is how high you can charge your energy (by not getting hit and not firing your weapons), and dark blue is the area available for upgrading your max charge level (you can get these types of upgrades from multi-prizes).
void glUI_EnergyMeter::Update(MainData * theWorld);
This function pulls values for m_lower_limit, m_current,
m_current_max, and m_upper_limit out of the main game state. Once these variables are set, the Draw
subroutine can take care of everything else.
#define POWER_UP_MINES 0
#define POWER_UP_REPEL 1
#define POWER_UP_BRICK 2
#define POWER_UP_WARP_GATE 3
#define
POWER_UP_WARP_DISABLER 4
#define POWER_UP_COUNT 5
class glUI_PowerUps : public
glUI_BaseElement {
glUI_Image m_graphics[POWER_UP_COUNT];
int m_count[POWER_UP_COUNT];
public:
void SetFont(glUI_Font * font);
void Draw();
void Update(MainData * theWorld);
void LoadGraphic(int index, char * filename);
};
void glUI_PowerUps::SetFont(glUI_Font * font);
This function will set the font with which power-up counts
are displayed (see below)
void glUI_PowerUps::Draw();
This function will draw the graphics for powerups based on the contents of the internal count array. Each entry in the count array is set whenever the Update() function is called (see below). There is a one-to-one correspondance with the count array and the m_graphics array, both of which are indexable by the above defines. The basic flow is as follows:
1. For each power up (0 to POWER_UP_COUNT – 1)
a. Check m_count for this power up.
b. If >0, then display the graphic, and display the count in m_font.
c. If =0, then don’t display anything, and move onto the next graphic.
d. If <0, then display the graphic, but do NOT display any count.
e. Move to the next x,y for the next graphic (basically move the graphic’s height worth of pixels down the screen).
void glUI_PowerUps::Update(MainData * theWorld);
This function updates the m_count array by delving into theWorld. It should pull the counts out of the appropriate inventory structure and fill in this array. It shouldn’t change anything.
void glUI_PowerUps::LoadGraphic(int index, char *
filename);
This function will load in a graphic into the m_graphics array. The index parameter is the index into the array, and the filename is the filename of the image to load into that slot. Using the defines above the user can know exactly what graphic should be loaded into which index. This must be done before any images will be seen.
Art and Video
Art
All the images and textures in NullSpace will be stored in 24-bit Bitmap format and loaded onto an OpenGL surface during the game.
3D Models
All character models in the game will be created with 3D Studio MAX and exported into a .ase file. This file will be parsed and modified using a program that outputs only the information we need into a .nsm file. This file will consist of the following information:
Num_Textures #
PATH path name
Num_Faces #
Num_Verticies #
FACE _ _ _ (3 indicies into a Model Face List)
VERT _ _ _ (3 indicies into
a Model Vertex List)
TFACE _ _ _ (3 indicies into
a Texture Face List)
TVERT _ _ _ (3 indicies into
a Texture Vertex List)
Num Animations # (Will always be 1 for this game)
Num Frames #
_ _ _ (which frame)
_ _ _ (time to frame)
Num Frames #
{
VERT _ _ _ (Verticies)
FACE NORMAL _ _ _
}
All this data will be loaded into the game and will take care of all necessary information for textures, models, and animation. All the character models will be in 3D and all animation frames for them will also be represented in 3D.
Video
NullSpace will make use of the Windows Video functions to load an .avi file and display its frames onto the screen to closely resemble a normal movie file. These videos will not play music.
Graphics Engine
All-Purpose
Overview
The All-Purpose part of the graphics engine is designed to encapsulate an easy way of displaying 3D graphics. To this end, it will be utilizing the OpenGL API in a specific class (henceforth the “GLClass”), which will expose member functions for initialization, termination and access to device contexts (such as the HDC and HWND), leaving the drawing to the specific object that needs to be drawn.
The GLClass is an independent object in and of itself. In other words, it will have no need to call into any other sections of the game. It is expected that the only functions that will call into the GLClass will be the game-specific graphics functions, for the purpose of initialization and termination, and the Special Effects, which will need direct access to the HDC for drawing.
Furthermore, the GLClass is specific only to the client executable and not the server, since the server is not a graphics-intensive application. So, it is very important to note that neither the game-specific graphics engine nor the all-purpose graphics engine will be used in the server, as the simplified server uses standard Windows-handled routines (such as dialog boxes) to supply messages to the user.
The second part to the All-Purpose Graphics Engine is the Model system. The Model system has a number of structures for use internally, but yields two major classes, the Model class and the GeomObject class. Both of these classes need access to the File I/O functions in order to properly load the models in from a file. The model file format is generated using a conversion utility on the ascii output file of a 3D Studio Max model (.ase).
Related to the Model system, yet with a different purpose is the Arena system. The arena doesn’t necessarily provide for the typical “map” in a game. In NullSpace’s case that is accomplished by each “tile” being a 3D object overlaid in a sequence, not a pre-modeled file. Instead, the arena is for the surrounding environment associated with a given map. NullSpace would use this feature to display the starry background and little planetoids underneath the playing field. The Arena class draws upon the File I/O functions to load itself in from a file. Arenas are constructed using 3D Studio Max and exported as ASCII file (.ase) then run through a conversion utility to get them in an acceptable format.
A fourth part of the Graphics Engine is the underlying camera system. While the camera does not have anything directly to do with the drawing of the game, game-specific functions will need to use a camera’s position and orientation to know where to draw the world. The camera has basic functionality as a storage device for its position in the world (using 3D coordinates) and its orientation (using two angles, one for “left/right” and one for “up/down”). It also has a more advanced purpose, that of scripted sequences. By supplying a destination and a time to get there, the camera will add the “script” to its queue and interpolate over time its new position.
The camera system will use no tool other than the File I/O tool for the loading of pre-written scripts that can be specified in the game by index value.
Data Structures
The GLClass is the central object of the Graphics
Engine that must be included in the main data structure of a game. It contains several internal copies of
device contexts, including the GDI Device Context, the OpenGL Rendering
Context, the Window Handle, and the Application Instance’s Handle.
It also stores several statistics about the window
created by the CreateGLWindow function, including window size, whether or not
it is fullscreen, and whether or not the window is currently “Active” (i.e. has
focus) so that it knows whether or not to draw.
Finally, it contains member functions for
Initializing OpenGL to be run in the application’s instance, as well as the
function to create a window (which stores all of the properties including the
device contexts during the window’s creation), the function to destroy that
window once it’s been created, and finally a function to reinitialize OpenGL
when the window has been resized.
Because the GLWindow needs a WinProc, it is supplied one in private, the
only portion of the callback that actually gets used is handling the activated
message
class GLClass
{
private:
HDC hDC; // Private GDI Device Context
HGLRC hRC; // Permanent Rendering Context
HWND hWnd; // Holds Our Window Handle
HINSTANCE hInstance; // Holds The Instance Of The Application
DEVMODE m_DMsaved; // The current statistics of the window
// (size, bit depth, etc.)
int m_width; // The window's current width
int m_height; // The window's current height
bool fullscreen; // Fullscreen Flag
bool active; // Window Active Flag (Initially “true”)
public:
// Variable Access Functions for Fullscreen, Size, Active
// Functions to Initialize OpenGL and Create/Destroy an OpenGL
window
// Functions to Resize the window
};
A TexPoint at current
contains nothing more than an integer index for use in indexing into a list of
texture coordinates.
struct TexPoint
{
int index;
};
A Vertex contains an x, y,
and z floating point value for a point or position in 3D space.
struct Vertex
{
GLfloat v[3]; //point of vertex in model coordinates
};
A Frame contains two arrays of 3D Points, one for vertices and one for face normals. It is designed to act as a “keyframe” holder for use in animation since animation consists of interpolating points from one frame to another. There may be any number of frames in a model, specified when it is loaded in.
struct Frame
{
GLPoint3D *vertexArray;
GLPoint3D *faceNormals;
};
An Animation contains nothing more than a list of
keyframes and the times that it takes to run between them. To keep it simple and indexable, these lists
are simply stored as dynamic arrays of unsigned integers. Finally, there needs to be an integer
specifying how many frames are in the animation.
Note: the timeBetweenFrames array corresponds
directly to the frameList.
Specifically, an index into the time array will return the time it takes
to run to the frame at the same index of the frame array. Therefore, typically the first index (0) of
the timeBetwenFrames array will have a value of 0, so that the animation is
ever changed, it will jump to the new one instead of interpolating to it.
struct Animation
{
int numFrames;
unsigned *frameList; //array of order frames in animation are
to be used
unsigned *timeBetweenFrames; // array of "times to move
next frame"
};
A Face contains a link to a texture, 3 texture
coordinate points, and an array of 3 unsigned integers (the “Triangle”) to act
as indices into a vertex table. The way
that textures are represented in OpenGL are as integers, so the link is an integer
value. The indices into the texture coordinate
array directly correspond to the indices into the vertex index array. That is to say, index 0 of the texCoords
array will give the texture coordinate for the point at index 0 of the vIndex
array.
struct Face
{
GLuint tIndex;//index into the model's texture list of the
texture to use
TexPoint texCoords[3]; //the texture coordinates for the face
Triangle vIndex; //index into current frame's vertex array
(the triangle)
};
A SingleAnimation is essentially an Animation struct
with only one frame. It is designed to
encapsulate an index to a frame and a time to get to that frame without using
dynamic variables in order to increase speed and efficiency. It is possible to make a list of
SingleAnimation structures to replace an Animation structure.
struct SingleAnimation
{
unsigned int nextFrame;
unsigned int timeToFrame;
};
A Material is, at current, only an array of indices
to OpenGL textures. Because textures
are represented as unsigned integers, the array is made up of them. Also, a variable is necessary to keep track
of how many textures are currently in use by the Material. The purpose of the Material is provide a
table associated with an object that the object’s drawing routine can index to
select a texture or other property.
Note: It is possible to add more properties here
about how an object reacts to light, however it is unnecessary for the purpose
of the game.
struct Material
{
int textureCount; //the number of textures used by an image
Gluint *textureArray; //the array OpenGL will supply values
for
//(that we will index
into with the faces)
};
The Model class acts as a storage device that contains
drawing/animation information about an object.
First and foremost, it is directly associated with a model file (“.NSM”)
by pathname so that we can call the load and unload functions multiple times
thereafter and not have to specify the path each time. Therefore Model needs access to the File I/O
library to load in files.
A Model contains several important variables involving
the properties of a 3D object. These
include the model’s vertices at each keyframe of animation, the model’s faces
(indices into the vertex table), the model’s texture information, and the
model’s animation number. These all
need to have variables associated with them to keep count of how many there are
since they are all dynamically allocated arrays and we don’t ever want to
access past the ends of them.
class Model
{
private:
char modelFile[MODEL_PATH_LEN];
//the pathname of the model
int faceCount; //the
number of faces (and face normals)
Face *faceArray; //the
faces of the model
int vertexCount; //this variable is constant for all
frames
int numTVertices; //the
number of texture vertices in the model
Vertex *textureCoordinatesList; //an array of the texture
vertices
int frameCount; //the number of keyframes to be stored
for
//animating the object
Frame *frameArray; //the array of keyframes themselves
int animationCount; //total number of animations the model has
Animation *animationArray; //the
array of actual animations
Material material; //contains
texture array for model
public:
//member access functions for the animations, vertices, faces
//load, free, and draw functions
};
A GeomObject is a geometrical object (e.g. a ship) that
the game loads in and animates. It is
going to be the base object that most of the game’s object classes will
inherit. Its primary purpose is to hold
the object’s coordinates, orientation, and size in world coordinates as well as
the current frame of animation to draw so that it can completely handle the
drawing process.
In order to obtain the proper animation information and
the proper frame information, a GeomObject needs to be associated with a model
during initialization. Because multiple
GeomObjects can use the same model, the Model object will be linked to via
pointer instead of creating one per GeomObject.
There are several properties to animations that
GeomObjects will need to keep track of.
First, there’s the index number of the animation it is currently running
so that it can index into the animation list of its model and know what
vertices it ultimately wants to “arrive” during the linear interpolation. Then, perhaps most importantly is the Frame
representing the frame of animation the object is currently in. This is the object in which all of the
linear interpolation will be done and the model will be drawn from. Upon each new keyframe of animation, the
keyframe coordinates will be copied into the currentFrame and a timer will be
set for moving to the next keyframe. As
the update animation function is called, linear interpolation will move the
points in the currentFrame closer to the points at the keyframe specified by
the nextFrameInAnimation variable. Note
that the timer needs to be stored as two variables, one for keeping track of
the last time that the object was moved, and one for how much time is left to
move in the current frame.
To ease the process of animating the object, whenever a
new animation is started, a queue of individual indices to frames is filled in
so that when each frame is reached, the front of the list is removed and the
old frame is done with. There are also
a couple of useful variables for keeping track of whether or not the animation
is supposed to loop when it is finished, and whether or not the animation
should be paused (this essentially halts the timer and reinitializes it when
the animation is unpaused).
class GeomObject
{
private:
Model *model; //a pointer to the model this object
represents
float scale; //a constant to scale the image by
Point3D position; //position
of the model in the world
Point3D rotation; //orientation
of the model in the world
Frame currentFrame; //the
frame that we draw (not necessarily
// a keyframe if we are inbetween frames)
int currentAnimation;
bool
m_bCurrentAnimationLooping;
bool m_IsAnimationPaused;
list<SingleAnimation> currentAnimationList;
int nextFrameInAnimation;
int timeRemainingInAnimation;
int timeLastAnimated;
public:
//access functions for model position and direction
//access functions for associating/dropping model
//access functions to get information about animation frame
//function to draw model
//functions to update/alter current animation
};
The Arena class contains all the information necessary to display a single model file with no animation needed. That being the case, it is acceptable to use an OpenGL-defined property called display lists, where the object is predrawn ahead of time and at rendering time the list will automatically draw the object with much more efficiency than normal. This also allows the Arena freedom to de-allocate the faces array and vertices array right after the list is first built to not take up unnecessary memory space. The only thing that will need to be kept is the number of textures and the texture index array itself. Also, in addition to the index of the display list itself, it is prudent to make sure that the list was successfully created before calling the draw so there is a variable which is set when the list is made.
class Arena
{
int numTextures; //to keep track of texture number
GLuint *texture; //Storage For our Textures
Face *faceArray; //Face info temporarily goes here
Vertex *vertexArray; //Vertex info temporarily goes here
GLuint dispList; //An index to an OpenGL display list
bool listExists; //Whether or not the list is made yet
//Private function to create a Display list for drawing
public:
//Functions for loading, emptying, and drawing
};
The CamPosObj serves to hold five important pieces of information for the camera object, namely 3 variables for the position in 3D space and 2 for the angles to orient the camera’s direction. It is made as a class with its members private to all objects except for the cameras so that it acts as an internal object.
class CamPosObj
{
private:
//the five most important variables to a camera,
//including the position and
orientation
float xpos;
float ypos;
float zpos;
GLfloat alpha;
GLfloat beta;
public:
//define all friendly classes
};
A CamScriptObj holds the information that goes into a list so that camera
movements may be stacked on top of one another and executed one after another. To accomplish this, we need keep track of only two variables: the camera’s destination position and the time that it takes to get to that position. It is made as a class with its members private to all objects except for the cameras so that it acts as an internal object.
class CamScriptObj
{
private:
//this is everything we need to pass into our Camera Script
List
int timeInterval;
CamPosObj m_cPos;
public:
//define all friendly classes
};
A Camera class is the main object in the camera movement section of the Graphics Engine. At any point, a camera will have its current position and orientation, a possible destination position and orientation, a list of movements that it is supposed to perform, whether or not it is paused, and how much time there is inbetween moving from the current position to the next position. Mostly, managing a camera is handling tricky variable manipulation. Were it not for the ability to slide the camera down predetermined paths, it would contain nothing more than a position and orientation. A nice helper function is be to adjust the angles of the camera to “look at” a point in 3D space.
Finally, the cornerstone of the Camera function is the UpdateCameraMovement function, which serves to use the time variables to linearly interpolate the camera’s position to its destination position. It is vital that when a Camera is used, UpdateCameraMovement be called before drawing, therefore it is a function that the game-specific “drawAll” function will need to call on.
class Camera
{
private:
//variables to keep track of proper linear interpolation
int timeLeftInMove;
int timeLastMoved;
//the camera position that our camera may be transitioning too
CamPosObj m_cDestPos;
//the position our camera is currently at (and displays from)
CamPosObj m_cPos;
//our camera script list (loads up a new script when old one
finishes)
list<CamScriptObj> m_ScriptList;
//variable to keep track of being paused or not
bool isPaused;
public:
//access function to know whether or not the camera is
currently paused
//access functions to get at our camera's position
//access functions to set our camera's position
//Add a CamScriptObj to our list for sliding the camera to a
new location
//Add a CamScriptObj to our list that automatically moves the
camera
//Some quick camera interaction functions
//Important function that updates the interpolation of the
camera
//Function that takes a position to have the camera “look at”
};
A Cscript is a solely internal representation of an array of CamScriptObj variables that keeps track of how many of those variables there are in a given script. It is made as a class instead of a struct for the simplicity of having the Constructer initialize the data to NULL and so that no class other than CameraScript would ever have access to its data.
class CScript
{
int numMovements;
CamScriptObj *CSO;
public:
//constructor initializes variables to NULL
//specify friend class CameraScript
};
A CameraScript is designed for pre-scripted movement of the camera, typically for an opening animation. By storing an array of Cscript objects, we are effectively storing an array of scripts that the user can access by index when they call the “RunScript” function. It also holds the number of scripts in this array because the array is dynamic and it should never allow the user to accidently access beyond the end of the array.
The CameraScript object will need access to the File I/O handler because it will load in the scripts from a text file.
class CameraScript
{
CScript *Scripts; //an array of internal CScripts
int m_iNumScripts; //and the number of them
public:
//Functions to load camera scripts, run them, and empty them
};
Functions
GLClass Functions
The important Init function, this function serves as
a wrapper to call multiple OpenGL functions.
Specifically, it enables 2D Textures, sets the blending function,
enables depth buffering, sets the depth calculation function, sets the
perspective correction function, and enables point smoothing. This is also where, were there lighting,
lighting would be enabled. This
function is called within the CreateWindow as well, and unless CreateWindow is
not called, should not need to be called anywhere else in the code.
int
GLClass::InitGL(GLvoid);
Initializes any OpenGL extensions that are available at runtime, it calls a Windows OpenGL interface function that polls the videocard for access to certain “extensions” or extra functions. If those are extensions are available, it returns success and associates them with static global variables which the user may then call and treat as though they were functions.
int GLClass::SetupExtensions();
The CreateGLWindow function serves as an abstraction
device from standard Windows functions.
It handles all of the standard initialization, including registering a
window class and setting up the CreateWindow parameters. For parameters, it takes a text message that
is to appear in the title, the width and height of the window, the bit-depth of
the screen, and whether or not to make it go full screen. It then polls the device for whether or not
the card supports the resolution it will attempt to change to if it is going
full screen. If that fails, the whole
function returns FALSE. Upon success,
it continues on to change the monitor’s resolution. If fulls creen was attempted, a window will be created without
the standard windows border, however otherwise it will have the title bar and
border.
Next, it stores the screen’s old information so that
when the window is eventually destroyed we can properly restore it. Then, it creates a device context and associates
it with the window, properly grabbing the bit depth of the screen’s new
resolution. This context is run through
several OpenGL functions to make it the main device context and create a
rendering context out of it. Once this
is all accomplished, OpenGL is ready to be initialized, so InitGL is
called. The CreateGLWindow returns
success if none of these functions fail.
BOOL GLClass::CreateGLWindow(char*
title, int width, int height, int bits, bool fullscreenflag);
The function to destroy the OpenGL window and free
resources, it first checks to see if the user was in full-screen mode and, if
so, attempts to return them from that using the Windows-supplied
ChangeDisplaySettings function with the parameters it had stored before going
fullscreen during window creation.
Next, it deletes the OpenGL rendering context, the main window HDC, the
window itself, and finally unregisters the window class.
GLvoid
GLClass::KillGLWindow(GLvoid);
The function reinitializes OpenGL’s projection
mathematics to incorporate a different width and height for the window by
calling OpenGL-supplied Perspective correction functions.
GLvoid
GLClass::ReSizeGLScene(GLsizei width, GLsizei height);
Toggles the OpenGL window between Fullscreen and Windowed modes by destroying the window and then re-creating it. New width, height, and bit-count variables must be supplied in case the window is to change size as well. It is more or less a wrapper for KillGLWindow and CreateGLWindow, returning success if both funtions succeed.
int
GLClass::ToggleFullscreen(char* title, int width, int height, int bits);
Takes a parameter of a pathname to a bitmap to be
loaded in as a texture in OpenGL. Needs
access to the File I/O handler to confirm whether or not the file exists. First it will call the AuxGL
library-supplied load bitmap function to efficiently load the bitmap’s bits
into memory. If that is successful,
then it calls the OpenGL function to make room for a texture in video memory,
then supplies the bits for that texture.
Finally, it frees the file that it loaded since the bitmap information
is now stored securely in video memory and it can return the OpenGL-supplied
index to that texture.
Gluint
LoadGLTextureFromFile(char *pathname);
Model Functions
The model’s load function simply takes a string
containing the pathname of a “.NSM” model file and uses the File I/O tool to
load it in. The function also takes a
second parameter: a scale value that acts as a percentage to load the file in
from. This is done to adjust the
initial size of the model once in case the size in the model file is
inconsistent with the game, which is more efficient to do during loading than
by changing the model’s scale value each time during drawing. The function returns 1 if successful in
loading all of the model’s information.
int
Model::Load(char * filename,
float scale = 1.0f);
The model’s empty function is a wrapper for calling
delete on all of the dynamically allocated data in the model. It is also called in the model’s destructor
in case the memory forgot to be freed manually.
void
Model::Empty();
The model’s draw function takes ten variables important to the drawing of the object in 3D space. It needs three variables for the object’s position, three for its rotation about each of the three axes, and three for its scale in the three major directions. Finally, because the Model itself contains no information about the specific vertices of the frame that it is trying to draw, it needs access to one by pointer, assuming that the Frame it receives will be compatible with the Model itself.
The drawing process is a simple one, using OpenGL primitives and having OpenGL handle all of the heavy math. It runs through every index in the model’s face list and sets the current texture to the texture associated with the face, then uses the indices to set a vertex according to the vertex in the Frame that was passed in.
void
Model::Draw( GLfloat xpos, GLfloat ypos, GLfloat zpos,
GLfloat xrot, GLfloat yrot,
GLfloat zrot,
GLfloat xscl, GLfloat yscl,
GLfloat zscl,
Frame
* currentFrame);
GeomObject Functions
The UseModel function’s basic purpose is more or
less as an access function that associates the Object’s model with a Model that
should have already been loaded in. This function then looks at the Model’s
vertex information so it can dynamically allocate the proper size in the
GeomObject’s currentFrame variable.
Finally, it initializes the object’s current frame to be the first frame
in the model’s animation data. This
function will fail if the GeomObject already was using a model.
int GeomObject::UseModel(Model * pModel);
The DropModel function sets the model pointer to
NULL and frees any allocated information in the currentFrame variable. It also
empties out the model’s animation queue since the animations are no longer
applicable. This is essentially the
GeomObject’s terminate function, although the model can be re-associated at any
point after this function is called.
void GeomObject::DropModel();
The internal (private) animation function queues up
a number of frames of animation by using the parameter as an index into the
animation array of the model to get at these frames. A second variable is passed in so that we can initialize an
internal looping variable depending on what was desired. Finally, the function initializes all of the
time variables now that a new animation is beginning.
void GeomObject::_Animate(int whichAnimation, bool looping);
The Animate function is a wrapper to call the
internal animation function with the looping variable set to false.
void GeomObject::Animate(int whichAnimation);
The LoopAnimation function is a wrapper to call the
internal animation function with the looping variable set to true.
void GeomObject::LoopAnimation(int whichAnimation);
The update animation function is the most
complicated function of the GeomObject because it takes the frame that the
object is currently on and interpolates values to the keyframe frame that it is
supposed to arrive at next. To do this
it first checks its internal time values to know by how much to interpolate the
vertices, then briefly checks to see if it has reached the end of the
animation. If it has and the looping
variable is set, it will restore the animation to the first frame and begin the
interpolation anew. If the looping
variable is not set, it will leave the current frame at the very last keyframe
of the animation.
If the animation is not finished, it will take the amount of time that has passed since it last updated the current frame and interpolate the vertices to the next frame by that amount. If the current frame is finished, it will get the next frame from the animation queue to use as the next keyframe to arrive at. It is imperative to the animation that UpdateAnimation be called before drawing the objects. Because it runs on a system involving time and not game cycles, it is acceptable to call it during the game-specific drawing function. Besides, it would just be unnecessary calculations to call this function more than once between drawing.
void GeomObject::UpdateAnimation();
The StopAnimation function empties the model’s
animation list, leaving the model at whatever frame it was on when
StopAnimation was called.
void GeomObject::StopAnimation();
PauseAnimation sets a variable that prevents the
model’s currentFrame from being changed when UpdateAnimation is called.
void GeomObject::PauseAnimation();
The UnpauseAnimation function both clears a variable
preventing the currentFrame from being changed during UpdateAnimation and
reinitializes the timer variables so that the UpdateAnimation does not know
time passed between the time the object was paused and the time it was
unpaused.
void GeomObject::UnpauseAnimation();
GetCurrentAnimation is an access function to get the
index of the animation that is currently in progress in case game-specific
functions depend on which animation is currently running.
int GeomObject::GetCurrentAnimation();
ChangeCurrentFrame is a lowlevel function that
automatically copies a keyframe from the current animation to the currentFrame
variable.
void GeomObject::ChangeCurrentFrame(int newFrame);
The Draw function serves mostly to redirect the
object’s drawing to its Model’s Draw function, making sure to pass in all of
its internal variables regarding position, orientation, scale, and its current
frame.
void GeomObject::Draw();
Arena
Functions
The BuildDisplayList function of the arena is what
would typically be the draw command of most other objects (such as
models). It consists of calling OpenGL
primitives and associating them with textures, then specifying texture
coordinates and vertex coordinates in a loop until the entire arena is
drawn. However, at the beginning an
OpenGL function to create a “display list” is called and when the drawing is
completed, the function to close off the list is made and the list is assigned
(as an integer) to a variable. From
this point on, whenever the glDrawList function is called we can pass it this
list index instead of making each draw command again and it will render it with
much more efficiency than normal. This
is acceptable to create at the start since the arena will not change throughout
the course of a game.
void Arena::BuildDisplayList();
The Arena’s Load function needs access to the File
I/O handler so that it can read in the information from the file. The file format is the same as the model
files, except there is no animation section.
The load function will allocate the Face array, Vertex array, and
texture array to the proper size and then build the display list. Because after the display list is made it is
no longer necessary to keep the face and vertex array information around, those
two variables will be immediately freed.
If the file loader encounters any problems (such as with the memory
allocation) it will return FALSE, otherwise it returns TRUE.
int Arena::Load(char * filename);
The Arena’s Empty function makes sure that
everything allocated in the class is freed and unallocated (in the textures’
cases). It also checks to see if a
display list has been made and, if so, calls the OpenGL deallocation function
for it. This is called in the Arena’s
destructor in case the user forgets to call it manually.
int Arena::Empty();
The Draw function checks to see if the display list
was properly built, then calls the OpenGL glDisplayList to render the list.
void Arena::Draw();
Camera Functions
SlideCamera creates and adds a CamScriptObj to the
camera movement list that contains destination information for the camera and a
time interval in milliseconds that it will take to move from its current
position to that destination.
void Camera::SlideCamera(float
X,float Y,float Z,GLfloat A,GLfloat B,int timeInterval);
Add a CamScriptObj to our list that automatically
moves the camera to a destination position/orientation. This script will run when it is reached in
the queue order and is pulled out. It
has the same functionality as calling SlideCamera with a 0 time interval only
is slightly more efficient because it doesn’t have to account for that.
void Camera::SetCamera(float
X,float Y,float Z,GLfloat A,GLfloat B);
The StopCamera function removes all CamScriptObjs
from its destination list and halts the camera where it is. If the user needs the camera to jump to a
spot instantaneously instead of just adding to the movement queue, this
function needs to be called first to make sure no other scripts are run first.
void Camera::StopCamera();
PauseCamera sets a variable that halts the camera
from being moved from its current position in the UpdateCameraMovement
function.
void Camera::PauseCamera();
The UnpauseCamera function undoes the effects of the
PauseCamera function. Specifically, it
clears the variable halting the camera from its movement in the
UpdateCameraMovement function and reinitializes the time variables so that the
update function doesn’t realize any time elapsed between the time the camera
was paused and the time it was unpaused.
void Camera::UnpauseCamera();
The UpdateCameraMovement function is an important
function which updates the interpolation of the camera whenever it is
called. It begins by calculating how
much time has passed since the camera was last updated and therefore knows how
much to interpolate the camera along its current path. If the camera has reached the end of its
current script, it will grab the next one from the camera script queue and
continue to interpolate based off of the new destination position. If there are no more scripts left in the
queue, the camera is left still at the position it was last at. UpdateCameraMovement needs to be called by
the game-specific Graphics Engine’s draw function right before drawing so that
the true position of the camera is reflected before each rendering cycle.
void
Camera::UpdateCameraMovement();
The LookAt function takes a position in 3D space
(represented by three integers) and alters the Alpha and Beta of the camera to
“face it.” This is accomplished through
some simple trigonometrical calculations.
void Camera::LookAt(float
X,float Y,float Z);
CameraScript Functions
LoadScripts uses the File I/O handler to temporarily
load a text file of scripts. It begins
by allocating an array of scripts according to the first number in the file,
then for each script it loads in two lines of information. If the function fails, it returns without
accomplishing anything.
void CameraScript::LoadScripts(char
* filename);
The RunScript function takes a reference to a camera
object and an index into its script array so that it can add the indexed script
elements to the camera’s script queue.
void CameraScript::RunScript(Camera
& cam, int whichScript);
EmptyScripts is a termination function that frees
the allocated script array. This
automatically is called in the destructor just in case the user forgot to free
the scripts manually.
void CameraScript::EmptyScripts();
Game-Specific
Overview
The Game-Specific Graphics Engine is easy to implement since every graphics object can be represented as a GeomObject or an Arena, both of which already have their own draw functions. The remaining portion of the graphics responsibility is to make sure the camera is in the right place and draw first the “world” (in NullSpace’s case, the stars), then the tiles, projectiles, ships, and (from the Special Effects Engine) the particles.
In order to draw the world, the graphics must first be loaded from files, therefore there are a couple of functions that are utilized to interface with the File I/O that load these models in and create their textures. Consequently, there are functions that free the resources allocated with all of the game’s models as well.
The camera can be in three general positions, all of which rely on the main player’s ship object. There are three functions that can be called before the world is rotated to the camera’s viewpoint that each take a ship object and move the camera relative to the ship appropriately. Only one of these should need to be called before drawing takes place, and which one is determined by the variable representing the “Camera Mode” in the MainData object.
Therefore, the game-specific section of graphics needs to interface directly with the all-purpose graphics so that it can use the draw functions supplied by the GeomObjects and Arenas. It must also draw upon the File I/O to make sure that all graphics objects are loaded and freed at the proper initialization and termination points of the game. When the tile templates, ship templates, and projectile templates are loaded in, they should take care of associating the GeomObjects with the model objects themselves, so it is important that the model objects are already loaded. It is very important to note that neither the game-specific graphics engine nor the all-purpose graphics engine will be used in the server, as the simplified server uses standard Windows-handled routines (such as dialog boxes) to supply messages to the user.
Data Structures
MainData
ShipObj
TileObj
SFXParticle class
Camera
GeomObject
Arena
Functions
A function to be called in the game loop’s
initialization phase, LoadArenaFromFile takes a pathname to the arena that needs
to be loaded. Because this arena is
independent from the game’s map, only one of these ever needs to be created and
certainly only one needs to be loaded at a time. If the arena is loaded successfully, the function returns TRUE,
FALSE otherwise.
int LoadArenaFromFile(char
*arenaName, Arena *arena);
A function to be called in the game loop’s
initialization phase, LoadAllTileModelsFromFile takes a pathname to a config
file, which in itself contains the pathnames to models of the nine tile
types. The first parameter would be
therefore akin to “tilemodel.cfg” which is constant and unchanging. It needs access to the address of the Tile
Object array so that it can modify not only the array’s contents, but the array
itself. If all tile models are loaded
successfully, TRUE is returned, otherwise FALSE.
int LoadAllTileModelsFromFile(char
*configName, TileObj **tileArray);
A function to be called in the game loop’s
initialization phase, LoadAllTileModelsFromFile takes a pathname to a config
file, which in itself contains the pathnames to models of the nine model
types. The first parameter would be
therefore akin to “shipmodel.cfg” which is constant and unchanging. It needs access to the address of the Ship
Object array so that it can modify not only the array’s contents, but the array
itself. If all tile models are loaded
successfully, TRUE is returned, otherwise FALSE.
int LoadAllShipModelsFromFile(char
*configName, Ship **shipArray);
UnloadArena is more or less a wrapper for calling
the arena’s unload command. It returns
FALSE if it encountered any problems.
int UnloadArena(Arena
*arena);
UnloadAllTileModels runs through each object in the
tile array and calls the unload model functions of their GeomObjects.
int UnloadAllTileModels(TileObj
**tileArray);
UnloadAllShipModels runs through each object in the
tile array and calls the unload model functions of their GeomObjects.
int UnloadAllShipModels(Ship
**shipArray);
The MoveCameraFirstPerson function sets the camera’s
beta vector to forty-five (straight forward) and its position to the center of
the ship. Because of back-face culling
that OpenGL automatically performs, the user won’t see the ship obstructing
their vision. The alpha angle value of
the camera is calculated from the direction vector that the ship is facing
along.
void MoveCameraFirstPerson(Camera
*cam, Ship *ship);
The MoveCameraThirdPersonCamchase function sets the
camera’s beta vector to roughly twenty degrees and its z position raised by
about five to ten units so that it is not in the exact same plane as the
ship. Then its remaining position is
set to be a negative multiple of the direction vector that the ship is facing
along. The alpha angle value of the
camera is also calculated from the ship’s direction vector.
void MoveCameraThirdPersonCamchase(Camera
*cam, Ship *ship);
The MoveCameraThirdPersonOverhead is the simplest
camera angle, placing its x and y position components equal to the center of
the ship and its z value much higher, by up to twenty units. The beta angle is ninety degrees to face
straight “down”, and the alpha is ninety degrees to face perfectly north.
void MoveCameraThirdPersonOverhead(Camera
*cam, Ship *ship);
The DrawAll function is very important in that it
draws the game to the client’s screen.
It works in a straightforward manner, first calling the OpenGL routine
to clear the depth buffers and initialize the frame to a black background. Next, it does a switch statement on the
game’s current camera view, and, depending on which case it is, calls the
appropriate “MoveCamera” function. It
is possible that the current camera view is none of the three pre-defined ones,
and in which case the UpdateCamera function will be called in case it is a
pre-scripted camera movement sequence that is taking place. Then, the OpenGL matrix stack is given a
rotation by the main camera’s alpha and beta fields, then a translation by its
coordinates in 3D space.
Once the world is set up properly, the OpenGL
glPushMatrix function is called to store this information away so that after
any other objects are drawn, we can glPopMatrix and return to this point. Immediately after, the current arena’s draw
function is called to draw the space background and little planetoids. Then a loop is run on each Ship Object in
the game’s object list, calling the update animation then the draw function of
each ship’s GeomObject along the way.
After that is accomplished, a loop is run on each Projectile object in
the game’s projectile object list, calling the update animation and then the
draw function of the GeomObjects within each projectile. Next, a loop is run on the entire map array,
using each value as an index into the tile object array and calling the draw
function of the indexed tile’s GeomObject.
Because OpenGL handles its own depth calculations, we do not need to
worry about any of these objects appearing on top of one another in an improper
order.
Next, the Special Effects engine exposes a draw
command that this function can easily execute to add all of the games particles
done in OpenGL. Lastly, the DrawAll function calls the UI’s draw function to
get the HUD onscreen.
int DrawAll(MainData
*theWorld);
Artist Instructions
The artists will use 3D Studio MAX to create their character models and Photoshop to create their textures. All textures in NullSpace will be 24-bit non-palletized Bitmaps in an uncompressed file. The resolution for these images will not exceed 256 x 256 resolution. All Bitmaps will be stored in .bmp format so all compression is done by .bmp compression and no extra compression will be done for NullSpace. Filenames for these textures will be in a simple and easy to follow format.
Sound and Music
Properly playing Sound & Music in NullSpace is a simple task thanks to the Xaudio SDK. Loading is performed by creating a Song or SoundEffect object, which contains a path of the sound file and a link to the AudioClass that will play it. Internally, Xaudio handles the loading of files just before play by running the InputOpen function of the SDK, passing in the sound’s filename as a string. To actually play the sound once it’s been created, simply call the Song or SoundEffect’s Play() function and it will redirect itself to an available AudioPlayer to begin. Because audio is handled in a separate thread, there is no need to deal with “updating” the audio while it plays. Sound and Music files must be in either .mp3 format, or .wav format, but they do not technically have to have those exact extensions on the file.
The Xaudio automatically links to DirectSound and therefore all of the hardware mixing is done internally. This keeps the process transparent to the designer so they will not have to deal with it. The one caveat is that a certain number of audio channels must be specified upon the audio classes creation, so only that number of channels can possibly be mixed at once. The more channels that are allocated, the more overhead the music code brings to the program.
DMA is another featured handled by DirectSound (and therefore Xaudio) that will be abstracted from the designer. This will not need to be dealt with directly.
The AudioClass is given a set number of “audio channels” upon its creation that it can use to play music and sound. The first channel is reserved for music (which has potential to loop) and the remaining channels are left for the sound effects. However, the more channels that are allocated, the more overhead the audio code brings to the program. An optimal number of channels is around eight, since sound effects are typically short enough that AudioPlayers free up almost immediately after the sound is played.
Thanks again to the Xaudio API, sound panning is available. The user need only specify how much sound to play out of one speaker, and how much sound to play out of the other when they call the SoundEffect file (panning is restricted to sound effects only). This is accomplished with a variable that is between -1.0 and 1.0, and plays with a bias to the left if negative and to the right if positive.
Xaudio’s internal priority is set to “normal” so that the sound thread does not obstruct the game’s other threads. However, sound effects also have a priority variable. If a sound has enough priority, then even if all sound channels are in use when the sound is called to play, it will stop one channel at random to start playing the sound with priority.
Finally, all credit is due to the Xaudio SDK for allowing us to play music and sound files efficiently while helping to keep the process very abstracted from the designer.
Sound Engineering
Instructions
The in-game sounds should all be high quality wav files (22,050 Hz or 44,100 Hz), using only one channel (mono), with 16 bits per sample. The game will pan the sounds left and right as necessary. Also, the individual sound files have to be at least 1.5 seconds long for the sound code to recognize them. If the sound is shorter than this length, add silence at the end of the file to compensate. Any major sound package can be used to create the sound, or they can be taken off of library CDs, so long as they end up in the above format. The sounds will go in the sounds sub directory in the project’s root directory.
The music should be MP3 format, utilizing a minimum quality of 112kbps to maintain a certain level of quality. The files can be Stereo or Joint-Stereo, whichever sounds better, but should not be mono, so that any stereo instruments or effects used in the composition will be heard properly. The title music can have a definite ending and beginning, but the in-game music should loop, going back to an earlier point in the song from the end in a clean manner. The time of the loop should be included in a text file with the song. In-game music does not need to have an ending, as it will be faded out when the player leaves the game, and should continue uninterrupted while the player is playing.
Level Specific Code
NullSpace will contain no level specific code. All level information will be from the map editor, and when in game, conflicts and level information will be resolved with the collision and physics engine and the 3D game engine respectively.
Milestone Schedule
By Team Member
|
Josh
Hobbs |
|
Producer |
|
Milestone |
Latest Starting Date |
Complete |
|
Math |
|
|
|
class
Vector{…}; |
10/8/2001 |
10/15/2001 |
|
void
set(); |
10/8/2001 |
10/15/2001 |
|
VECTOR
operator+(VECTOR& v); |
10/8/2001 |
10/15/2001 |
|
VECTOR
operator-(VECTOR& v); |
10/8/2001 |
10/15/2001 |
|
VECTOR
operator*(VECTOR& v); |
10/8/2001 |
10/15/2001 |
|
VECTOR
operator^(VECTOR& v); |
10/8/2001 |
10/15/2001 |
|
int
VECTOR lineIntersect(LINE line, POINT *ipt); |
10/8/2001 |
10/15/2001 |
|
int
VECTOR vectorIntersect(VECTOR& v, POINT *ipt); |
10/8/2001 |
10/15/2001 |
|
int
VECTOR circleIntersect(POINT2D centerPt, float radius, POINT2D *ipt); |
10/8/2001 |
10/15/2001 |
|
Collision |
|
|
|
int
getOrthVector(CenterPt, Radius, PtOnCircle, *OrthVector); |
10/29/2001 |
11/5/2001 |
|
int
getNormalVector(Vector, *NormalVector); |
10/29/2001 |
11/5/2001 |
|
int
getAngle(NormalVector, Vector, *Angle); |
10/29/2001 |
11/5/2001 |
|
int
getReflectionVector(NormalVector, Angle, *ReflectionVector); |
10/29/2001 |
11/5/2001 |
|
void
doCollision( SHIPOBJ, PROJECTILEOBJ, MAPOBJ); |
10/29/2001 |
11/5/2001 |
|
void
CollisionPlayer( SHIPOBJ, PROJECTILEOBJ, MAPOBJ); |
10/29/2001 |
11/5/2001 |
|
int
ship_wall(SHIPOBJLIST, MAPOBJ); |
10/29/2001 |
11/5/2001 |
|
int
ship_projectile(SHIPOBJLIST, PROJECTILEOBJLIST); |
10/29/2001 |
11/5/2001 |
|
int
ship_ship(SHIPOBJLIST); |
10/29/2001 |
11/5/2001 |
|
void
Collision_Weapon(PROJECTILEOBJ, MAPOBJ); |
10/29/2001 |
11/5/2001 |
|
Score |
|
|
|
int
updateScore(PLAYEROBJ, amount); |
11/19/2001 |
11/22/2001 |
|
int
updateBounty(PLAYEROBJ, amount); |
11/19/2001 |
11/22/2001 |
|
Work with CJ on Special Effects |
11/22/2001 |
12/8/2001 |
|
CJ
Clark |
|
Designer |
|
Milestone |
Latest Starting Date |
Complete |
|
Map Editor |
|
|
|
bool
LoadLevel |
10/15/2001 |
10/29/2001 |
|
bool
LoadTiles |
10/15/2001 |
10/29/2001 |
|
bool
SaveLevel |
10/15/2001 |
10/29/2001 |
|
bool
SaveTiles |
10/15/2001 |
10/29/2001 |
|
bool
DrawTileBar |
10/15/2001 |
10/29/2001 |
|
void
GetTileButtonClickedOn |
10/15/2001 |
10/29/2001 |
|
bool
LoadStates |
10/15/2001 |
10/29/2001 |
|
bool
DrawStates |
10/15/2001 |
10/29/2001 |
|
void
GetGameStateButtonClickedOn |
10/15/2001 |
10/29/2001 |
|
bool
InitNewMap |
10/15/2001 |
10/29/2001 |
|
bool
LoadMap |
10/15/2001 |
10/29/2001 |
|
bool
ReadMapFile |
10/15/2001 |
10/29/2001 |
|
bool
DrawForegroundTiles |
10/15/2001 |
10/29/2001 |
|
RECT
GetTilesOnScreen |
10/15/2001 |
10/29/2001 |
|
void
FreeMapData |
10/15/2001 |
10/29/2001 |
|
void
FreeMap |
10/15/2001 |
10/29/2001 |
|
Void
ResizeMap |
10/15/2001 |
10/29/2001 |
|
Void
SelectAll |
10/15/2001 |
10/29/2001 |
|
Void
PlaceSelectAll |
10/15/2001 |
10/29/2001 |
|
Void
JumpScreen |
10/15/2001 |
10/29/2001 |
|
Special Effects |
|
|
|
Create
Particles |
11/22/2001 |
12/8/2001 |
|
Destroy
Particles |
11/22/2001 |
12/8/2001 |
|
Draw
Particles |
11/22/2001 |
12/8/2001 |
|
Update
Particles Positions |
11/22/2001 |
12/8/2001 |
|
Set
Particle Data |
11/22/2001 |
12/8/2001 |
|
Create
Special Effect |
11/22/2001 |
12/8/2001 |
Amadou
Savadogo |
|
Lead Tester |
|
Milestone |
Latest Starting Date |
Complete |
|
Physics -All Purpose |
|
|
|
Phy_UpdateVelocity() |
10/15/2001 |
10/29/2001 |
|
Phy_UpdatePosition() |
10/15/2001 |
10/29/2001 |
|
Phy_CalcElasticityVelocity() |
10/15/2001 |
10/29/2001 |
|
Phy_CalcForceFromVelAndMass() |
10/15/2001 |
10/29/2001 |
|
Phy_CalcForceRotational() |
10/15/2001 |
10/29/2001 |
|
Physics -Game Specific |
|
|
|
UpdatePhysics |
10/21/2001 |
10/29/2001 |
|
Work with Josh on Collision |
10/29/2001 |
11/5/2001 |
|
Dan
Brakeley |
|
Product Manager |
|
Milestone |
Latest Starting Date |
Complete |
|
Front End |
|
|
|
class
UI_FrontEndBase |
10/15/2001 |
10/29/2001 |
|
class
UI_Button |
10/15/2001 |
10/29/2001 |
|
class
UI_TrackBar |
10/15/2001 |
10/29/2001 |
|
class
UI_ListView |
10/15/2001 |
10/29/2001 |
|
class
UI_IPAddress |
10/15/2001 |
10/29/2001 |
|
class
UI_TextBox |
10/15/2001 |
10/29/2001 |
|
class
UI_RadioButton |
10/15/2001 |
10/29/2001 |
|
class
UI_ClientFrontEnd |
10/15/2001 |
10/29/2001 |
|
class
UI_FrontEndBase |
10/15/2001 |
10/29/2001 |
|
class
UI_CheckBox |
10/15/2001 |
10/29/2001 |
|
class
UI_ServerFrontEnd |
10/15/2001 |
10/29/2001 |
|
class
UI_Bitmap |
10/15/2001 |
10/29/2001 |
|
class
UI_Image |
10/15/2001 |
10/29/2001 |
|
UI |
|
|
|
class glUI_BaseElement |
11/5/2001 |
11/19/2001 |
|
class glUI_TextureManager |
11/5/2001 |
11/19/2001 |
|
class glUI_Font |
11/5/2001 |
11/19/2001 |
|
class glUI_Image |
11/5/2001 |
11/19/2001 |
|
class glUI_Frame |
11/5/2001 |
11/19/2001 |
|
class glUI_Text |
11/5/2001 |
11/19/2001 |
|
class glUI_TextBox |
11/5/2001 |
11/19/2001 |
|
class glUI_ChatArea |
11/5/2001 |
11/19/2001 |
|
class glUI_TextInput |
11/5/2001 |
11/19/2001 |
|
class glUI_Radar |
11/5/2001 |
11/19/2001 |
|
class glUI_EnergyMeter |
11/5/2001 |
11/19/2001 |
|
class glUI_PowerUps |
11/5/2001 |
11/19/2001 |
|
AI |
|
|
|
PathFinding |
11/5/2001 |
11/19/2001 |
|
ChoseAction(); |
11/19/2001 |
11/22/2001 |
|
Ed
Pfent |
|
Technical Director |
|
Milestone |
Latest Starting Date |
Complete |
|
Input -All Purpose |
|
|
|
BYTE
IsKeyPressed(BYTE key) |
10/8/2001 |
10/15/2001 |
|
void
Update() |
10/8/2001 |
10/15/2001 |
|
int Init(HINSTANCE hInstance, HWND hWnd) |
10/8/2001 |
10/15/2001 |
|
void
End() |
10/8/2001 |
10/15/2001 |
|
Help
Nathan get Graphics and Networking done on time |
10/15/2001 |
10/29/2001 |
|
Input -Game Specific |
|
|
|
void
UpdateInput(mainData *theWorld) |
10/29/2001 |
11/5/2001 |
|
AI |
|
|
|
PathFinding |
11/5/2001 |
11/19/2001 |
|
ChoseAction(); |
11/19/2001 |
11/22/2001 |
|
Nathan
Gray |
|
Art Director |
|
Milestone |
Latest Starting Date |
Complete |
|
Graphics Engine -All Purpose |
|
|
|
All
Functions |
|
Completed |
|
Graphics Engine -Game Specific |
|
|
|
LoadArenaFromFile |
10/15/2001 |
10/29/2001 |
|
LoadAllTileModelsFromFile |
10/15/2001 |
10/29/2001 |
|
LoadAllShipModelsFromFile |
10/15/2001 |
10/29/2001 |
|
UnloadArena |
10/15/2001 |
10/29/2001 |
|
UnloadAllTileModels |
10/15/2001 |
10/29/2001 |
|
UnloadAllShipModels |
10/15/2001 |
10/29/2001 |
|
MoveCameraFirstPerson |
10/15/2001 |
10/29/2001 |
|
MoveCameraThirdPersonCamchase |
10/15/2001 |
10/29/2001 |
|
MoveCameraThirdPersonOverhead |
10/15/2001 |
10/29/2001 |
|
DrawAll |
10/15/2001 |
10/29/2001 |
|
Networking -All Purpose |
|
|
|
All
Functions |
|
Completed |
|
Networking -Game Specific |
|
|
|
Init
Game Messages |
10/15/2001 |
10/29/2001 |
|
Update
Player Stats Messages |
10/15/2001 |
10/29/2001 |
|
Update
Score Messages |
10/15/2001 |
10/29/2001 |
|
Update
Powerup Messages |
10/15/2001 |
10/29/2001 |
|
Audio -All Purpose |
|
|
|
All
Functions |
|
Completed |
|
Audio -Game Specific |
|
|
|
LoadSongList |
11/5/2001 |
11/19/2001 |
|
EmptySongList |
11/5/2001 |
11/19/2001 |
|
PlaySong |
11/5/2001 |
11/19/2001 |
|
Jeff
Keely |
|
Technical Writer |
|
Milestone |
Latest Starting Date |
Complete |
|
File I/O -All Purpose |
|
|
|
NS_FILE OpenNSFile(char *pathname,char flags) |
10/8/2001 |
10/15/2001 |
|
void CloseNSFile(NS_FILE * file) |
10/8/2001 |
10/15/2001 |
|
void IsEndofNsFile(NS_FILE * file) |
10/8/2001 |
10/15/2001 |
|
void WriteString(NS_FILE file, char *string) |
10/8/2001 |
10/15/2001 |
|
void ReadString(NS_FILE file, char *string, char
skipMe) |
10/8/2001 |
10/15/2001 |
|
int WriteData(NS_FILE file, void *data, int
itemSize, int numItems) |
10/8/2001 |
10/15/2001 |
|
Int ReadData(NS_FILE file, void *data, int
itemSize, int numItems) |
10/8/2001 |
10/15/2001 |
|
Work with Amadou on Physics |
10/21/2001 |
10/29/2001 |
By Week
|
Week 1 |
|
9/10/01 - 9/16/01 |
|
Milestone |
Member |
Progress |
|
Game
Concept |
All |
Started |
|
Week 2 |
|
9/17/01 - 9/23/01 |
|
Milestone |
Member |
Progress |
|
Game
Concept |
All |
Completed |
|
GDD |
All |
Started |
|
Week 3 |
|
9/24/01 - 9/30/01 |
|
Milestone |
Member |
Progress |
|
GDD |
All |
In Work |
|
Week 4 |
|
10/01/01 -10/07/01 |
|
Milestone |
Member |
Progress |
|
GDD |
All |
Completed |
|
TDD |
All |
Started |
|
Week 5 |
|
10/08/01 -10/14/01 |
|
Milestone |
Member |
Progress |
|
TDD |
All |
Completed |
|
Math |
Josh |
Started |
|
File
I/O |
Jeff |
Started |
|
Input |
Ed |
Started |
|
Week 6 |
|
10/15/01 -10/21/01 |
|
Milestone |
Member |
Progress |
|
Math |
Josh |
Completed |
|
File I/O |
Jeff |
Completed |
|
Input |
Ed |
Completed |
|
Map
Editor |
CJ |
Started |
|
Physics -
All Purpose |
Amadou, Jeff |
Started |
|
Graphics
Engine - Game Specific |
Nathan |
Started |
|
Networking
- Game Specific |
Nathan |
Started |
|
Front End |
Dan |
Started |
|
Week 7 |
|
10/22/01 -10/28/01 |
|
Milestone |
Member |
Progress |
|
Physics -
Game Specific |
Amadou, Jeff |
Started |
|
Week 8 |
|
10/29/01 -11/04/01 |
|
Milestone |
Member |
Progress |
|
Map
Editor |
CJ |
Completed |
|
Physics |
Amadou, Jeff |
Completed |
|
Graphics
Engine - Game Specific |
Nathan |
Completed |
|
Networking
- Game Specific |
Nathan |
Completed |
|
Front End |
Dan |
Completed |
|
Collision |
Josh |
Started |
|
Week 9 |
|
11/05/01 -11/11/01 |
|
Milestone |
Member |
Status |
|
Collision |
Josh |
Completed |
|
UI |
Dan |
Started |
|
Audio -
Game Specific |
Nathan |
Started |
|
Preliminary
AI |
Dan |
Started |
|
Week 10 |
|
11/12/01 -11/18/01 |
|
Milestone |
Member |
Progress |
|
|
|
|
|
Week 11 |
|
11/19/01 -11/25/01 |
|
Milestone |
Member |
Progress |
|
UI |
Dan |
Completed |
|
Audio -
Game Specific |
Nathan |
Completed |
|
Preliminary
AI |
Dan |
Completed |
|
Stats |
|
Started-Completed |
|
AI |
Dan |
Started-Completed |
|
Beta |
|
Completed |
|
Special
Effects |
CJ, Josh |
Started |
|
Week 12 |
|
11/26/01 -12/02/01 |
|
Milestone |
Member |
Progress |
|
|
|
|
|
Week 13 - Final Week |
12/03/01 -12/07/01 |
|
|
Milestone |
Member |
Progress |
|
Special
Effects |
CJ, Josh |
Completed |
|
Polish AI |
Dan |
Completed |
|
Testing
Phase |
All |
Completed |
By Task
|
1st MILESTONES |
Latest Starting
Date |
Completed |
|
Math -All-Purpose- |
10/8/01 |
10/15/01 |
|
class Vector{...}; |
10/8/01 |
10/15/01 |
|
void set(); |
10/8/01 |
10/15/01 |
|
VECTOR operator+(VECTOR& v); |
10/8/01 |
10/15/01 |
|
VECTOR operator-(VECTOR& v); |
10/8/01 |
10/15/01 |
|
VECTOR operator*(VECTOR& v); |
10/8/01 |
10/15/01 |
|
VECTOR operator^(float scaler); |
10/8/01 |
10/15/01 |
|
int lineIntersect(LINE line, POINT2D *iPt); |
10/8/01 |
10/15/01 |
|
int vectorIntersect(VECTOR vector2, POINT2D *iPt); |
10/8/01 |
10/15/01 |
|
int circleIntersect(POINT2D centerPt, float
radius, POINT2D *iPt); |
10/8/01 |
10/15/01 |
|
Testing these functions |
10/8/01 |
10/15/01 |
|
File I/O -All Purpose- |
10/8/01 |
10/15/01 |
|
NS_FILE OpenNSFile(char *pathname,char flags) |
10/8/01 |
10/15/01 |
|
void CloseNSFile(NS_FILE * file) |
10/8/01 |
10/15/01 |
|
void IsEndofNsFile(NS_FILE * file) |
10/8/01 |
10/15/01 |
|
void WriteString(NS_FILE file, char *string) |
10/8/01 |
10/15/01 |
|
void ReadString(NS_FILE file, char *string, char
skipMe) |
10/8/01 |
10/15/01 |
|
int WriteData(NS_FILE file, void *data, int
itemSize, int numItems) |
10/8/01 |
10/15/01 |
|
Int ReadData(NS_FILE file, void *data, int
itemSize, int numItems) |
10/8/01 |
10/15/01 |
|
Input -All Purpose- |
10/8/01 |
10/15/01 |
|
BYTE IsKeyPressed(BYTE key) |
10/8/01 |
10/15/01 |
|
void Update() |
10/8/01 |
10/15/01 |
|
int Init(HINSTANCE hInstance, HWND hWnd) |
10/8/01 |
10/15/01 |
|
void End() |
10/8/01 |
10/15/01 |
|
Input -Game Specific- |
10/12/01 |
10/15/01 |
|
void UpdateInput(mainData *theWorld); |
10/12/01 |
10/15/01 |
|
2nd MILESTONES |
Latest Starting Date |
Completed |
|
Map Editor |
10/15/01 |
10/29/01 |
|
bool LoadLevel |
10/15/01 |
10/29/01 |
|
bool LoadTiles |
10/15/01 |
10/29/01 |
|
bool SaveLevel |
10/15/01 |
10/29/01 |
|
bool SaveTiles |
10/15/01 |
10/29/01 |
|
bool DrawTileBar |
10/15/01 |
10/29/01 |
|
void GetTileButtonClickedOn |
10/15/01 |
10/29/01 |
|
bool LoadStates |
10/15/01 |
10/29/01 |
|
bool DrawStates |
10/15/01 |
10/29/01 |
|
void GetGameStateButtonClickedOn |
10/15/01 |
10/29/01 |
|
bool InitNewMap |
10/15/01 |
10/29/01 |
|
bool LoadMap |
10/15/01 |
10/29/01 |
|
bool ReadMapFile |
10/15/01 |
10/29/01 |
|
bool DrawForegroundTiles |
10/15/01 |
10/29/01 |
|
RECT GetTilesOnScreen |
10/15/01 |
10/29/01 |
|
void FreeMapData |
10/15/01 |
10/29/01 |
|
void FreeMap |
10/15/01 |
10/29/01 |
|
Void ResizeMap |
10/15/01 |
10/29/01 |
|
Void SelectAll |
10/15/01 |
10/29/01 |
|
Void PlaceSelectAll |
10/15/01 |
10/29/01 |
|
Void JumpScreen |
10/15/01 |
10/29/01 |
|
|
10/15/01 |
10/29/01 |
|
Physics -All Purpose- |
10/15/01 |
10/29/01 |
|
Phy_UpdateVelocity() |
10/15/01 |
10/29/01 |
|
Phy_UpdatePosition() |
10/15/01 |
10/29/01 |
|
Phy_CalcElasticityVelocity() |
10/15/01 |
10/29/01 |
|
Phy_CalcForceFromVelAndMass() |
10/15/01 |
10/29/01 |
|
Phy_CalcForceRotational() |
10/15/01 |
10/29/01 |
|
Physics -Game Specific- |
10/21/01 |
10/29/01 |
|
UpdatePhysics() |
10/21/01 |
10/29/01 |
|
Graphics Engine -All
Purpose- |
Completed |
Completed |
|
Graphics Engine -Game Specific- |
10/15/01 |
10/29/01 |
|
LoadArenaFromFile |
10/15/01 |
10/29/01 |
|
LoadAllTileModelsFromFile |
10/15/01 |
10/29/01 |
|
LoadAllShipModelsFromFile |
10/15/01 |
10/29/01 |
|
UnloadArena |
10/15/01 |
10/29/01 |
|
UnloadAllTileModels |
10/15/01 |
10/29/01 |
|
UnloadAllShipModels |
10/15/01 |
10/29/01 |
|
MoveCameraFirstPerson |
10/15/01 |
10/29/01 |
|
MoveCameraThirdPersonCamchase |
10/15/01 |
10/29/01 |
|
MoveCameraThirdPersonOverhead |
10/15/01 |
10/29/01 |
|
DrawAll |
10/15/01 |
10/29/01 |
|
Networking -All Purpose- |
Completed |
Completed |
|
Networking -Game Specific- |
10/15/01 |
10/29/01 |
|
Init Game Messages |
10/15/01 |
10/29/01 |
|
Update Player Stats Messages |
10/15/01 |
10/29/01 |
|
Update Score Messages |
10/15/01 |
10/29/01 |
|
Update Powerup Messages |
10/15/01 |
10/29/01 |
|
Front End |
10/15/01 |
10/29/01 |
|
class UI_FrontEndBase |
10/15/01 |
10/29/01 |
|
class UI_Button |
10/15/01 |
10/29/01 |
|
class UI_TrackBar |
10/15/01 |
10/29/01 |
|
class UI_ListView |
10/15/01 |
10/29/01 |
|
class UI_IPAddress |
10/15/01 |
10/29/01 |
|
class UI_TextBox |
10/15/01 |
10/29/01 |
|
class UI_RadioButton |
10/15/01 |
10/29/01 |
|
class UI_ClientFrontEnd |
10/15/01 |
10/29/01 |
|
class UI_FrontEndBase |
10/15/01 |
10/29/01 |
|
class UI_CheckBox |
10/15/01 |
10/29/01 |
|
class UI_ServerFrontEnd |
10/15/01 |
10/29/01 |
|
class UI_Bitmap |
10/15/01 |
10/29/01 |
|
class UI_Image |
10/15/01 |
10/29/01 |
|
|
|
|
|
3rd MILESTONES |
Latest Starting Date |
Completed |
|
Collision -All-Purpose- |
10/29/01 |
11/5/01 |
|
int getOrthVector( CenterPt, Radius, PtOnCircle,
*OrthVector ); |
10/29/01 |
11/5/01 |
|
int getNormalVector( Vector, *NormalVector ); |
10/29/01 |
11/5/01 |
|
int getAngle( NormalVector, Vector, *Angle ); |
10/29/01 |
11/5/01 |
|
int getReflectionVector( NormalVector, Angle,
*ReflectionVector ); |
10/29/01 |
11/5/01 |
|
Collision -Game
Specific- |
10/29/01 |
11/5/01 |
|
void doCollision( SHIPOBJ, PROJECTILEOBJ, MAPOBJ
); |
10/29/01 |
11/5/01 |
|
void CollisionPlayer( SHIPOBJ, PROJECTILEOBJ,
MAPOBJ ); |
10/29/01 |
11/5/01 |
|
int ship_wall( SHIPOBJLIST, MAPOBJ ); |
10/29/01 |
11/5/01 |
|
int ship_projectile( SHIPOBJLIST,
PROJECTILEOBJLIST ); |
10/29/01 |
11/5/01 |
|
int ship_ship( SHIPOBJLIST ); |
10/29/01 |
11/5/01 |
|
void Collision_Weapon( PROJECTILEOBJ, MAPOBJ ); |
10/29/01 |
11/5/01 |
|
Input -Game Specific- |
10/29/01 |
11/5/01 |
|
void UpdateInput(mainData *theWorld); |
10/29/01 |
11/5/01 |
|
4th MILESTONES |
Latest Starting Date |
Completed |
|
UI |
11/5/01 |
11/19/01 |
|
class glUI_BaseElement |
11/5/01 |
11/19/01 |
|
class glUI_TextureManager |
11/5/01 |
11/19/01 |
|
class glUI_Font |
11/5/01 |
11/19/01 |
|
class glUI_Image |
11/5/01 |
11/19/01 |
|
class glUI_Frame |
11/5/01 |
11/19/01 |
|
class glUI_Text |
11/5/01 |
11/19/01 |
|
class glUI_TextBox |
11/5/01 |
11/19/01 |
|
class glUI_ChatArea |
11/5/01 |
11/19/01 |
|
class glUI_TextInput |
11/5/01 |
11/19/01 |
|
class glUI_Radar |
11/5/01 |
11/19/01 |
|
class glUI_EnergyMeter |
11/5/01 |
11/19/01 |
|
class glUI_PowerUps |
11/5/01 |
11/19/01 |
|
Audio -All
Purpose- |
Completed |
Completed |
|
Audio -Game
Specific- |
11/5/01 |
11/19/01 |
|
LoadSongList |
11/5/01 |
11/19/01 |
|
EmptySongList |
11/5/01 |
11/19/01 |
|
PlaySong |
11/5/01 |
11/19/01 |
|
Preliminary AI |
11/5/01 |
11/19/01 |
|
PathFinding |
11/5/01 |
11/19/01 |
|
Alpha |
|
|
|
Score |
11/19/01 |
11/22/01 |
|
int updateScore( PLAYEROBJ, amount ); |
11/19/01 |
11/22/01 |
|
Int updateBounty( PLAYEROBJ, amount ); |
11/19/01 |
11/22/01 |
|
1 Stage completed |
11/19/01 |
11/22/01 |
|
Stats |
11/19/01 |
11/22/01 |
|
int calculateRank |
11/19/01 |
11/22/01 |
|
CaculateNewBounty |
11/19/01 |
11/22/01 |
|
int CalculateDamageDone |
11/19/01 |
11/22/01 |
|
void recharge |
11/19/01 |
11/22/01 |
|
More AI |
11/19/01 |
11/22/01 |
|
ChoseAction() |
11/19/01 |
11/22/01 |
|
Beta |
|
|
|
All stages completed |
11/22/01 |
12/8/01 |
|
Polish AI |
11/22/01 |
12/8/01 |
|
Fix anything wrong with AI |
11/22/01 |
12/8/01 |
|
Play testing Phase |
11/22/01 |
12/8/01 |
|
Special Effects |
11/22/01 |
12/8/01 |
|
Create particles |
11/22/01 |
12/8/01 |
|
Destroy particles |
11/22/01 |
12/8/01 |
|
Draw particles |
11/22/01 |
12/8/01 |
|
Update particle positions |
11/22/01 |
12/8/01 |
|
Set particle data |
11/22/01 |
12/8/01 |
|
Create special effect |
11/22/01 |
12/8/01 |
|
GOLD |
|
|